Home Appliances / Small Kitchen Appliances
User Manual for Cuisinart 2-in-1 Grill & Sandwich Maker GRSM4U
Quick guide for the Cuisinart 2-in-1 Grill & Sandwich Maker GRSM4U. Learn how to fit plates, use the drip tray, preheat, cook, and clean your appliance safely.
Quick answers from the manual
Quick answer
- The Cuisinart GRSM4U is a 2-in-1 grill and sandwich maker. It features interchangeable plates, a floating hinge for varying food thicknesses, and an integrated drip tray. Always preheat before use and never use metal utensils. p. 1, 13
Key actions
- Fitting Plates p. 11
- Preheating p. 13
First start
- Remove packaging, clean plates, and preheat the unit. Expect slight smoke/odor on first use. p. 8, 10, 14
Problems and fixes
Unit smokes
Normal for first use of non-stick surface.
p. 14Where to find it in the PDF
- Product Description p. 5
- Fitting Plates p. 11
- Cleaning p. 16
Table of contents
Manual images
Click an image to enlargeQuick guide from the manual
The Cuisinart 2-in-1 Grill & Sandwich Maker is designed for indoor domestic use. Before first use, ensure all packaging is removed and plates are cleaned. Always preheat the unit completely before cooking. The appliance features a floating hinge to accommodate different food thicknesses and an integrated drip tray for fat collection.
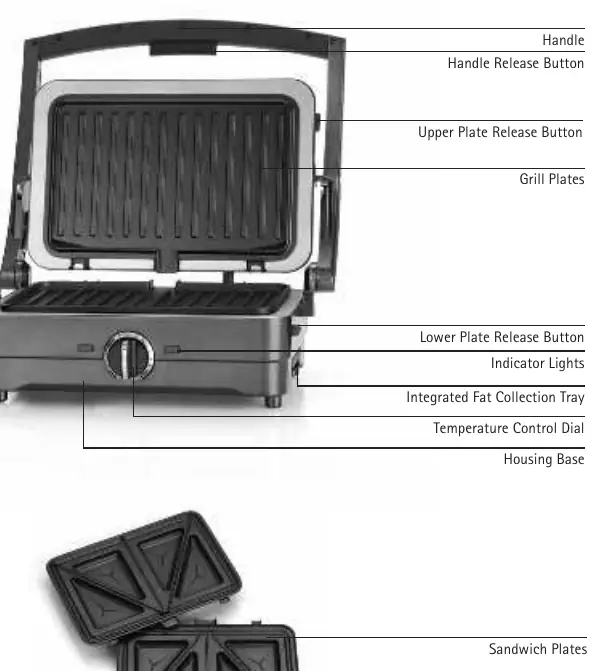
Product Description
The appliance consists of a housing base with a temperature control dial and indicator lights. It includes interchangeable grill plates and sandwich plates, a handle with a release button, and an integrated fat collection tray. A scraping tool is provided for cleaning.
Fitting and Removing Plates
Ensure the unit is switched off and fully cooled down before changing plates.
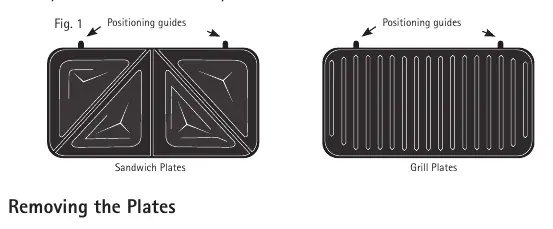
- Fitting: Align the two cut-outs at the back of the plate with the brackets on the housing base. Tilt the plate and slide it underneath the bracket. Push down the front end until it locks into place.
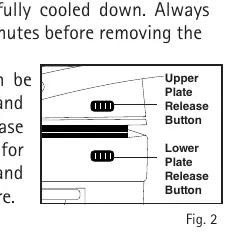
- Removing: Press the plate release buttons located on the right side of the upper and lower housing. The plate will loosen; lift it up and slide it out from under the brackets.
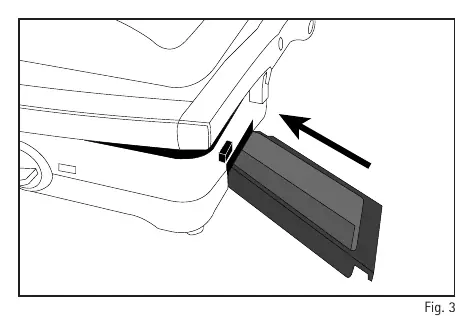
Fitting the Integrated Drip Tray
The drip tray slides into the slot on the right side of the lower housing. Ensure it is inserted correctly to collect fat drained via the recess at the rear of the plates.
Using the Appliance
For optimum results, always preheat the unit:
- Plug the unit into a mains socket.
- Close the lid and turn the temperature control dial to the desired setting (Low, Medium, or High).
- A red light indicates the power is on and the unit is heating.
- Once the optimal temperature is reached, the green light will illuminate.
Cooking Tips: Use high heat for searing meats and low heat for delicate foods like vegetables or fruits. The floating hinge automatically adjusts to the thickness of your food. Never use metal utensils, as they will damage the non-stick coating.
Cleaning & Maintenance
Always allow the appliance to cool for at least 30 minutes before cleaning.
- Use the provided scraping tool to remove leftover food.
- Plates and the drip tray can be washed by hand or in the dishwasher (top rack recommended for plates).
- Wipe the housing base, cover, and control knobs with a soft, dry cloth.
- Never immerse the housing, plug, or lead in water.
Manufacturer information
Cuisinart
Practical help
Common problems
Unit smokes or has a slight odour on first use
This is normal and common for appliances with a non-stick surface.
Green light turns off during cooking
This is normal thermostat operation; the light cycles on and off to maintain temperature.
Food sticking to plates
Ensure plates are clean; use the scraping tool or heat-proof plastic spatula. Never use metal utensils.
Before use
- Remove all packaging materials and promotional labels.
- Clean the grill and sandwich plates thoroughly.
- Ensure plates are correctly fitted and locked into position.
- Place the unit on a stable, level, heat-resistant surface.
- Check for any signs of damage before use.
Specs in practice
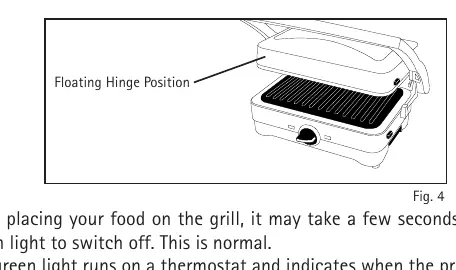
- Floating Hinge
- Allows the upper plate to adjust to the thickness of the food for even cooking.
- Temperature Control Dial
- Adjustable settings (Low, Medium, High) to suit different food types.
Images and diagrams
- Fig 1: Shows how to align plate cut-outs with housing brackets.
- Fig 2: Shows the location of the upper and lower plate release buttons.
- Fig 3: Shows the insertion of the integrated drip tray into the side slot.
- Fig 4: Illustrates the floating hinge position.
Model compatibility
- Indoor, domestic use only.
- Not for use by children.
- Requires 100mm clearance around sides/back/front and 700mm above.
- Furniture must withstand 85°C temperature rise.

Manual page author
Emily Carter
User documentation editor
Prepares concise manual descriptions and highlights the most useful setup, operation, and maintenance information for readers.