Software / Apps Services
Owner's Manual for Inspiron 16 Plus 7640
Comprehensive owner's manual for the Inspiron 16 Plus 7640, covering hardware specifications, setup procedures, component replacement instructions, and troubleshooting steps.
Table of contents
Manual images
Jump to the sectionQuick guide from the manual
This document provides essential information for the Inspiron 16 Plus 7640, including hardware specifications, setup instructions, and procedures for replacing internal components. Always consult this guide before performing any hardware maintenance to ensure safety and proper handling.
Device Overview
The Inspiron 16 Plus 7640 features a variety of ports and components:

- Right side: microSD-card slot, universal audio jack, and two USB 3.2 Gen 1 ports.
- Left side: Power-adapter port, HDMI 2.1 port, and a Thunderbolt 4 port.
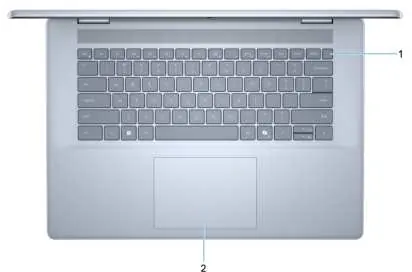
- Top: Power button (with optional fingerprint reader) and touchpad.
- Front: Camera with privacy shutter, microphones, and front-firing speakers.
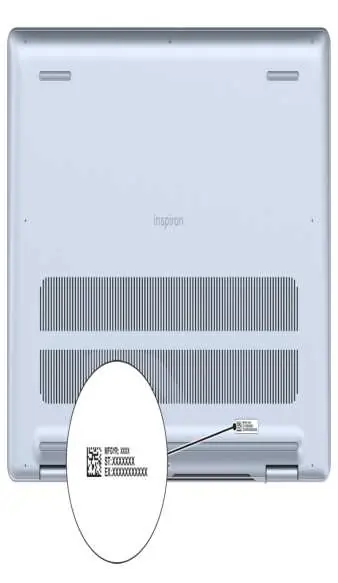
- Bottom: Down-firing speakers and Service Tag label.
Setup and First Use
To set up your computer:

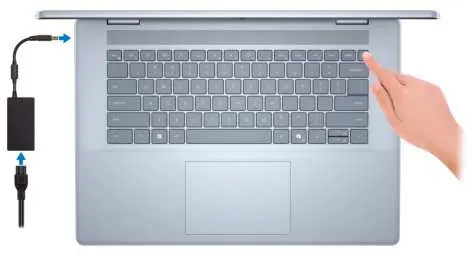
- Connect the power adapter to the power-adapter port and press the power button.
- Follow the on-screen Windows setup instructions.
- Connect to a network for updates and sign in with or create a Microsoft account.
- Access Dell applications like SupportAssist and My Dell from the Start menu for system management and updates.
Hardware Specifications
Key technical details include:
- Processor: 14th Generation Intel Ultra 7 155H.
- Memory: Two DDR5 DIMM slots, supporting up to 32 GB at 5600 MT/s.
- Storage: Supports M.2 2230 or M.2 2280 PCIe NVMe Gen4 solid-state drives.
- Display: 16-inch 2.5K display with Dolby Vision and ComfortView Plus.
- Wireless: Intel AX211 or BE200 modules supporting Wi-Fi 6E/7 and Bluetooth 5.3/5.4.
Maintenance and Component Replacement
The manual provides detailed, step-by-step instructions for removing and installing Customer Replaceable Units (CRUs) and Field Replaceable Units (FRUs), including:
- Base cover, solid-state drives, and wireless cards.
- Memory modules and cooling fans.
- Battery, speakers, display assembly, and system board.
Important: Always follow safety precautions, including electrostatic discharge (ESD) protection, before working inside the computer.
Troubleshooting
If you encounter issues, use the following tools:
- SupportAssist: Proactively identifies hardware and software issues.
- Built-in Self-Test (BIST): Includes M-BIST and LCD Power rail tests for hardware diagnostics.
- System-diagnostic lights: Use the battery-charge status light to interpret power and battery states.
Manufacturer information
Dell Inc.
Practical help
Common problems
Battery charge is low or critical
Check the battery-status light. Solid yellow indicates low charge; blinking yellow indicates critical charge.
Computer does not turn on
Ensure the power adapter is connected. If the battery is in power-saving mode due to shipment, it must be connected to power for the first start.
Display eye strain
Position the display 20-28 inches away, blink frequently, and take a 20-second break every 20 minutes by looking at an object 20 feet away.
Before use
- Connect the power adapter to the power-adapter port.
- Press the power button to turn on the computer.
- Follow on-screen Windows setup instructions.
- Connect to a network for Windows updates.
- Register your computer using Dell Product Registration.
Specs in practice
- Thunderbolt 4
- Supports data transfer up to 40 Gbps, Power Delivery, and DisplayPort output.
- ComfortView Plus
- Hardware-based low blue light technology enabled at the factory to reduce eye strain.
- ExpressCharge
- Allows for faster battery charging (approx. 2 hours) compared to standard charge (approx. 3 hours).
Images and diagrams
- Figure 1 & 2: Identify external ports on the right and left sides of the laptop.
- Figure 3: Shows the power button location and touchpad.
- Figure 4: Highlights the camera, privacy shutter, and microphone locations.
- Figure 5 & 6: Locates the Service Tag on the bottom of the device for support identification.
- Figure 7: Illustrates the correct connection of the power adapter.
Model compatibility
- Thunderbolt 4 ports support up to two 4K displays or one 8K display.
- A USB Type-C to DisplayPort adapter is required to connect a DisplayPort device.
- The computer does not support a coin-cell battery.

Manual page author
David Miller
Documentation analyst
Organizes user manual content into clear summaries, with attention to model details, product context, and everyday usability.