Power / Batteries & Chargers
EcoFlow PowerKit 10kWh Quick Start Guide
Quick start guide for the EcoFlow PowerKit 10kWh. Includes installation instructions for the Power Hub, AC/DC Smart Distribution Panel, battery stacking, component connections, and app setup.
Table of contents
Manual images
Click an image to enlargeQuick Start Guide Overview
The EcoFlow PowerKit 10kWh is a modular energy storage system designed for various applications, including Recreational Vehicles (RV), Off-Grid builds, and Home Backup systems. This guide provides essential installation and configuration steps to ensure safe and efficient operation.
Power Hub Installation
The Power Hub is the central unit of the system. Proper ventilation is critical to prevent overheating.
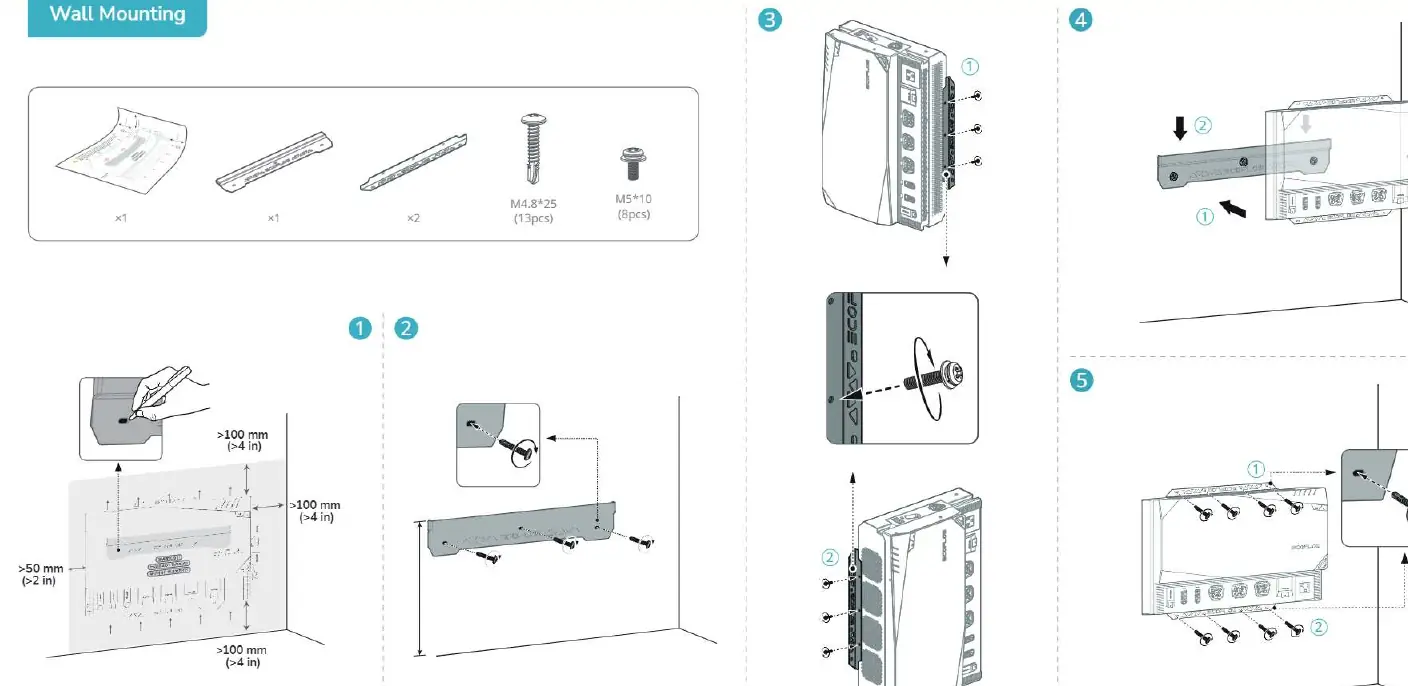
- Ventilation: Ensure a minimum clearance of 100mm (4 in) around the Power Hub to allow for proper airflow.
- Wall Mounting: Use the provided mounting bracket and screws (M4.8*25 and M5*10). Secure the bracket to the wall, then mount the Power Hub onto the bracket.
AC/DC Smart Distribution Panel Installation
The distribution panel can be installed in a recess or mounted on a wall.
- Recess Installation: Cut the required opening, insert the panel, and secure it using the provided screws.
- Wall Mounting: Use the mounting bracket and screws provided.
- Wiring: Ensure correct polarity when connecting AC/DC lines. Follow the wiring diagram for your specific region (US/JP or DE/FR/UK/ES).
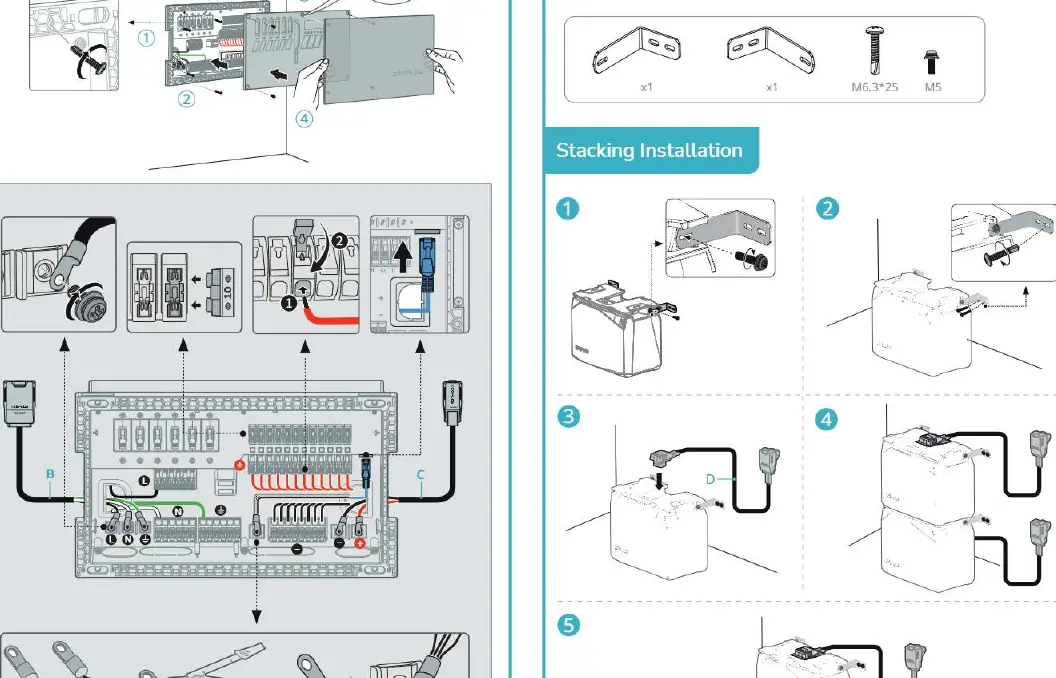
Battery Stacking and Installation
The LFP batteries can be stacked to save space or surface-mounted.
- Stacking: Align the batteries and use the provided stacking hardware to secure them together.
- Surface Mounting: Use the mounting feet and screws (M6.3*25) to secure the battery to the surface.
Connecting Components
Use the provided cables (labeled A through G) to connect the system components.
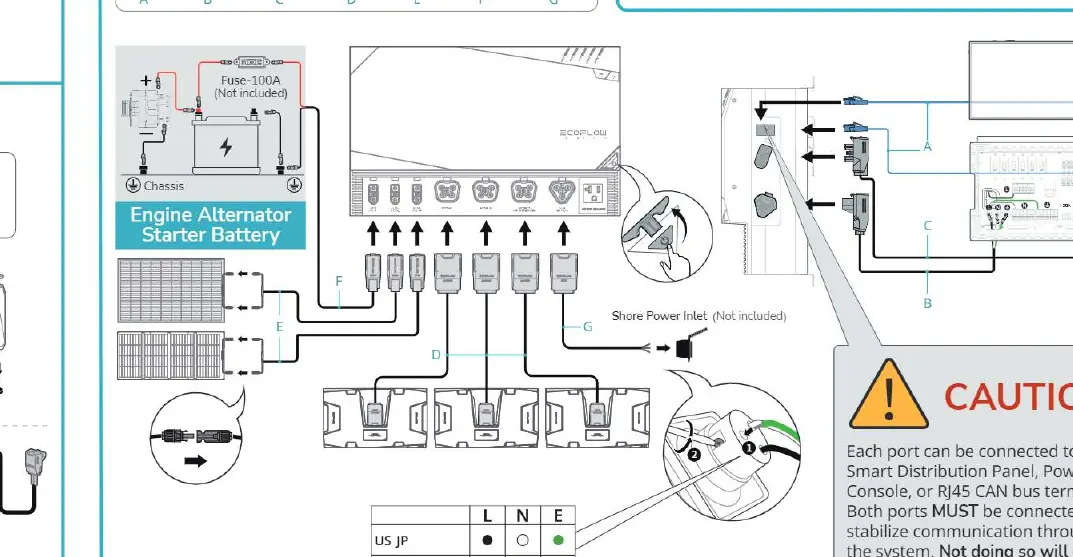
- Important: Each port must be connected to the AC/DC Smart Distribution Panel, Power Kit Console, or RJ45 CAN bus terminator. Both ports MUST be connected to stabilize communication throughout the system. Failure to do so will cause the system to malfunction.
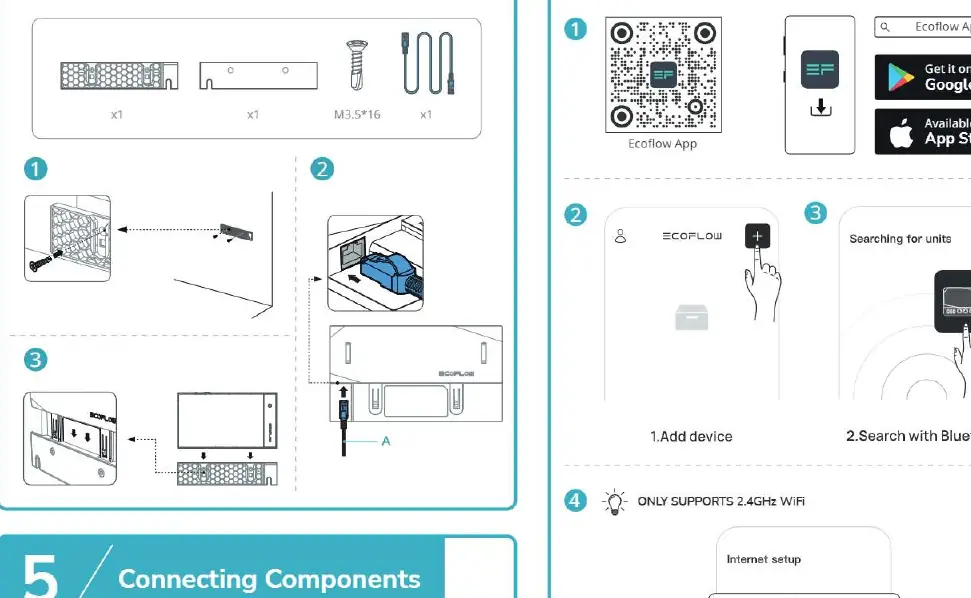
EcoFlow App Setup
The EcoFlow App allows for remote monitoring and control.
- Download the EcoFlow App from the Google Play Store or Apple App Store.
- Open the app and search for units.
- Add the device and connect via Bluetooth.
- Follow the prompts to connect to the internet. Note: The system only supports 2.4GHz Wi-Fi networks.
Manufacturer information
EcoFlow
Practical help
Common problems
Power Hub overheating
Ensure there is at least 100mm (4 in) of clearance around the unit for ventilation.
System malfunction or communication error
Ensure the RJ45 CAN bus terminator is connected to both the AC/DC Smart Distribution Panel and the Power Kit Console.
App connection failure
Verify that your network is a 2.4GHz Wi-Fi network; 5GHz networks are not supported.
Before use
- Verify all components are present (Power Hub, Distribution Panel, Batteries, Console).
- Ensure proper ventilation space (>100mm) for the Power Hub.
- Check wiring polarity (L, N, E) for the AC/DC Smart Distribution Panel based on your region.
- Confirm RJ45 CAN bus terminators are installed correctly.
- Ensure the Wi-Fi network is 2.4GHz.
Specs in practice
- Ventilation Clearance
- Minimum 100mm (4 in) required to prevent overheating.
- Wi-Fi Frequency
- 2.4GHz only; required for app connectivity.
Images and diagrams
- System diagrams illustrate connections for RV, Off-Grid, and Home Backup scenarios.
- Mounting diagrams detail wall and recess installation steps for the Power Hub and Distribution Panel.
- Connection diagrams show the specific cable ports (A-G) for system integration.
Model compatibility
- AC/DC Smart Distribution Panel wiring differs by region (US/JP vs DE/FR/UK/ES).
- The system requires RJ45 CAN bus terminators for stable communication.

Manual page author
David Miller
Documentation analyst
Organizes user manual content into clear summaries, with attention to model details, product context, and everyday usability.