Automotive / ECU Tuning
Installation Manual for Evolution Powersports 2018-2021 X3 120 Base Tuning Pack
Comprehensive installation guide for the Evolution Powersports 2018-2021 X3 120 Base Tuning Pack. Includes step-by-step instructions for wastegate adjustment, fuel pump installation, multi-map setup, and critical performance requirements.
Table of contents
Manual images
Click an image to enlargeImportant Information
This tuning pack is a high-performance upgrade intended for OFF ROAD or racing use only. Installation requires technical and mechanical knowledge. Improper installation or the use of poor-quality fuel can cause severe engine damage. Always ensure the engine is cold before beginning any installation procedures.
Fuel Requirements: Use only 91 Octane or better fuel. Running the engine in the wrong mode (e.g., 95 octane mode) with poor fuel can destroy the engine quickly. Note that octane ratings are based on US measurements; ensure proper conversion for your region.
Included Parts and Required Tools
Included Parts:
- X3 Intercooler Assembly with fan
- EVP X3 Charge Tubes
Required Tools:
- T-30 Torx Socket
- Compressed Air
- Flat Head Screwdriver
- Di Electric Grease
- Mityvac MV8255
- 10mm Wrench
Installation Steps
General Installation (All Stages):
- Remove the OEM charge tube from the turbo to the throttle body.
- Install the Intercooler/fan assembly into the vehicle.
- Install the EVP charge tubes.
- Connect the intercooler fan to the OEM harness plug (provision available on the 120 hp version).
Specific Stage Requirements:
- Stage S-R: Raise OEM Wastegate crack pressure to 6 lbs. Use 91 Octane or better fuel.
- Stage 1, 2, 3: Raise OEM Wastegate crack pressure to 7 lbs. Install 18 XDS/XRS fuel pump assembly. Use 91 Octane or better fuel. Re-gap OEM Spark Plugs to 0.020 inches.
Wastegate Adjustment
Note: This procedure applies only to tunes that require it. Ensure the engine is cold.
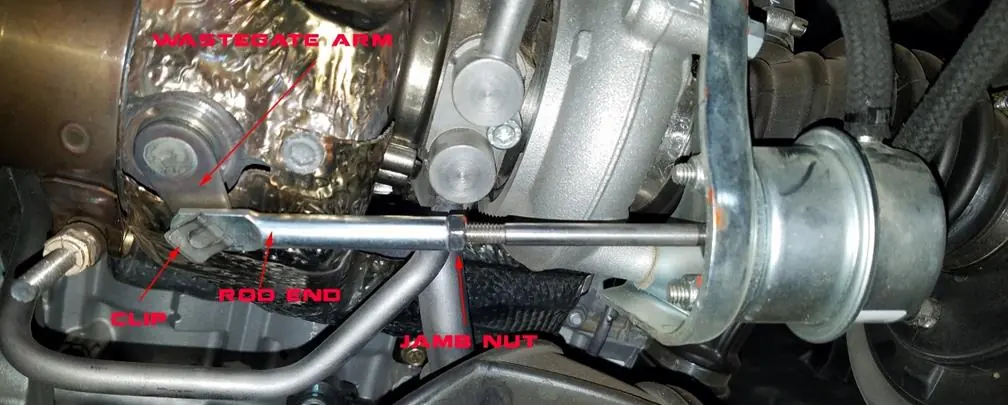
- Remove the panel between the seats to access the turbocharger.
- Use a small flat blade screwdriver to remove the clip holding the wastegate actuator rod onto the wastegate arm.
- Loosen the jamb nut on the wastegate rod using a 10mm wrench.
- Remove the rod end from the arm. Screw the rod end clockwise to shorten the arm (raises crack pressure) or lengthen it to lower crack pressure.
- Check crack pressure using a Mityvac. Repeat the pressure check 3 times to ensure accuracy.
- Reinstall the rod end onto the arm, reinstall the clip, and tighten the jamb nut.
Multi Map Installation
For customers with the Vmap Multi Map Option:
- Remove the factory sport/eco mode switch.
- Install the supplied EVP 95 Oct/91 Oct switch.
- For Stage 4RWI tunes, 95 Octane fuel is required.
Warning: Be careful when using this function. Running in "RACE GAS MODE" when "PUMP GAS" is in the tank can damage your engine.
Fuel Pump Installation
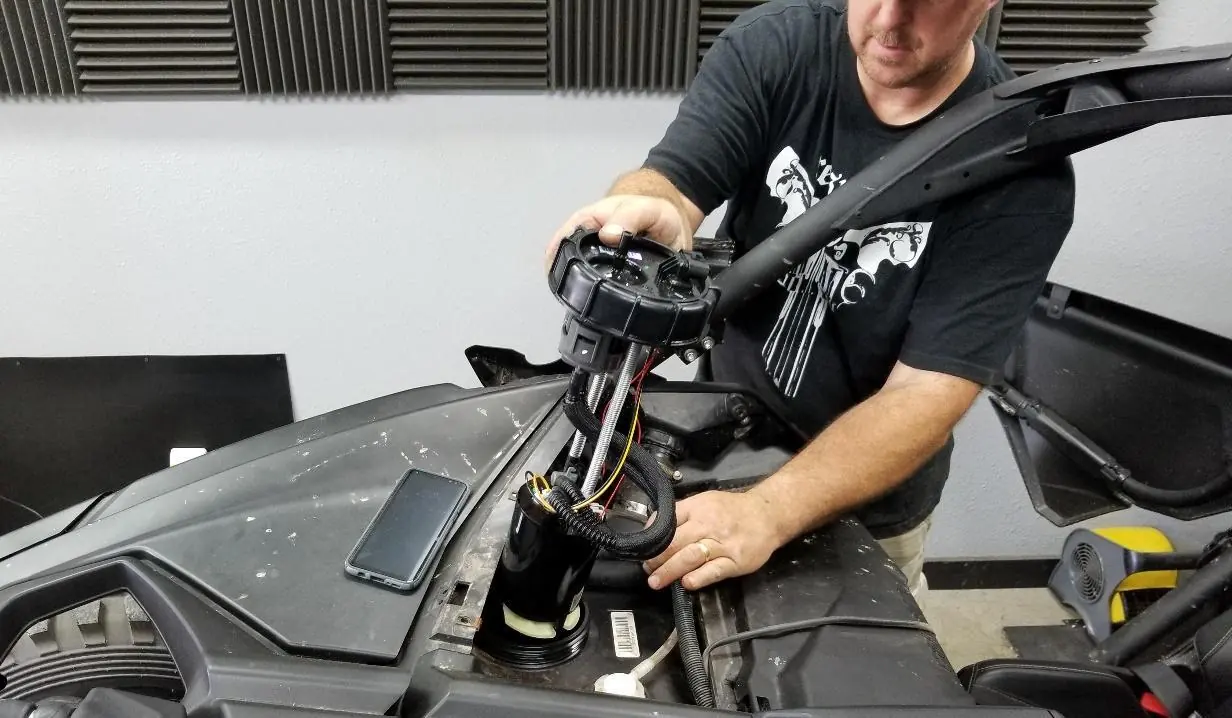
- Remove plastics covering the fuel tank.
- Locate the arrow on the top of the fuel pump; it must face the passenger side of the vehicle.
- Unplug the electrical connector.
- Unhook the fuel hose by removing the red clip, pushing down on the fitting, and pushing in on the back side of the fitting.
- Rotate the pump assembly cap counterclockwise and remove the assembly.
- Install the 2018 fuel pump assembly in reverse order. Ensure the rubber gasket is reinstalled at the top of the fuel tank to prevent leaks.
Clutching and Performance
The tuned X3 engine makes best power around 7900-8100 RPM. It is strongly recommended to consider a clutch kit to achieve optimal performance and belt life.
Manufacturer information
Evolution Powersports LLC
Practical help
Common problems
Engine damage
Ensure you are using the correct fuel (91 Octane or better) and that the engine is running in the correct mode for the fuel in the tank.
Fuel leaks
Check all fuel injector and rail connections after installation before starting the engine.
Incorrect wastegate pressure
Adjust the rod length; shorten the rod to raise crack pressure, lengthen to lower it. Verify with a Mityvac.
Before use
- Ensure the engine is cold before starting installation.
- Verify you have 91 Octane or better fuel.
- Gather required tools: T-30 Torx, Mityvac, 10mm wrench, etc.
- Check for fuel leaks after installing injectors/fuel rail before starting the engine.
- Ensure the rubber gasket is installed on the fuel tank to prevent leaks.
Specs in practice
- Wastegate Crack Pressure (Stage S-R)
- 6 lbs
- Wastegate Crack Pressure (Stage 1, 2, 3)
- 7 lbs
- Spark Plug Gap
- 0.020 inches
- Optimal RPM Range
- 7900-8100 RPM
Images and diagrams
- Wastegate Adjustment: Shows the rod end, clip, and jamb nut required for adjusting crack pressure.
- Fuel Pump Installation: Shows the removal and orientation of the fuel pump assembly.
Model compatibility
- Intended for OFF ROAD or racing use only.
- Not for use on public highways or public roads.
- Multi Map option requires specific fuel (95 Octane for Stage 4RWI).

Manual page author
David Miller
Documentation analyst
Organizes user manual content into clear summaries, with attention to model details, product context, and everyday usability.