Automotive / Engine Components
Installation Instructions for Evolution Powersports X3 'The Clamp' Plenum Brace
Step-by-step installation guide for the Evolution Powersports X3 'The Clamp' Plenum Brace (SKU: 203FC0051). Includes required tools, preparation, and mounting procedures for this performance part.
Quick answers from the manual
Quick answer
- This manual provides installation instructions for the Evolution Powersports X3 'The Clamp' Plenum Brace (SKU: 203FC0051), including required tools and step-by-step mounting procedures. p. 1, 2
Key actions
- Grind tabs on the plenum p. 1
- Install the clamp pieces p. 2
Where to find it in the PDF
- Installation Steps p. 1, 2
- Regulatory Information p. 3
Table of contents
Manual images
Click an image to enlargeQuick guide from the manual
This document provides installation instructions for the Evolution Powersports X3 'The Clamp' Plenum Brace (SKU: 203FC0051). The installation requires mechanical modification of the plenum, specifically grinding down existing tabs to accommodate the brace. This product is intended exclusively for closed-course, competition, or racing vehicles.
Required tools
- Dremel or Air Grinding Tool
- Oval Shape High Speed Cutter (for Plastic/Wood)
- Allen Wrench Set
- Spring Tool
- Metric Sockets and Ratchet
- T-30 Torx
- Blue Loctite
Installation steps
- Remove the rear valence.
- Remove the muffler.
- Unplug the MAP sensor and remove it from the plenum.
- Cover the MAP sensor hole with tape to prevent debris from entering.
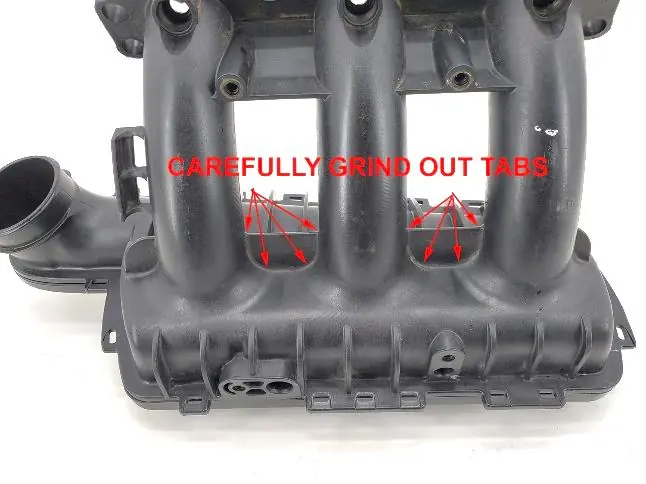
- Using a Dremel tool or air grinder, carefully remove the tabs shown in the manual. Do not compromise the integrity of the runners; remove only as much material as necessary.
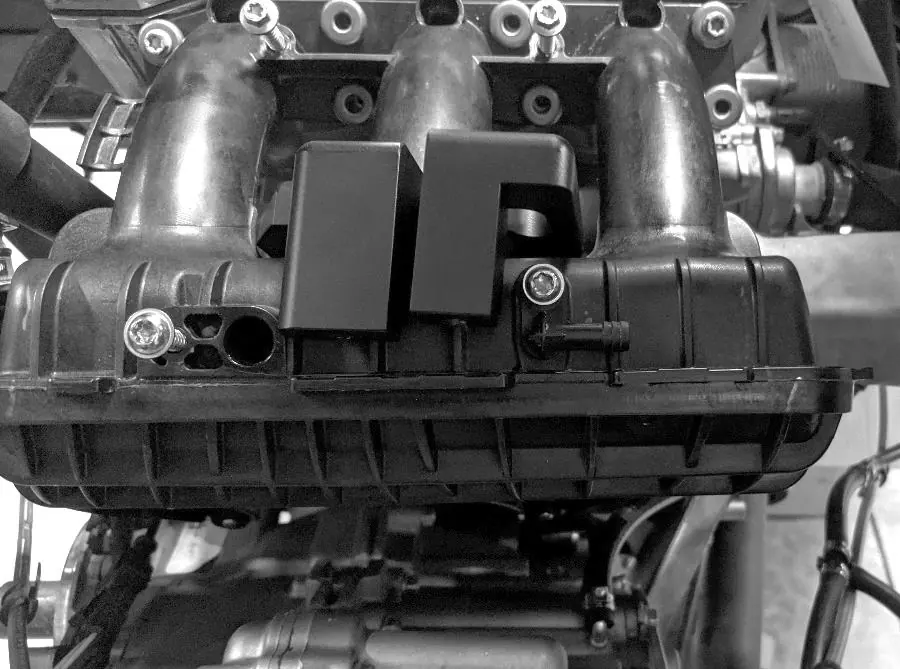
- Once tabs are removed, place the left half of the inside piece first, then the right.
- Install all (3) pieces. Start all (4) bolts before tightening them down. Apply Blue Loctite to the threads of the bolts.
- When tightening the (2) bottom bolts, it is easiest to use a 6mm Allen socket.
- Tighten all (4) bolts.
Regulatory and usage notes
This product is exempt from emission standards under 40 C.F.R. § 1051.620 and California law. It is sold only for use on EPA-certified, emission-regulations-exempt, and noise-regulations-exempt competition or racing vehicles. It is not for recreational use or use on public highways.
Manufacturer information
Evolution Powersports LLC
Practical help
Common problems
Tabs interfering with installation
Use a Dremel or air grinder with an oval shape high speed cutter to remove the tabs as shown in the manual.
Difficulty tightening bottom bolts
Use a 6mm Allen socket for easier access when tightening the two bottom bolts.
Before use
- Ensure you have a Dremel or air grinder
- Have an oval shape high speed cutter for plastic/wood
- Prepare Blue Loctite
- Verify you are working on a closed course/racing vehicle
Show more Show less
Images and diagrams
- The manual includes photos showing which tabs to grind on the plenum.
- Photos illustrate the correct positioning of the clamp pieces.
Model compatibility
- For use only on EPA-certified, emission-regulations-exempt, and noise-regulations-exempt competition/racing vehicles.
- Not for recreational use or public highways.

Manual page author
Emily Carter
User documentation editor