Optics / Telescope Accessories
User Manual for Explore Scientific 114mm Equatorial Newtonian Telescope
Comprehensive user guide for the Explore Scientific 114mm Equatorial Newtonian Telescope. Includes assembly instructions, polar alignment, collimation, magnification calculations, and app setup.
Table of contents
Manual images
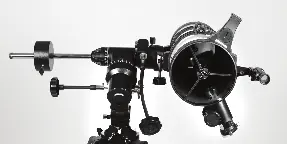
Click an image to enlargeQuick guide from the manual
This telescope is a Newtonian reflector designed for astronomical observation. Warning: Never look directly at the sun with this device, as it will cause instant and irreversible eye damage. Always supervise children during use. The telescope requires assembly, polar alignment, and collimation to function correctly. The included AR-Telescope app can assist with celestial navigation.
Assembly
1. Open the tripod legs and extend them to the desired height, ensuring the top remains level. Attach the accessory tray to the center leg braces.
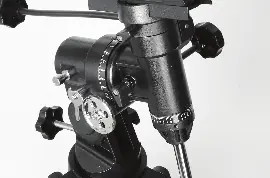
2. Place the equatorial head onto the tripod and tighten the attachment knob from underneath.
3. Screw the counterweight shaft into the mount. Slide the counterweight onto the shaft and secure it with the lock knob.
4. Attach the slow-motion controls to the mount shafts. The longer control is for the declination (Dec) axis, and the shorter one is for the right ascension (RA) axis.
5. Secure the telescope tube to the mount using the cradle rings and saddle plate. Ensure the dovetail bar is firmly locked.
Inserting an Eyepiece and Focusing
1. Remove the protective cap from the focuser.
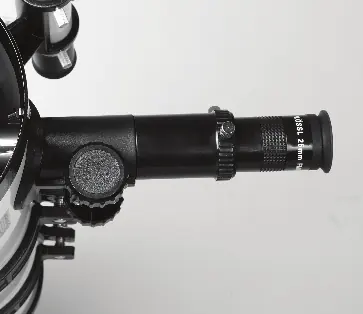
2. Insert the 25mm or 10mm Plossl eyepiece into the focuser and tighten the thumbscrew.
3. To focus, point the telescope at a distant object (at least 0.5 miles away) and turn the focus knobs until the image is sharp.
Aligning the Finderscope
1. Turn on the red-dot finderscope.
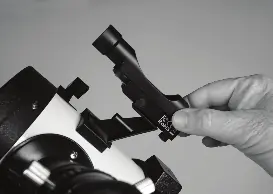
2. Point the main telescope at a distant, stationary target (e.g., a telephone pole).
3. Use the adjustment knobs on the finderscope to align the red dot with the target centered in the main eyepiece.
Polar Alignment and Balancing
1. Polar alignment is essential for tracking objects. Place the tripod on the ground with one leg pointing north (or south in the southern hemisphere).
2. Level the mount and set the latitude using the latitude adjustment knob.
3. Balance the telescope by adjusting the counterweight on the shaft and the position of the tube in the cradle rings until it does not drift when the locks are released.
Collimating the Optics
1. Collimation ensures the mirrors are aligned for the best image quality.
2. Rough collimation involves adjusting the secondary mirror using the three collimation screws until the reflection of your eye appears round and centered.
3. Fine collimation is done by adjusting the primary mirror's spring-loaded knobs while viewing a star (like Polaris) at high magnification, aiming for a concentric airy disc.
App Usage
1. Download the AR-Telescope app via the QR code or app store.
2. Pair the app with the Bluetooth mount to access the Starry Sky Map, astronomy encyclopedia, and science trivia.
Care and Maintenance
1. Do not clean the primary mirror unless absolutely necessary. If you can see your reflection in normal room light, it does not need cleaning.
2. Contact customer support if you believe the mirror requires professional cleaning.
Practical help
Common problems
Image is upside-down
This is normal for Newtonian telescopes. Your brain will adapt when viewing celestial objects.
Target drifting out of view
Ensure proper polar alignment. Use the slow-motion controls to track the object as the Earth rotates.
Dust on primary mirror
Do not clean unless necessary. If you can see your reflection in normal room light, it does not need cleaning.
Red dot not aligned with telescope
Use the adjustment knobs on the finderscope to center the red dot on the same target visible in the main eyepiece.
Before use
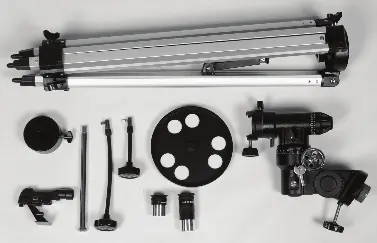
- Check all parts against the parts list
- Ensure tripod is level
- Perform polar alignment
- Align the red-dot finderscope
- Check battery for Bluetooth mount
Specs in practice
- Focal Length
- Distance light travels to the focal point; used to calculate magnification.
- Magnification
- Telescope focal length divided by eyepiece focal length.
Images and diagrams
- Figure 2.9: Features of the equatorial mount and tripod
- Figure 11.1: Newtonian telescope optical path
- Figure 13.1: App interface functions
Model compatibility
- Requires 1.25-inch eyepieces
- App compatible with iOS and Android

Manual page author
Emily Carter
User documentation editor
Prepares concise manual descriptions and highlights the most useful setup, operation, and maintenance information for readers.