Electronics / AV Switchers
User Manual for Extron SF 10C SUB Subwoofer
Comprehensive setup and installation guide for the Extron SF 10C SUB subwoofer. This manual covers ceiling and floor mounting, aircraft cable and threaded rod installation, grille mounting, and wiring procedures.
Table of contents
Manual images
Click an image to enlargeQuick guide from the manual
The Extron SF 10C SUB is a plenum-rated, 8-ohm, 4th-order band-pass subwoofer. This guide is intended for experienced installers. The unit is heavy (approximately 17 kg / 38 lbs) and requires at least two people for installation. It can be mounted in a ceiling using aircraft cables or threaded rods, or placed on a floor using the optional SMK F SF 10C Plus Kit.
Safety warnings
- Installation and service must be performed by authorized personnel only.
- Properly suspending equipment requires training and expertise. Improper rigging can cause the speaker to fall, resulting in death or injury.
- Do not rest the subwoofer on the ceiling grid, even temporarily.
- Maintain at least a 2-inch (5 cm) clearance between the cable gripper plunger and any other object in the ceiling space.
- Do not allow the port tube or any part of the subwoofer to touch the installation surface to avoid undesired audio vibrations.
Mounting the subwoofer
Ceiling Mounting (Aircraft Cable):
- Determine the location and remove necessary ceiling tiles.
- Mark and drill four holes in the structural ceiling at an approximate 10-degree angle from the corners.
- Install lag eye bolts into the holes.
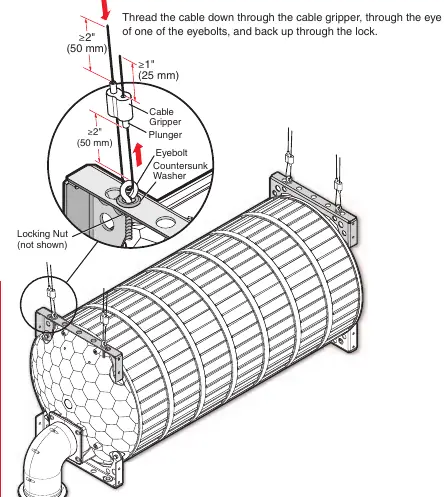
- Thread the suspension cable through the bolt eyehole and the cable gripper.
- Install the included eyebolts into the subwoofer frame using countersunk washers and locking nuts.
- Lift the subwoofer into position and secure the cables through the cable grippers.
- Adjust cable tension so the subwoofer is level and approximately 1 inch (2.5 cm) from the top surface of the ceiling tile.
Ceiling Mounting (Threaded Rod):
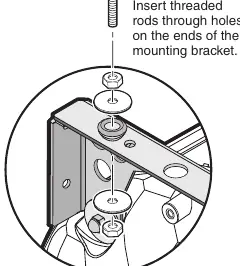
- Fasten four threaded rods (1/4-inch or 3/8-inch diameter) to the support structure (e.g., unistruts).
- Attach the rods to the corner securing points of the subwoofer using nuts and washers.
- Adjust the nuts to level the subwoofer and position it approximately 1 inch (2.5 cm) from the ceiling tile surface.
Mounting the port tube and grille
- Orient the port tube toward the listening space and attach it to the speaker.
- Mark and cut the hole in the ceiling tile using the included template.
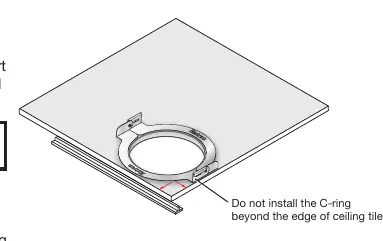
- Place the C-ring on the subwoofer side of the ceiling tile.
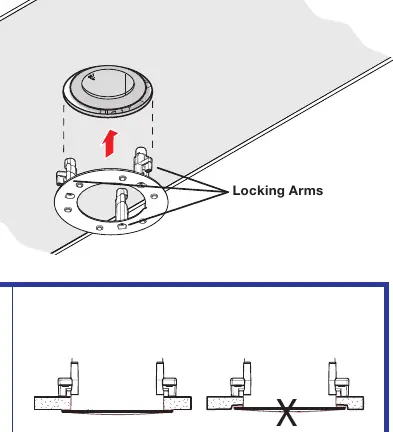
- Place the grille adapter on the opposite side and use a Phillips screwdriver to turn the three locking arms to mate with the C-ring.
- Tighten the locking arms to clamp the adapter. Note: For rigid materials, use the Opti-Torque indicator rings to avoid overtightening.
- Affix the magnetic grille to the adapter.
Connection and operation
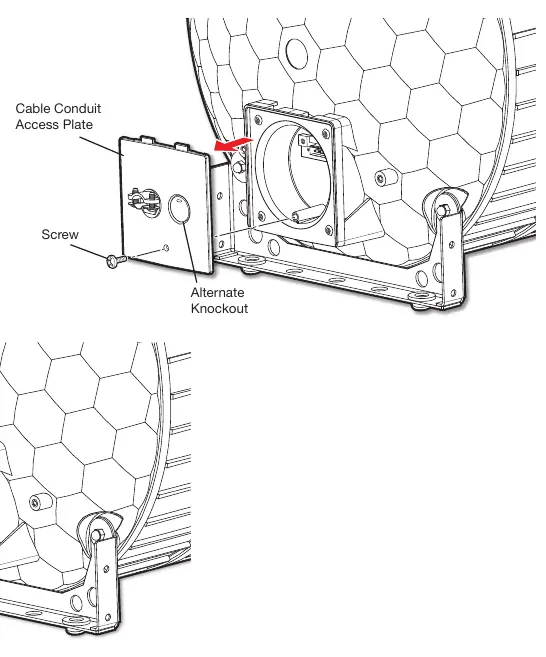
- Loosen the cable conduit access plate screw and remove the plate.
- Configure the plate for either standard cable clamp or flexible conduit usage.
- Strip 3/16 inch (5 mm) from the wire ends. Do not tin the leads.
- Connect wires to the captive screw connector. Use either single or double wiring methods based on your amplifier configuration.
- Insert the captive screw plug into the subwoofer receptacle.
- Replace the access plate and tighten the retaining screw.
Manufacturer information
Extron Electronics
Practical help
Common problems
Subwoofer falling from ceiling
Ensure installation is performed by qualified personnel, cables are properly secured, and there is at least 2 inches of clearance around the cable gripper plunger.
Undesired audio vibrations
Ensure the port tube and subwoofer enclosure do not touch the installation surface.
Short circuit or loose wires
Ensure stripped wire length is exactly 3/16 inch (5 mm). Do not tin the leads before installation.
Before use
- Verify the ceiling structure can support 17 kg (38 lbs).
- Ensure at least two people are available for installation.
- Check for obstructions above the suspended ceiling.
- Confirm wire gauge matches the wiring method (12-18 AWG).
- Ensure you have the correct mounting hardware (aircraft cables or threaded rods).
Specs in practice
- 17 kg (38 lbs)
- Weight of the subwoofer; requires two people for safe installation.
- 3/16 inch (5 mm)
- Required length for stripping wire ends to prevent short circuits or loose connections.
Images and diagrams
- Aircraft cable installation: Shows the cable gripper, plunger, and eyebolt assembly.
- Wiring methods: Illustrates single vs. double wiring configurations for the captive screw connector.
- Grille installation: Shows the C-ring, grille adapter, and locking arms assembly.
Model compatibility
- Optional SMK F SF 10C Plus Kit is required for floor mounting.
- Compatible with 1/4-inch or 3/8-inch diameter threaded rods for ceiling mounting.

Manual page author
Michael Turner
Technical manual editor
Reviews PDF manuals for structure, safety notes, and practical product details so readers can find the right information quickly.