Electronics / AV Accessories
User Manual for Extron EDID 111H 4K PLUS
Quick setup guide and user manual for the Extron EDID 111H 4K PLUS HDMI EDID emulator. Learn how to connect cables, use the LockIt Lacing Bracket, configure EDID settings, and manage storage slots.
Table of contents
Manual images
Click an image to enlargeQuick Guide from the Manual
The Extron EDID 111H 4K PLUS is an HDMI EDID emulator designed for professional AV installations. It supports video rates up to 4K@60 Hz 4:4:4, HDCP 2.3, and EDID Minder technology. Before connecting power, ensure you have read the safety guidelines on the Extron website. The device allows for capturing and storing EDID information from a connected display.
Rear Panel Cabling
The rear panel contains the following connections:
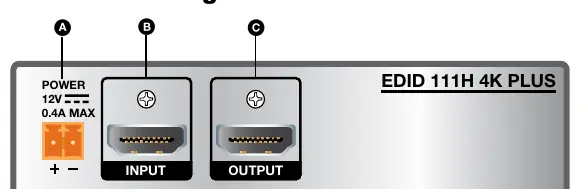
- Power Connector: Connect the included 12 VDC power supply to the orange, two-pole, 3.5 mm captive screw connector. Ensure correct polarity as shown in the diagram.
- HDMI Input: Connect your HDMI source here.
- HDMI Output: Connect your display or output device here.
HDMI Connector LockIt Lacing Bracket
To prevent accidental disconnection, use the included LockIt Lacing Bracket:
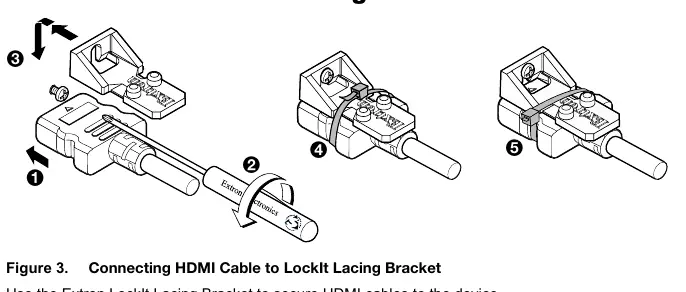
- Plug the HDMI cable into the rear panel connection.
- Loosen the mounting screw on the panel.
- Place the bracket over the screw and against the HDMI connector.
- Tighten the screw to secure the bracket.
- Place the tie wrap around the connector and bracket, tighten it, and trim the excess.
Attention: Do not overtighten the mounting screw to avoid stripping the thin shield.
Front Panel Controls
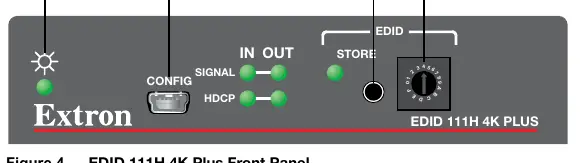
- Power LED: Illuminates when power is connected.
- Config Port: USB mini-B port for connecting a host computer for configuration via Extron PCS software.
- EDID STORE Button: Press to capture and store EDID information from a connected display.
- EDID Selection Rotary Switch: A 16-position switch (0-F). Positions 0-B select factory resolutions. Positions C-F are used for storing up to four user-defined EDID files.
Connecting and Powering
- Set the rotary switch to the desired resolution.
- Connect the HDMI source to the Input.
- Connect the display to the Output.
- Turn on the display.
- Connect the power supply to the device and then to AC power.
- Turn on the video source.
Manufacturer information
Extron Electronics
Practical help
Common problems
EDID storage not working
Ensure the rotary switch is set to positions C-F. Positions 0-B are non-functional for storage.
HDMI cable loose
Use the included LockIt Lacing Bracket to secure the cable to the device.
Before use
- Verify you have the included 12 VDC power supply.
- Ensure you have an HDMI source and a display device.
- Read the safety and regulatory compliance guide on the Extron website.
Specs in practice
- Rotary Switch 0-B
- Selects factory-defined resolutions (e.g., 1080p, 4K/UHD).
- Rotary Switch C-F
- Selects user-defined storage slots for captured EDID data.
Images and diagrams
- Figure 1 shows the rear panel with Power, HDMI Input, and HDMI Output ports.
- Figure 3 illustrates the installation of the LockIt Lacing Bracket to secure HDMI cables.
- Figure 4 details the front panel, including the Config port, EDID STORE button, and rotary switch.
Model compatibility
- Supports video rates up to 4K@60 Hz 4:4:4.
- Supports HDCP 2.3.

Manual page author
David Miller
Documentation analyst
Organizes user manual content into clear summaries, with attention to model details, product context, and everyday usability.