Lighting / Fixtures
Feit Electric 13-Inch White Round Puff Fixture Installation Guide
Quick installation and setup guide for the Feit Electric 13-Inch White Round Puff Fixture. Includes wiring instructions, color temperature selection, and troubleshooting tips.
Table of contents
Manual images
Click an image to enlargeQuick guide from the manual
This guide covers the installation and configuration of the Feit Electric 13-Inch White Round Puff Fixture. Before starting, ensure the power is turned off at the circuit breaker. The fixture supports three color temperatures (3000K, 4000K, 5000K) which can be selected via a switch on the driver or reset using a standard wall switch.
Safety Information
Warning: Risk of shock. Turn off the main power at the circuit breaker before installing the fixture. All electrical connections must be in accordance with local and National Electrical Code (N.E.C.). If you are unfamiliar with proper electrical wiring, consult a qualified electrician.
- Wear rubber-soled shoes and work on a sturdy ladder.
- Ensure the fixture is grounded to avoid electrical shocks.
- Handle with care as some metal parts may have sharp edges.
Pre-Assembly
Tools Required: Phillips screwdriver, electrical tape.
Hardware Included:
- Fixture Plate (1)
- Fixture Lens (1)
- Mounting Screws (2)
- Wire Connectors (3)
Installation
- Turn Off the Power: Switch off the power at the fuse box or circuit breaker.
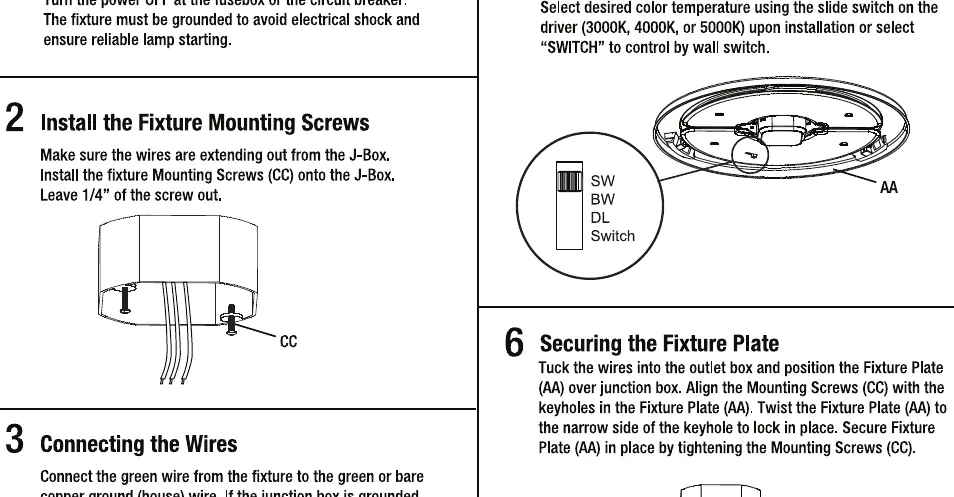
- Install Mounting Screws: Install the fixture mounting screws (CC) onto the junction box, leaving 1/4 inch of the screw exposed.
- Connect the Wires: Connect the green wire from the fixture to the green or bare copper ground wire. Connect the white wire to the neutral supply wire and the black wire to the power supply wire.
- Secure Wire Connectors: Screw the wire connectors (DD) onto the wire end connections and wrap with electrical tape (optional).
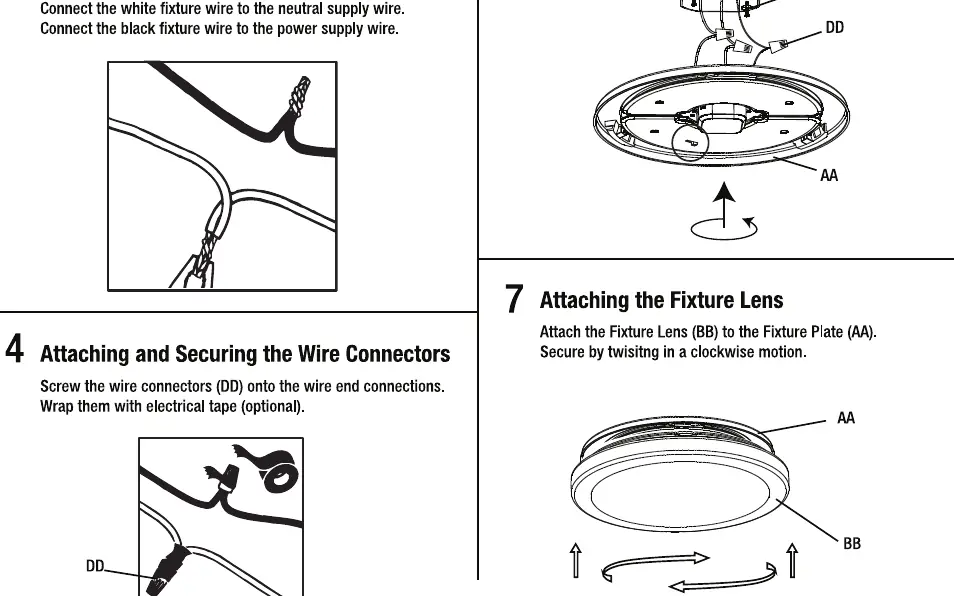
- Select Color Temperature: Select the desired color temperature (3000K, 4000K, or 5000K) using the slide switch on the driver.
- Secure Fixture Plate: Tuck wires into the outlet box, align the mounting screws with the keyholes in the fixture plate (AA), twist to lock, and tighten the screws.
- Attach Lens: Attach the fixture lens (BB) to the fixture plate (AA) by twisting in a clockwise motion.
Color Changing Instructions
The color temperature can be set before installation using the slide switch on the driver. To change the color temperature using an existing wall switch:
- Set the slide switch on the back of the fixture to "Switch".
- Toggle the wall switch ON and OFF within 0.5-3 seconds to cycle through the 3 color temperatures.
- To reset multiple fixtures to the same color, toggle the wall switch ON and OFF 7 times, leaving it in the ON position.
Troubleshooting
If the fixture does not operate, verify that the circuit breaker is not tripped and that the fixture is wired properly. If you experience erratic operation, move electronics away from the fixture or install a radio interference filter. If the light flickers or hums, ensure the dimmer is compatible and increase the light level.
Manufacturer information
Feit Electric Company, Inc.
Practical help
Common problems
Fixture will not operate
Verify that the circuit breaker is not tripped and that the fixture is wired properly.
Erratic operation
Move electronics away from the fixture or install a radio interference filter.
Fixture flickers or hums
Ensure the dimmer is compatible and increase the light level.
Before use
- Turn off power at the fuse or circuit breaker box.
- Ensure you have a Phillips screwdriver and electrical tape.
- Verify the junction box is grounded.
- Select the desired color temperature (3000K, 4000K, 5000K) before final installation.
Specs in practice
- Color Temperature
- Selectable between 3000K (Soft White), 4000K (Bright White), and 5000K (Daylight).
- Supply Circuit
- Requires 120V, 60Hz power supply.
Images and diagrams
- Wiring: Connect green to ground, white to neutral, and black to hot.
- Color Switch: Located on the driver; slide to select temperature or set to 'Switch' for wall switch control.
Model compatibility
- Compatible with standard wall switches for color resetting.
- Requires a compatible dimmer for dimming functionality.

Manual page author
Michael Turner
Technical manual editor
Reviews PDF manuals for structure, safety notes, and practical product details so readers can find the right information quickly.