Lighting / Decorative Lighting
Assembly Instructions for GE Appliances 22020LO Pre-Lit Christmas Tree
Quick assembly and usage guide for the GE Appliances 22020LO Pre-Lit Christmas Tree. Learn how to set up, shape branches, operate lighting functions, and store your tree properly.
Quick answers from the manual
Quick answer
- To assemble the tree, insert section A into the stand, then stack sections B and Top. Release the red twist-ties, shape the branches, and plug into a 120V outlet. Use the foot pedal to select from 8 lighting functions. p. 1
Key actions
- Assemble tree sections p. 1
- Shape branches p. 1
- Select lighting function p. 1
First start
- Connect sections and plug in p. 1
Show 4 more answers Show less
Problems and fixes
Tree does not illuminate
Check wall switch, press foot pedal, and verify all electrical connections between sections.
p. 1Maintenance and reset
- Storage instructions p. 1
Technical specifications
| Parameter | Value | Meaning | Pages |
|---|---|---|---|
| Height | 7.5 ft | Total tree height | p. 1 |
| Sections | 3 | Number of tree sections | p. 1 |
Where to find it in the PDF
- Assembly and Troubleshooting p. 1
Table of contents
Quick guide from the manual
This manual provides assembly and maintenance instructions for the 7.5 ft (2.29 m) GE Appliances Pre-Lit Christmas Tree. The tree features Easy Light Technology, which eliminates cord connections between sections. The tree is for indoor use only and operates on 120V power.
Assembly instructions
- Unpack: Carefully unpack the carton and inspect the sections labeled A, B, and Top, along with the tree stand.
- Prepare Stand: Open the tree stand and set it at a 90-degree angle.
- Install Section A: Insert section A into the tree stand and tighten the thumbscrew. Plug the tree into an electrical wall outlet.
- Release Branches: Untie the red twist-tie to release the branch panels. Allow branches to fall into place with a gentle pull.
- Assemble Section B: Align and insert section B into the top of section A. Ensure the alignment marks are matched.
- Assemble Top: Align and insert the Top section into the top of section B.
Shaping the tree
For a fuller look, adjust the branch tips after assembly:
- Start at the inner branches and stagger the tips.
- Move each tip up to 40 degrees.
- Position tips 2 and 3 to horizontal.
- Position tip 4 to vertical.
- Position tips 5 and 6 up to 45 degrees.
Lighting functions
Use the foot pedal to cycle through the 8 available lighting functions:
- 1. Auto
- 2. Steady On
- 3. Change
- 4. SLO-GLO
- 5. Full flash 1
- 6. Warm white Change
- 7. Full flash 2
- 8. Change / Full flash
- 9. OFF
Tree storage
- Disconnect the main extension cord from the wall outlet.
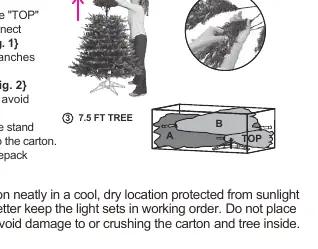
- Starting from the top, disconnect the Top section from section B, then disconnect section B from section A.
- Gently fold the branch tips and fold the branches up toward the center, taking care to avoid damaging the lights.
- Remove section A from the stand, close the stand, and place all parts into the carton.
- Store the carton in a cool, dry location protected from sunlight.
Troubleshooting
If the tree does not illuminate:
- Ensure the wall switch is turned on.
- Press the Function Change Foot Pedal to ensure the lights are not set to "OFF".
- Check for loose or missing bulbs.
- Verify that all factory connections are secure and that the electrical connections between tree sections (plug to extension cord outlet) are properly made.
Practical help
Common problems
Tree does not illuminate
Check if the wall switch is on, press the foot pedal to cycle functions, and verify all electrical connections between tree sections are secure.
One section of the tree does not light up
Check that section for loose or missing bulbs and ensure the connection between that section and the rest of the tree is properly made.
Before use
- Unpack carton and verify sections A, B, Top, and Tree Stand are present.
- Ensure the tree stand is opened to a 90-degree angle.
- Tighten the thumbscrew on the tree stand.
- Untie the red twist-tie to release branch panels.
- Ensure the tree is placed in a location suitable for indoor use (120V).
Show more Show less
Specs in practice
- Assembly Time
- Approximately 5-10 minutes
Images and diagrams
- Assembly Diagram: Illustrates the stacking order of sections A, B, and Top into the stand.
- Branch Shaping: Shows the specific angles (40-45 degrees) to position branch tips for a fuller appearance.
- Foot Pedal: Indicates the location of the pedal used to change lighting functions.
Model compatibility
- For indoor use only.
- Do not use or install additional Christmas lighting or ornaments powered by a light bulb socket, as this may damage the tree and void the warranty.

Manual page author
Emily Carter
User documentation editor