Electronics / Speakers & Soundbars
Operating Manual for Genelec 1236A Smart Active Monitor
Quick guide for the Genelec 1236A Smart Active Monitor. Learn about installation, flush mounting, GLM software setup, cable connections, and safety precautions.
Table of contents
Manual images
Click an image to enlargeQuick Guide
The Genelec 1236A is a high-performance Smart Active Monitor system consisting of an enclosure and a RAM-XL amplifier. Setup is performed using the Genelec Loudspeaker Manager (GLM) software. Ensure the RAM-XL amplifier is placed in a well-ventilated 19-inch rack and that the enclosure is flush-mounted for optimal acoustic performance. Always use the specific RAM-XL amplifier calibrated for your enclosure, as indicated by matching serial numbers.

General Description
The system comprises a 430-litre enclosure with two 458 mm (18 in) bass drivers, two 130 mm (5 in) midranges, and a 50 mm (2 in) compression driver. The midrange and treble drivers are mounted in a Directivity Control Waveguide (DCW) which can be rotated for horizontal or vertical mounting.
Installation and Mounting
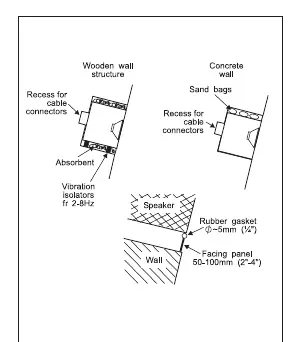
Flush mounting is strongly recommended to improve bass response and efficiency. When flush mounting, ensure the enclosure is flush with the wall surface. If using a decorative cloth frame, ensure it is acoustically transparent and less than 20 mm deep. The monitor enclosure should be mounted on vibration isolators (resonant frequency 2-8 Hz) if the wall structure is not solid concrete. Leave a 50-100 mm gap around the enclosure, filled with mineral wool or foam plastic.
Aligning the DCW
To rotate the DCW plate: place the monitor in the intended orientation, unscrew the eight M5 fixing screws using a 4 mm Allen key, carefully pull the plate away, rotate it so the midrange and treble drivers are aligned vertically (treble on top), and remount.
Connections
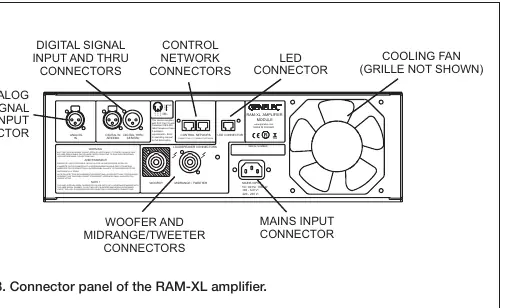
The RAM-XL amplifier connects to the monitor via two 4-pole Speakon cables (Woofer and Midrange/Tweeter). The GLM network uses RJ45 cables to daisy-chain monitors and subwoofers. The amplifier supports 100-120 VAC and 220-240 VAC mains input.
Setup and Use
Setup is managed via GLM software:
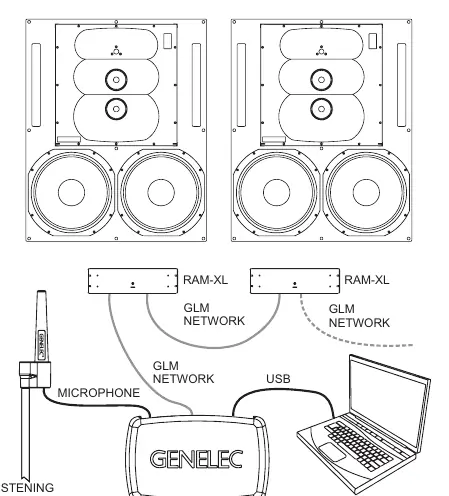
- Link all monitors and subwoofers in a daisy-chain using CAT5 (RJ45) cables.
- Connect the GLM Adapter to your computer via USB.
- Place the measurement microphone at the listening position.
- Download and install the GLM software from the Genelec website.
- Follow the software instructions to measure and calibrate the system.
The Intelligent Signal Sensing (ISS) feature can be activated via GLM to automatically put the monitor into power-saving standby mode when no audio signal is detected.
Maintenance
Periodically check the protective grille on the cooling fan on the back of the RAM-XL amplifier. Clean with a vacuum cleaner if blocked. Increased fan noise may indicate a blockage.
Safety Considerations
- Servicing must be performed by certified Genelec personnel only.
- Do not open the enclosure or amplifier.
- Ensure the mains connection is earthed.
- The speaker connectors on the RAM-XL amplifier can output hazardously high voltages; wiring must be installed by a qualified person.
- Do not expose the product to water or moisture.
Technical Specifications
The system features a frequency response of 21 Hz - 20 kHz (± 2.0 dB). The RAM-XL amplifier provides 2 x 1000 W (bass), 2 x 400 W (midrange), and 250 W (treble) short-term power. Crossover frequencies are set at 420 Hz and 3.2 kHz.
Manufacturer information
Genelec Oy
Practical help
Common problems
Red warning light on the monitor
Indicates an overload condition (analog input exceeded, digital clipping, or driver/amplifier overload). Turn down the source level and check for bit errors in AES/EBU data.
System overheats and shuts off
Ensure free flow of air around the RAM-XL amplifier. The ambient temperature must be 15-35°C. Check for blockages in the cooling fan grille.
Monitor does not power on
Check mains connection and ensure the power button has been pressed. If ISS is active, ensure an audio signal is present to wake the monitor.
Before use
- Check all items for damage upon delivery.
- Verify that the RAM-XL amplifier serial number matches the enclosure.
- Ensure the amplifier is in a well-ventilated 19-inch rack.
- Verify mains voltage (100-120V or 220-240V).
- Ensure speaker cables are connected to the correct amplifier outputs.
- Download and install the latest GLM software.
Specs in practice
- Crossover frequencies
- 420 Hz (Bass/Mid) and 3.2 kHz (Mid/Treble).
- Mains voltage
- 100-120 VAC and 220-240 VAC 50/60 Hz.
- Analog input max level
- +25.0 dBu.
- Digital input
- AES/EBU, 16-24 bits, 32-192 kHz.
Images and diagrams
- Figure 1 & 2: Acoustic axis and monitor orientation.
- Figure 3: Enclosure mounting details and vibration isolation.
- Figure 6: GLM network cabling diagram.
- Figure 8: RAM-XL amplifier connector panel layout.
Model compatibility
- RAM-XL amplifier is individually calibrated for the specific enclosure it is delivered with; do not mix pairs.
- Flush mounting is strongly recommended for optimal performance.

Manual page author
Emily Carter
User documentation editor
Prepares concise manual descriptions and highlights the most useful setup, operation, and maintenance information for readers.