General / Other Manuals
Acrylic Keychain Design Template (100x100mm)
A comprehensive guide and design template for creating custom 100x100mm acrylic keychains, including technical specifications for print preparation and submission requirements.
Table of contents
Design Specifications
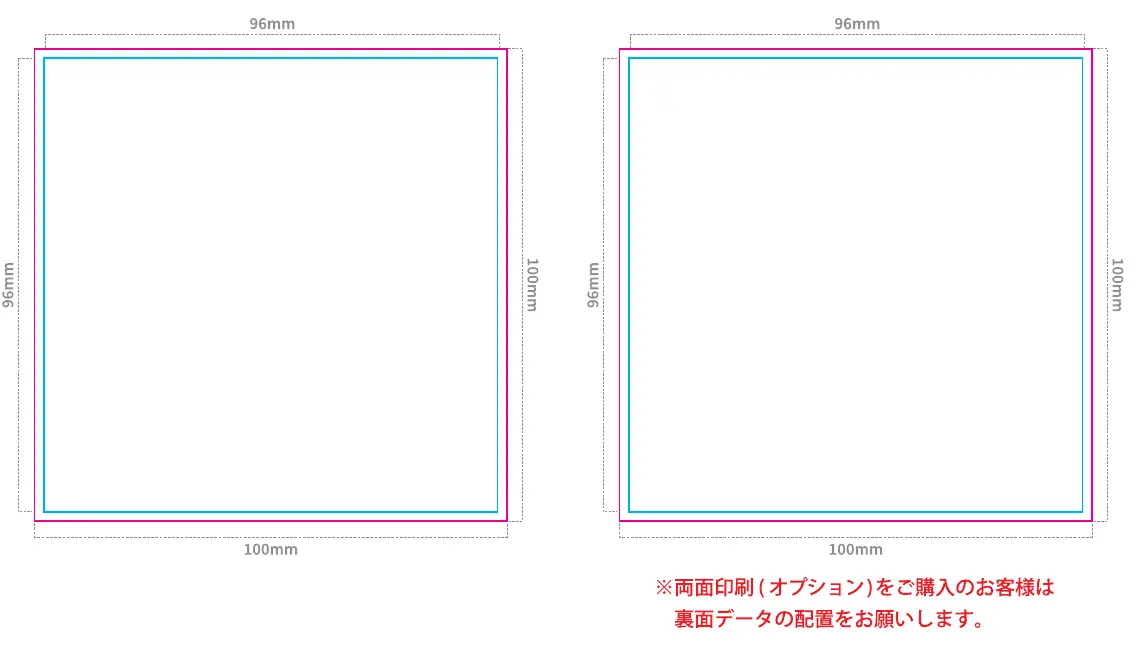
This template is designed for creating custom acrylic keychains with a maximum size of 100x100mm. When preparing your artwork, it is essential to ensure that your design fits within the specified dimensions. The final product size includes the cut line, and it is recommended to leave a margin of approximately 2mm from the cut line to ensure your design is not cropped or damaged during the manufacturing process.
Preparing Your Artwork
To ensure the highest quality output for your acrylic keychains, please follow these professional design standards:
- Original Size: Always create your design at the actual intended size within the provided blue frame.
- Cut Lines: Place your cut lines within the designated red frame to ensure accurate laser cutting.
- Avoid Edge Printing: Do not place important design elements or text within 2mm of the outer edge of the acrylic, as this can lead to peeling or printing defects.
- Font Outlining: All text elements must be converted to outlines to prevent font substitution errors during the printing process.
- Image Embedding: Ensure all images used in your design are properly embedded in the file.
- Color Mode: The file must be set to CMYK color mode to ensure accurate color reproduction.
- White Ink Layer: If your design requires a white base layer, ensure the white ink is set to 100% K (black) in your file.
Submission Checklist
Before submitting your design for production, please verify that you have completed all necessary steps. Ensure that you have created the main design, the white ink layer, and the cut lines. Double-check that your color mode is set to CMYK and that all text has been converted to outlines. If you are ordering double-sided printing, please ensure that the back-side data is correctly positioned and aligned with the front-side design. Please note that the hardware attachment hole is fixed and cannot be modified. Ensure your design does not interfere with this area. By following these guidelines, you will help ensure a smooth production process and a high-quality final product that meets your expectations.
Practical help
Common problems
Printing defects or peeling at the edges
Ensure no important design elements or text are placed within 2mm of the outer edge of the acrylic.
Font substitution errors
Convert all text elements to outlines before submitting the file.
Before use
- Create design at original size within the blue frame
- Place cut lines within the red frame
- Convert all text to outlines
- Embed all images
- Set color mode to CMYK
- Set white ink layer to 100% K
- Verify back-side data alignment for double-sided orders
Images and diagrams
- The blue frame represents the area for your design.
- The red frame indicates the required placement for cut lines.
- The small circle icon indicates the fixed position for the hardware attachment hole.
Model compatibility
- The hardware attachment hole position is fixed and cannot be moved.
- Double-sided printing is available as an optional service.

Manual page author
David Miller
Documentation analyst
Organizes user manual content into clear summaries, with attention to model details, product context, and everyday usability.