Wearables / Smartwatches
Assembly Instructions: 10CZYCSCT04-WH Shoe Cabinet
Comprehensive assembly guide for the 10CZYCSCT04-WH shoe cabinet, featuring step-by-step instructions, safety warnings, and hardware lists.
Table of contents
Product Overview
The 10CZYCSCT04-WH shoe cabinet is a functional and stylish storage solution designed for home organization. This unit features a combination of open shelving and a side compartment, providing versatile storage for various footwear. The design incorporates a sliding door mechanism for the main shelving area and a hinged lid for the side storage section, ensuring easy access to your items while maintaining a clean aesthetic.
Safety and Preparation
Before beginning the assembly, it is essential to read all instructions carefully and ensure that all parts listed in the manual are present. Work in a spacious area, preferably on a carpet or the provided cardboard packaging, to prevent damage to the floor and the furniture components. Safety is paramount: do not allow children to climb on the unit, as this poses a significant tipping hazard. Keep all small parts and packaging materials away from children and pets to avoid choking risks. When moving the assembled cabinet, ensure all items are removed first, and always use multiple people to lift the unit rather than dragging or pushing it, which could cause structural failure or injury.
Assembly Guidelines
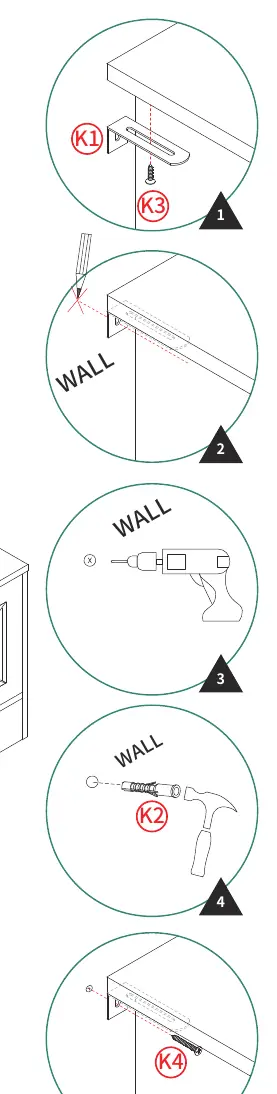
The assembly process requires careful attention to the sequence of steps. During initial assembly, it is recommended to keep screws slightly loose to allow for adjustments. Once the entire structure is correctly aligned, firmly tighten all hardware. Be cautious when using power tools, as excessive force can strip the pre-drilled holes or damage the wood panels. The assembly involves connecting the base, side panels, and shelves using the provided cam locks and screws. Ensure that cam bolts are inserted correctly and that cam locks are fully engaged to secure the joints. The final steps include attaching the sliding door hardware and the hinged lid, followed by securing the unit to the wall using the provided anti-tip kit for maximum stability.
Maintenance and Care
To maintain the appearance and longevity of your shoe cabinet, avoid placing sharp objects or corrosive chemicals on the surfaces. Clean the unit with a soft, dry cloth. Periodically check the hardware to ensure that all screws and cam locks remain tight, especially after the initial settling period. If the unit needs to be relocated, always empty it completely and lift it with assistance to prevent damage to the joints.
Practical help
Common problems
Unit feels unstable or wobbly
Ensure all cam locks are fully tightened and the unit is properly secured to the wall using the provided anti-tip kit.
Difficulty inserting cam locks
Check that the cam bolt is screwed in straight and to the correct depth; ensure the cam lock arrow points toward the bolt.
Damage to wood during assembly
Avoid using high-torque power tools; hand-tighten screws to prevent stripping the material.
Before use
- Verify all parts are present according to the parts list.
- Clear a spacious, protected work area.
- Ensure you have a screwdriver and necessary tools.
- Read all safety warnings regarding tipping hazards.
- Confirm the wall is suitable for the anti-tip anchor installation.
- Prepare to lift the unit with at least two people.
Specs in practice
- Cam Lock (B/C)
- Circular fastener that locks onto the cam bolt to pull panels tightly together.
- Wall Anchor (K)
- Safety hardware used to secure the cabinet to the wall to prevent accidental tipping.
Images and diagrams
- The manual uses exploded-view diagrams to show the relationship between panels and hardware.
- Numbered circles correspond to specific wooden panels listed in the parts list.
- Letters (A, B, C, etc.) identify specific hardware components.
- Arrows indicate the direction of assembly or movement for sliding parts.
- Warning icons (triangles with exclamation marks) highlight critical assembly steps or safety precautions.
Model compatibility
- The unit is designed for indoor use only.
- Wall mounting is required for safety; ensure your wall type is compatible with the provided anchors.

Manual page author
Michael Turner
Technical manual editor
Reviews PDF manuals for structure, safety notes, and practical product details so readers can find the right information quickly.