General / Other Manuals
Acrylic Magnet Design Guidelines (100x100mm)
Essential design specifications and submission requirements for creating custom 100x100mm acrylic magnets.
Table of contents
Design Specifications
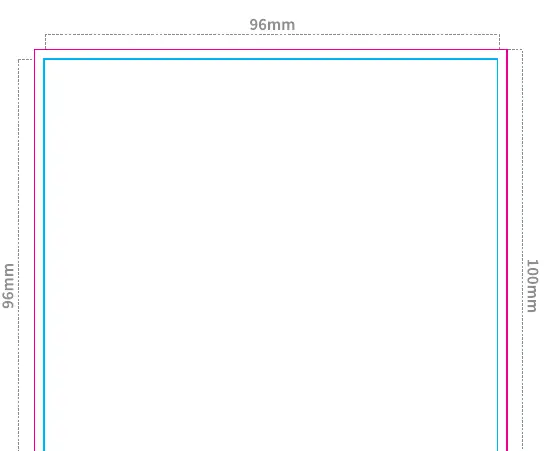
Creating a custom acrylic magnet requires precise adherence to design dimensions to ensure a high-quality final product. The total physical size of the magnet is 100x100mm, with a designated printable area of 96x96mm. It is essential to maintain a 2mm margin from the edge of the print area to the cut line to prevent any design elements from being cropped incorrectly during the manufacturing process.
File Preparation Requirements
Before submitting your design, ensure that all artwork is prepared in its original size within the specified boundaries. All text must be converted to outlines to prevent font substitution issues. If your design includes images, they must be embedded directly into the file. The color mode must be set to CMYK to ensure accurate color reproduction during the printing process. If a white base layer is required, ensure it is set to K100 percent.
Submission Checklist
To ensure a smooth production process, verify your files against the following criteria before submission:
- Ensure the design is created at the original size within the blue frame.
- Verify that the cut path is clearly defined within the red frame.
- Confirm that all text has been converted to outlines.
- Check that all images are properly embedded.
- Ensure the color mode is set to CMYK.
- Verify that the white base layer is set to K100.
If you do not specify the exact placement of the attachment hole or tab, it will be placed in the center by default. For complex shapes, the cut line may be simplified during production. Please ensure that all necessary information regarding printing options, such as single-sided or double-sided printing, and packaging preferences, are clearly indicated on the submission form. Avoid including delivery address changes or other unrelated notes in the submission comments section, as these should be handled through the official contact form on the website.
Practical help
Common problems
Text is not displaying correctly
Ensure all text has been converted to outlines before submission.
Colors look different than expected
Verify that the file color mode is set to CMYK.
Images are missing or broken
Make sure all images are embedded in the file rather than linked.
Before use
- Design created at original size
- Cut path defined in red frame
- All text converted to outlines
- All images embedded
- Color mode set to CMYK
- White base layer set to K100
Specs in practice
- Printable Area
- 96x96mm area for your artwork.
Images and diagrams
- The blue frame represents the printable area of 96x96mm.
- The red frame indicates the final cut line for the 100x100mm product.
Model compatibility
- Default hole/tab placement is center if not specified.
- Complex shapes may be simplified during the cutting process.

Manual page author
Emily Carter
User documentation editor
Prepares concise manual descriptions and highlights the most useful setup, operation, and maintenance information for readers.