Home Appliances / Small Kitchen Appliances
User Manual for Gorenje KR 1800SDP / KR 1800SM Contact Grill
Quick guide for the Gorenje KR 1800SDP and KR 1800SM contact grill. Learn how to use the three grilling positions, clean the plates, and safely operate your appliance.
Table of contents
Quick Guide
Before using your Gorenje contact grill for the first time, ensure it is placed on a firm, dry, and stable surface. Perform a 10-minute burn-in by running the grill empty in position 4 to remove any manufacturing residues; ventilate the room during this process.
Product Overview
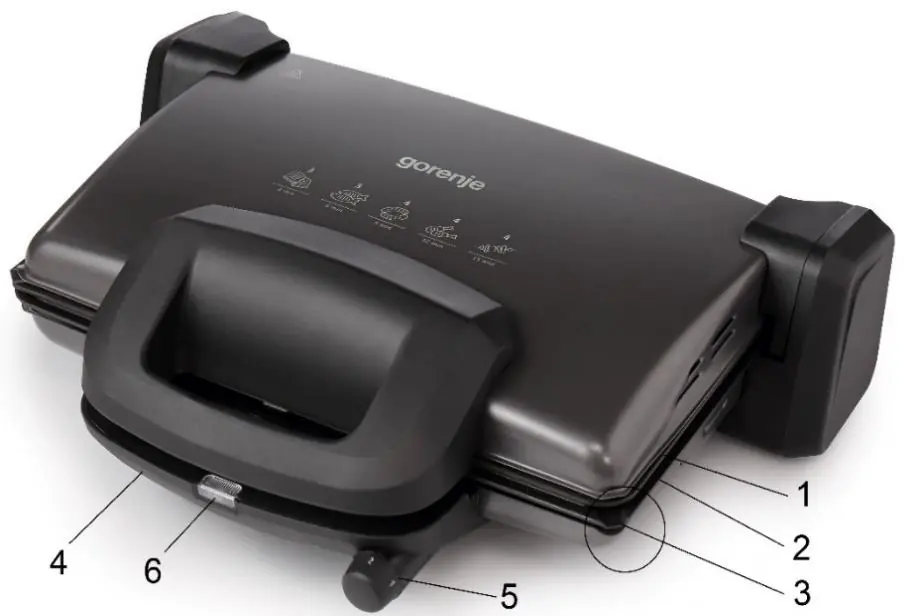
- Upper cooking plate
- Lower cooking plate
- Draining groove
- Handle
- Temperature regulation button
- Function light
Operating Positions
The grill can be used in three different ways:
1. Toasting Position
Place the upper cooking plate in a vertical position. Place toasts on the lower plate and close the upper plate on top. Do not press down with force.
2. Baking Position
Position the upper plate vertically just above the lower plate. Place food in a tray or directly on the lower plate.
3. Open Grilling Position
Open the upper plate to 180°. Place food on both plates. Use wooden or plastic utensils to avoid damaging the coating.
Cleaning and Maintenance
Always unplug the appliance and let it cool completely before cleaning. Remove the plates, soak in warm water with detergent to dissolve grease, then wash by hand or in a dishwasher. Clean the exterior with a damp cloth. Do not use aggressive cleaning agents.
Safety Instructions
The appliance becomes very hot during operation. Use the handle or oven mitts. Keep out of reach of children under 8 years. Do not connect to external timers or remote control systems.
Manufacturer information
Gorenje
Practical help
Common problems
Unpleasant smell during first use
Run the grill empty for 10 minutes in position 4 and ventilate the room.
Food sticking to plates
Use wooden or plastic utensils; do not use metal tools.
Plates not heating
Check if the grill is properly plugged in and the plates are correctly installed.
Before use
- Check for transport damage.
- Place on a firm, dry, stable surface.
- Ensure voltage matches the rating plate.
- Ensure the outlet is grounded and at least 10A.
- Clean the plates before first use.
Specs in practice
- 180° Position
- Open grill position for a larger cooking surface.
Images and diagrams
- 1. Upper cooking plate
- 2. Lower cooking plate
- 3. Draining groove
- 5. Temperature regulation button
- 6. Function light
Model compatibility
- For indoor use only.
- Not for professional use.

Manual page author
Michael Turner
Technical manual editor
Reviews PDF manuals for structure, safety notes, and practical product details so readers can find the right information quickly.