Garden / Lawn Care
User Manual for Greenworks 10A Electric Power Head 21142
Quick guide for the Greenworks 10A Electric Power Head (21142). Includes assembly instructions, operation tips, maintenance, and troubleshooting for this versatile garden tool power unit.
Table of contents
Manual images
Click an image to enlargeQuick guide from the manual
The Greenworks 10A Electric Power Head (21142) is a versatile tool designed to power various garden attachments. Before operation, ensure you have read all safety instructions, wear appropriate eye protection (ANSI Z87.1), and verify that the guard and handle are securely attached. Always disconnect the power source before performing any assembly, maintenance, or changing attachments.
Product description
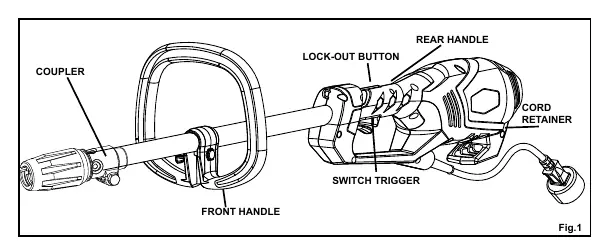
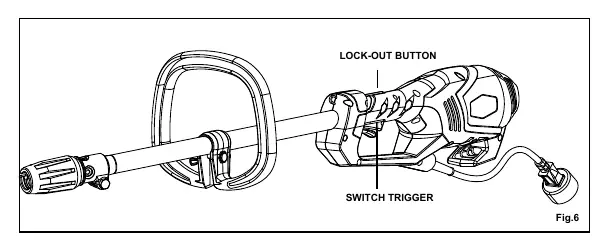
The power head features a cord retainer to prevent accidental unplugging, a lock-out button to prevent accidental starting, and a front handle for better control. It is designed to be used with specific Greenworks and Ryobi Expand-it attachments.
Assembly
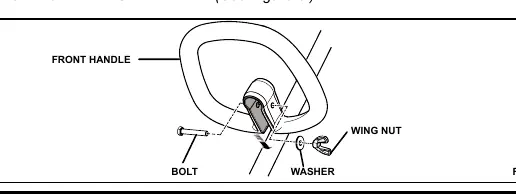
Attaching the front handle
Slide the front handle onto the power head shaft, angled toward the rear handle. Insert the bolt through the holes, add the washer, and secure it with the wing nut.
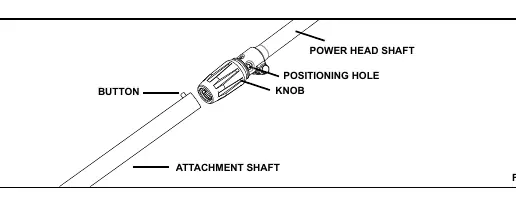
Installing attachments
- Unplug the power head.
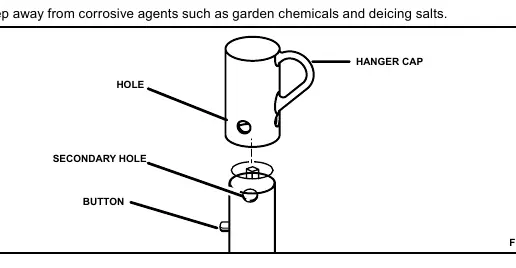
- Loosen the knob on the coupler and remove the hanger cap from the attachment.
- Push the button on the attachment shaft and align it with the guide recess on the power head coupler.
- Slide the shafts together and rotate the attachment shaft until the button locks into the positioning hole.
- Tighten the knob securely before operation.
Operation
Connecting to power
Form a loop with the extension cord, pass it through the opening in the bottom of the rear handle, and place it over the cord retainer to prevent the plug from loosening.
Starting and stopping
To start, depress the lock-out button and squeeze the switch trigger. To stop, simply release the switch trigger.
Maintenance
Keep the air vents clean and free of debris after each use. Clean the power head using a damp cloth with a mild detergent. Do not use strong solvents on plastic parts. Store the unit in a dry, well-ventilated place, inaccessible to children.
Troubleshooting
If the motor fails to start, check that the power cord is securely plugged in and verify that the household circuit breaker has not tripped.
Manufacturer information
Greenworks
Practical help
Common problems
Motor fails to start when switch trigger is depressed.
Ensure the power cord is plugged in securely and check if the household circuit breaker has tripped.
Before use
- Check the work area for debris like rocks, glass, or nails.
- Wear ANSI Z87.1 compliant safety glasses with side shields.
- Ensure the grass deflector and handles are securely attached.
- Inspect the extension cord for damage.
- Ensure the switch trigger is not engaged before plugging in the unit.
Images and diagrams
- Fig 1: Overview of power head controls including coupler, handle, and trigger.
- Fig 2: Attachment connection mechanism showing the button and positioning hole.
- Fig 3: Front handle assembly components.
- Fig 4-5: Correct method for securing the extension cord using the cord retainer.
Model compatibility
- Compatible with Greenworks attachments: 29402 (Trimmer), 29017 (Hedge Trimmer), 29027 (Pole Saw), 29047 (Tiller), 29057 (Brush Cutter), 29067 (Blower).
- Compatible with Ryobi Expand-it attachments.

Manual page author
Michael Turner
Technical manual editor
Reviews PDF manuals for structure, safety notes, and practical product details so readers can find the right information quickly.