Garden / Lawn Care
Greenworks 14" 10A Electric Dethatcher User Manual
Quick guide for the Greenworks 14" 10A Electric Dethatcher. Includes assembly instructions, operation, maintenance, and troubleshooting steps.
Table of contents
Manual images
Click an image to enlargeQuick guide from the manual
This manual provides essential instructions for the safe operation and maintenance of the Greenworks 14" 10A Electric Dethatcher. Before using the tool, ensure you have read all safety warnings. The unit is designed for outdoor use only and requires a 120V, 15A circuit. Always wear safety goggles, hearing protection, and a dust mask during operation. Keep bystanders at least 100 feet (30 m) away and do not operate on slopes greater than 15 degrees.
Assembly
The dethatcher requires assembly before use. Ensure the unit is disconnected from the power supply during this process.
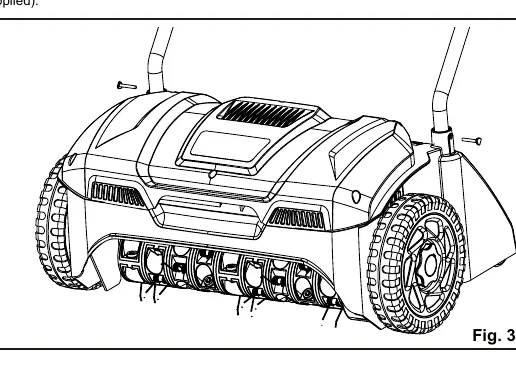
- Lower Handle: Assemble the cord retainer onto the lower handle. Insert the lower handle into the housing holes and fasten it using the supplied screws with a screwdriver.
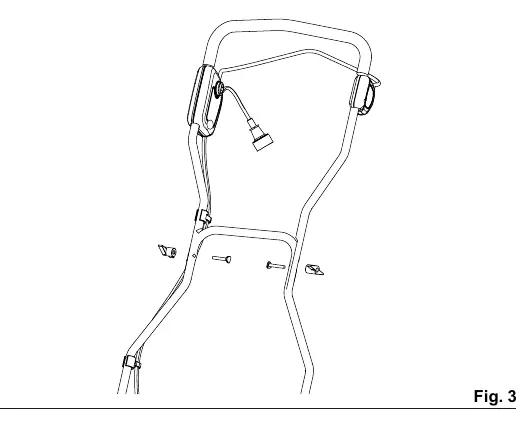
- Upper Handle: Align the upper handle with the lower handle. Insert the hex bolts from the outside and thread the knobs onto the bolts to tighten securely.
Operation
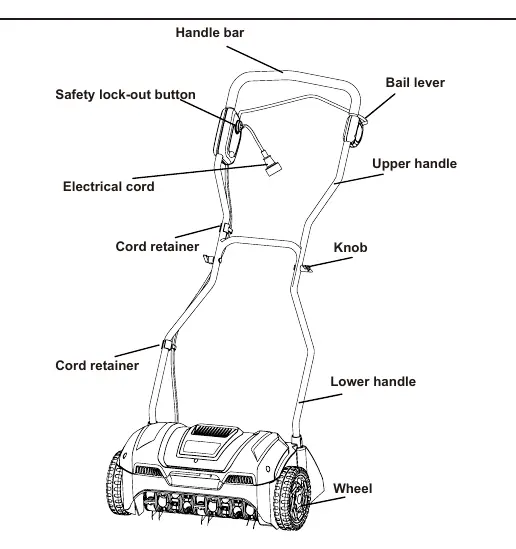
Familiarize yourself with the controls, including the bail lever and safety lock-out button.
- Starting: Plug the unit into an approved outdoor extension cord. Press and hold the safety lock-out button, then pull the bail lever against the handlebar to start the motor.
- Stopping: Simply release the bail lever.
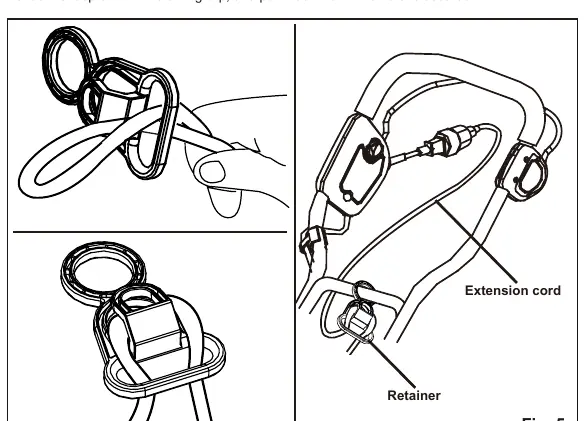
- Cord Retainer: To prevent accidental disconnection, fold the extension cord into a loop, push it through the bottom hole of the retainer, and slide it over the retaining clip.
Maintenance
Regular maintenance ensures the longevity of your dethatcher. Always unplug the unit and wait for all moving parts to stop before performing any service.
- Cleaning: Clean the bottom of the dethatcher after each use. Do not use high-pressure water or hard/pointed objects. Use a clean cloth to remove dirt and debris.
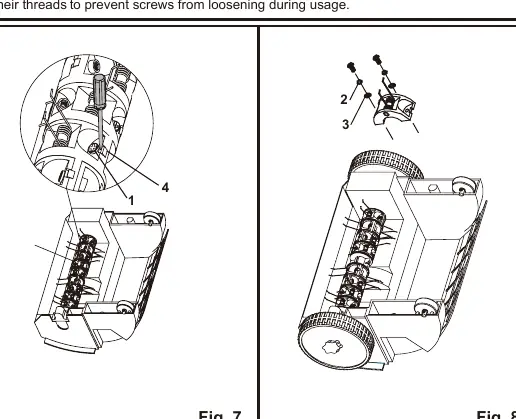
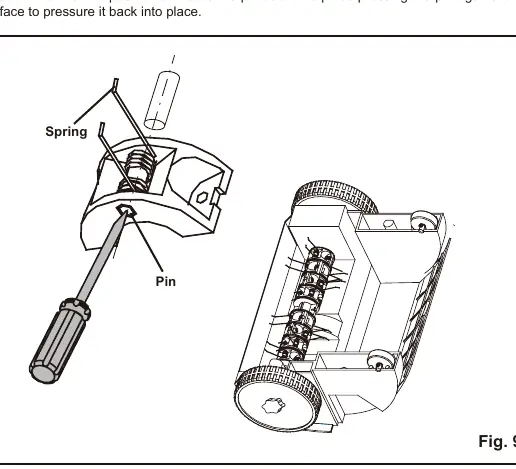
- Tine Replacement: If tines are worn or broken, they must be replaced. Remove the tine cartridge by unscrewing the tine casing (star-shaped screws, flat washer, and lock washer). Use a screwdriver to press the lock on the shaft edge to separate the casing. Replace the tines and reassemble in the original order.
- Storage: The unit can be folded for storage by releasing the knobs. Store in a dry, locked space away from children.
Troubleshooting
If you encounter issues, check the following:
- Abnormal noise: Check for foreign objects on the cylinder.
- Motor won't start: Verify the extension cable gauge and condition.
- Hard to push: Remove foreign objects or mow the lawn if the grass is too tall.
- Poor results: Adjust the cylinder or mow the lawn before dethatching.
Technical Specifications
- Motor: 120 V, AC only, 60 Hz, 10 Amps
- Speed: 3,500 RPM
- Dethatching Path: 14" (36 cm)
- Dethatching Depth: 3/8" (1 cm)
- Unit Weight: 23 lb 12 oz (10.8 kg)
Manufacturer information
Greenworks
Practical help
Common problems
Abnormal noise or clattering
Switch off, unplug, and remove foreign objects blocking the cylinder.
Motor will not start
Check if the extension cable is faulty or has an insufficient conductor cross-section.
Dethatcher is hard to push
Remove foreign objects or mow the lawn if the grass is too tall.
Dethatching results are not satisfactory
Adjust the dethatcher cylinder or mow the lawn before use.
Before use
- Read all safety rules and operating instructions.
- Ensure the extension cord is outdoor-rated and of the correct gauge.
- Wear safety goggles, hearing protection, and a dust mask.
- Clear the work area of stones and slippery spots.
- Ensure bystanders are at least 100 feet (30 m) away.
- Check that all parts are properly assembled and screws are tightened.
Specs in practice
- Dethatching Path
- The width of the area covered in one pass (14 inches).
- Dethatching Depth
- The depth the tines penetrate the soil (3/8 inch).
Images and diagrams
- Fig 2: Identifies the bail lever, safety lock-out button, and cord retainers.
- Fig 5: Shows how to secure the extension cord using the cord retainer.
- Fig 7-9: Illustrates the procedure for removing the tine casing and replacing individual tines.
Model compatibility
- Use only identical replacement parts for servicing.
- Requires a 120V, 15A circuit with a time-delayed fuse or circuit breaker.
- Use only extension cords intended for outdoor use (e.g., SW-A, SOW-A, STW-A).

Manual page author
Emily Carter
User documentation editor
Prepares concise manual descriptions and highlights the most useful setup, operation, and maintenance information for readers.