Garden / Lawn Care
Handy THTD48 48-inch Towed De-thatcher
Quick guide for the Handy THTD48 48-inch towed de-thatcher. Includes assembly instructions, operation tips, maintenance, and parts diagrams.
Table of contents
Manual images
Click an image to enlargeQuick guide from the manual
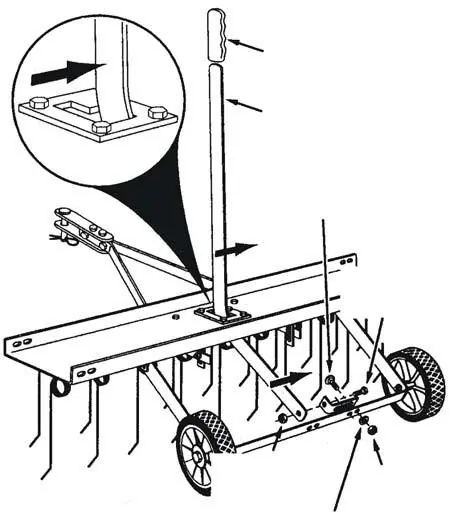
The Handy THTD48 is a towed de-thatcher designed for domestic garden use. Assembly requires a minimum of two people due to the weight and size of the unit. Before use, ensure all bolts are tightened and the unit is properly attached to a compatible vehicle (Lawn/Garden Tractor or ATV). The maximum towing speed is 10 MPH. If the unit appears to be jumping during operation, add extra weight (such as concrete patio blocks) to the tine shield.
Safety
General Safety: Always read the manual before use. Keep bystanders, children, and pets away from the operating area. Never allow anyone to ride on the de-thatcher or the towing vehicle. Wear substantial footwear and gloves during operation. Do not operate on excessively steep slopes and always work up and down the slope, never across.
Assembly
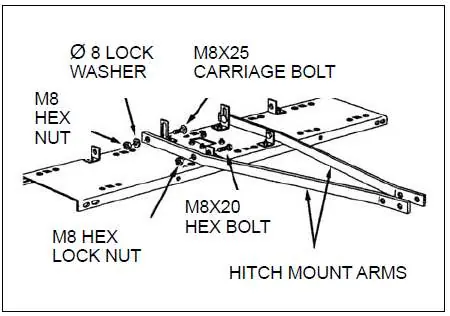
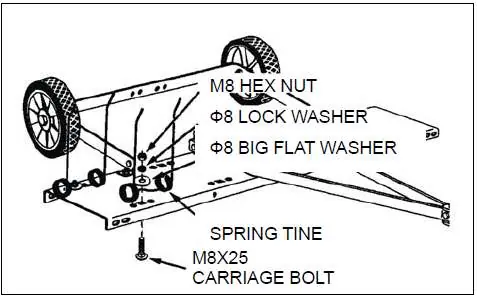
The de-thatcher requires assembly before use. Ensure you have the following tools: 1/2" wrenches, 9/16" wrench, 3/4" wrench (or adjustable), and pliers. Inspect all components for damage before starting. Follow the steps carefully, ensuring all brackets and hitch arms are correctly aligned. Do not fully tighten all bolts until the assembly is complete, as specified in the step-by-step instructions.
Operation
To operate, attach the de-thatcher to the vehicle hitch using the provided pin. Lower the de-thatcher into the operating position using the lift handle. Adjust the tine shield so it is level and both front and rear spring tines are in contact with the ground. For best results, use a criss-cross pattern on your lawn. Vary the vehicle speed to achieve the best de-thatching action.
Maintenance
Regular maintenance is essential for longevity. Clean the tines and rinse/dry the unit after each use. Periodically check all fasteners for tightness, as vibration can cause them to loosen. Grease the axle and wheel bearing area when needed. Store the unit in a dry location, preferably indoors during winter months. If storing outside, keep the tongue higher than the back of the cart to prevent moisture accumulation.
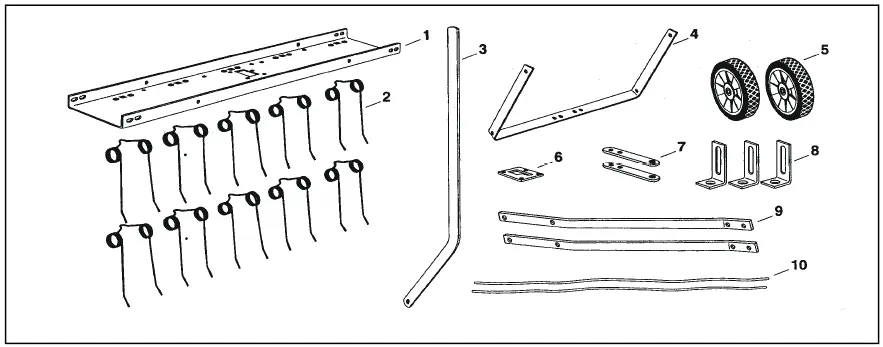
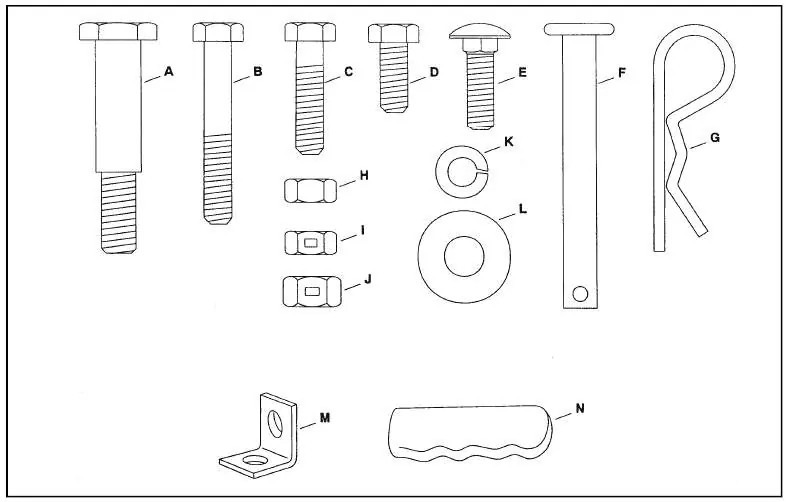
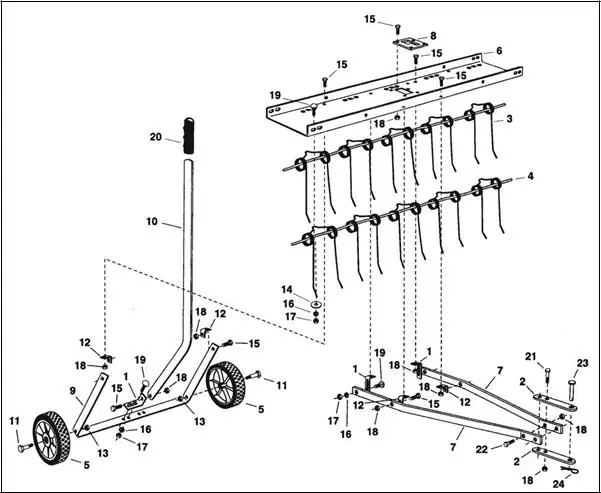
Parts Diagram
The manual includes a comprehensive parts diagram and list identifying all 24 components, including the tine shield, hitch arms, wheels, and various hardware (bolts, nuts, washers). If parts are missing or damaged, contact the Spares Team at 01793 333212.
Practical help
Common problems
De-thatcher jumping during use
Add extra weight to the tine shield. Concrete patio blocks are recommended due to their low profile; secure them with rubber tie-down straps or wire.
Uneven de-thatching
Adjust the tine shield level. Ensure both the front and rear spring tines are in contact with the ground.
Parts missing or damaged
Do not operate the machine. Contact the Spares Team at 01793 333212 for assistance.
Before use
- Check all bolts, nuts, and screws for tightness.
- Ensure towing vehicle is suitable (Lawn/Garden Tractor or ATV).
- Verify tire pressure is 25 PSI.
- Ensure all safety labels are present and legible.
- Clear the area of bystanders and pets.
- Ensure the hitch pin is secured with an R-pin.
Specs in practice
- Working Width
- 48 inches (122cm) coverage area.
Images and diagrams
- Assembly diagrams illustrate the step-by-step connection of the hitch arms, axle brackets, and tine shield.
- The parts diagram identifies all 24 components for maintenance and repair.
Model compatibility
- Designed for domestic gardens only.
- Do not tow on public highways.
- Use only with recommended vehicles (Lawn/Garden Tractors and ATVs).

Manual page author
David Miller
Documentation analyst
Organizes user manual content into clear summaries, with attention to model details, product context, and everyday usability.