Home Appliances / Coffee Equipment
User Manual for Hamilton Beach 2-Way FlexBrew Coffee Maker
Comprehensive user guide for the Hamilton Beach 2-Way FlexBrew Coffee Maker. Includes setup, brewing instructions for carafe and single-serve, cleaning procedures, and troubleshooting tips.
Quick answers from the manual
Quick answer
- The Hamilton Beach 2-Way FlexBrew is a dual-function coffee maker that brews single-serve packs or ground coffee on one side and a full carafe on the other. It features programmable brewing for the carafe side and automatic shutoff. p. 1, 4
Key actions
- Brewing Single-Serve p. 5, 6
- Brewing Carafe p. 7
- Cleaning Clogged Needle p. 9
First start
- Wash all removable parts in hot, soapy water. Brew one cycle with water on each side and discard water. p. 4
Problems and fixes
Coffee maker will not brew
Clean the piercing needle, descale the unit, or ensure the reservoir has sufficient water.
p. 10, 11Maintenance and reset
- Clean the unit at least once a month using white vinegar. p. 9
Technical specifications
| Parameter | Value | Meaning | Pages |
|---|---|---|---|
| Single-Serve Max Water | 10 oz (296 ml) for packs / 14 oz (414 ml) for grounds | Maximum water capacity for single-serve brewing. | p. 5, 6 |
Where to find it in the PDF
- Parts and Features p. 4
- Brewing Instructions p. 5, 6, 7
- Care and Cleaning p. 9
Table of contents
Manual images
Click an image to enlargeQuick guide from the manual
The Hamilton Beach 2-Way FlexBrew Coffee Maker allows you to brew using either a full carafe or single-serve packs/ground coffee. Before first use: Wash all removable parts in hot, soapy water, rinse, and dry. Brew one cycle with water on each side and discard the water.

Parts and Features
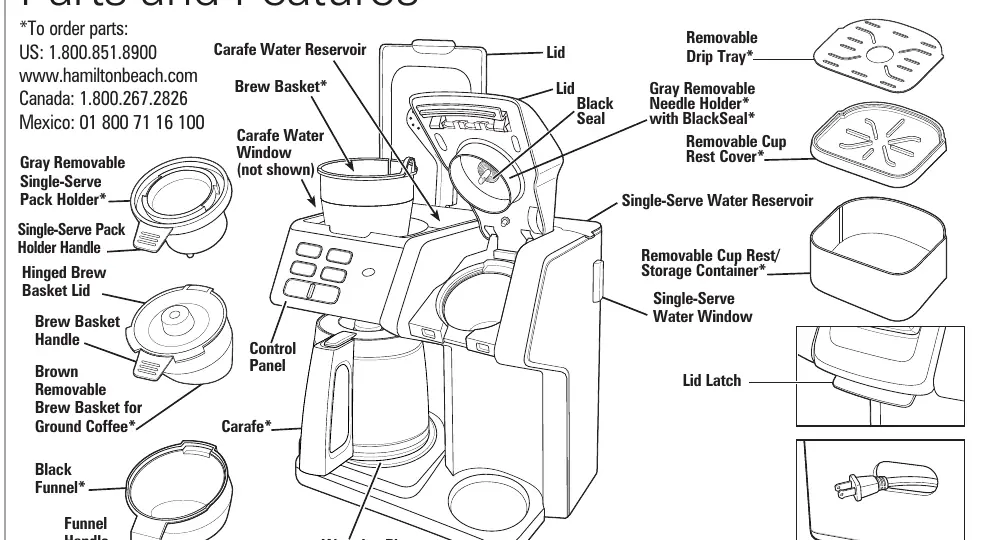
- Carafe Side: Includes carafe, brew basket, and warming plate.
- Single-Serve Side: Includes removable pack holder, funnel, and cup rest.
- Control Panel: Used for programming, brew strength selection, and starting the brew cycle.
Brewing Single-Serve
You can use single-serve packs or ground coffee on the single-serve side.
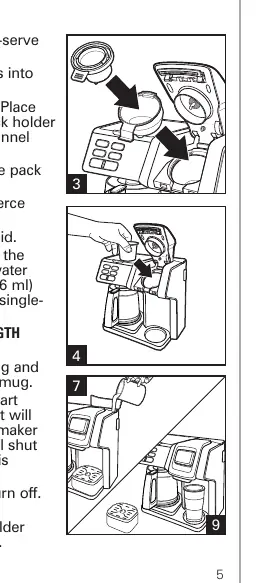
- Using Packs: Insert the funnel and pack holder. Place the pack in the holder. Fill the reservoir with water (max 10 oz). Press the single-serve button, select strength, and press BREW NOW.
- Using Ground Coffee: Use the brown removable brew basket. Add ground coffee (max 3 tablespoons). Place in the funnel, fill reservoir with water (max 14 oz), and press BREW NOW.
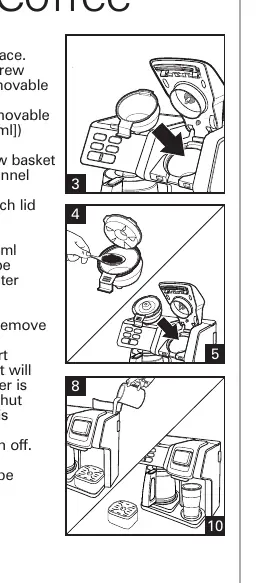
Brewing Carafe
The carafe side is designed for brewing up to 12 cups.
- Place a paper filter in the carafe brew basket and add coffee grounds (1 tablespoon per cup).
- Fill the carafe reservoir with cold water.
- Place the carafe on the warming plate.
- Select brew strength and press BREW NOW.
- Pause and Serve: You can remove the carafe during brewing to pour a cup; the flow will stop automatically. Replace within 20 seconds to prevent overflow.
Programming
Programming is available for the Carafe side only.
- Set the current time using the SET TIME button.
- Press and hold the PROG button.
- While holding PROG, use SET TIME to set the desired brewing hour and minutes.
- Release PROG and press it again to activate the automatic brew.
Care and Cleaning

- Routine Cleaning: Clean at least once a month (weekly for hard water areas) using white vinegar. Pour vinegar into the reservoir, run a partial cycle, let sit for 30 minutes, then finish the cycle. Run 2-3 cycles of fresh water to rinse.
- Clogged Needle: If the single-serve side is not dispensing, the needle may be clogged. Remove the gray needle holder and use a small paper clip to clear the piercing needle.
Troubleshooting
- Overflow: Ensure you are not exceeding the maximum water or coffee ground limits. Do not lift the lid during brewing.
- Coffee Tastes Bad: Ensure the machine is clean and you are using fresh, quality coffee and filtered water.
- Unit Won't Turn On: Check that the unit is plugged in, the reservoir has water, and the carafe is properly positioned on the warming plate.
Manufacturer information
Hamilton Beach
Practical help
Common problems
Coffee maker will not brew or dispense
Check if the piercing needle is clogged (clean with paper clip), ensure the reservoir has enough water (min 6 oz), or perform a cleaning cycle if mineral deposits have formed.
Coffee overflows from brew basket
Reduce the amount of ground coffee (max 3 tablespoons for single-serve) or ensure you are not using too finely ground coffee.
Water on counter under unit
Do not overfill the reservoir (max 14 oz for single-serve). Ensure the mug is placed correctly to prevent dribbling.
Coffee single-serve pack bursts
This is often due to manufacturing variability in the packs. Try a different brand.
Before use
- Wash all removable parts in hot, soapy water.
- Rinse and dry all parts.
- Brew one cycle with water only on the carafe side.
- Brew one cycle with water only on the single-serve side.
- Discard all water from the initial cycles.
Specs in practice
- Single-Serve Water Capacity
- Maximum 10 oz (296 ml) for packs; 14 oz (414 ml) for ground coffee.
- Carafe Capacity
- Up to 12 cups.
- Automatic Shutoff
- The carafe side shuts off automatically two hours after the brew cycle begins.
Images and diagrams
- The parts diagram identifies the carafe, brew basket, single-serve pack holder, and water reservoirs.
- The needle cleaning diagram shows how to remove the gray needle holder by turning it from the locked to the unlocked icon.
Model compatibility
- Use only the carafe provided with the appliance.
- Do not use hot water in the reservoir.
- Do not use creamer or nondairy creamer in the reservoir.
- Auto-start feature is for the Carafe side only.

Manual page author
David Miller
Documentation analyst
Organizes user manual content into clear summaries, with attention to model details, product context, and everyday usability.