Tools / Power Tools
Handling Instructions for Hikoki C 12RSH3 Slide Compound Miter Saw
Quick guide for the Hikoki C 12RSH3 Slide Compound Miter Saw, covering installation, safety, cutting procedures, and maintenance.
Table of contents
Quick guide from the manual
This document provides essential instructions for the safe and efficient operation of the Hikoki C 12RSH3 Slide Compound Miter Saw. It covers installation, safety precautions, various cutting modes (miter, bevel, compound, and slide cutting), and routine maintenance. Always ensure the tool is securely mounted on a level surface before use and wear appropriate personal protective equipment.
Safety instructions
- Always wear eye and hearing protection.
- Keep hands at least 100 mm away from the saw blade.
- Never cross your hands over the cutting line.
- Ensure the workpiece is stationary and clamped against the fence and table.
- Let the blade reach full speed before contacting the workpiece.
- If the blade jams, turn the tool off immediately and wait for all moving parts to stop before clearing the material.
Installation
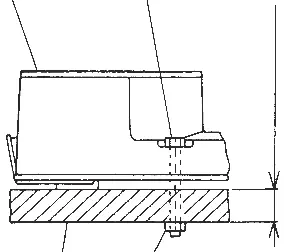
The machine must be fixed to a level, horizontal workbench. Use 8 mm diameter bolts suitable for the thickness of your workbench (bolt length should be at least 40 mm plus the bench thickness). Ensure the base holder is adjusted so its bottom surface contacts the bench.
Cutting procedures
- Press cutting: For narrow workpieces, slide the hinge to the holder and tighten the slide securing knob.
- Slide cutting: For wide workpieces (up to 312 mm), loosen the slide securing knob to allow the cutting head to move freely.
- Miter/Bevel/Compound cutting: Use the respective locking handles to set the desired angles. Always verify the angle settings before cutting.
- Groove cutting: Adjust the 6 mm depth adjustment bolt to set the desired cutting depth.
Maintenance and inspection
- Regularly inspect all mounting screws and tighten if loose.
- Check the carbon brushes periodically and replace them when worn to the limit line.
- Lubricate sliding surfaces (hinge, holder, vise assembly) once a month.
- Keep the lower guard clean and ensure it moves smoothly.
- Clean the machine and dust port using dry air.
Manufacturer information
HiKOKI
Practical help
Common problems
Tool suddenly stops
The tool may be overburdened or the motor has automatically stopped to prevent failure. If the trigger was held for 5 minutes or more, switch the power on again.
Cannot tilt the tool
Ensure the bevel lock handle is fully loosened. If tilting to the right, ensure the set pin (A) has been pulled out.
Saw blade is dull or cutting poorly
Check for worn or missing teeth, ensure the bolt is tight, and verify the blade is installed in the correct direction.
Before use
- Ensure the power source matches the nameplate requirements.
- Verify the machine is securely fixed to a level workbench.
- Check that the lower guard moves smoothly.
- Ensure the workpiece is free of foreign objects like nails.
- Verify the saw blade is sharp and correctly installed.
Specs in practice
- No load speed
- 4000/min, the rotational speed of the blade when not cutting.
- Saw blade diameter
- 305 mm external diameter; do not use blades of other sizes.
Images and diagrams
- Fig. 4: Shows the bolt pattern and mounting requirements for fixing the saw to a workbench.
- Fig. 8: Illustrates the lower guard, which must move smoothly to protect the operator.
- Fig. 14: Shows the slide securing knob used to lock the carriage for press cutting.
Model compatibility
- Designed for cutting wood and aluminum sash only.
- Do not use with abrasive cut-off wheels for ferrous metals or masonry.
- Use only HiKOKI-recommended saw blades.

Manual page author
Michael Turner
Technical manual editor
Reviews PDF manuals for structure, safety notes, and practical product details so readers can find the right information quickly.