Tools / Grinding Tools
Operating instructions for Hilti DCG 230-D / DAG 230-D angle grinder
Comprehensive operating guide for the Hilti DCG 230-D and DAG 230-D angle grinders. Includes safety instructions, assembly, disc installation, operation, maintenance, and troubleshooting.
Quick answers from the manual
Quick answer
- The Hilti DCG 230-D and DAG 230-D are professional angle grinders for cutting and grinding metal and mineral materials. They feature ATC (Active Torque Control) and a restart interlock for safety. p. 6, 7, 8
Key actions
- Fitting the guard p. 15
- Fitting the disc p. 16
- Adjusting the grip p. 17
Problems and fixes
Tool doesn't start
Check power supply, supply cord, carbon brushes, or restart interlock.
p. 18Show 3 more answers Show less
Maintenance and reset
- Clean air vents regularly with a dry brush. p. 18
Technical specifications
| Parameter | Value | Meaning | Pages |
|---|---|---|---|
| Rated voltage | 230 V / 110 V / 127 V | Operating voltage | p. 10 |
| Rated speed | 6,500/min | No-load speed | p. 10 |
| Weight (DCG 230-D) | 6.6 kg | Tool weight | p. 10 |
| Weight (DAG 230-D) | 5.9 kg | Tool weight | p. 10 |
Where to find it in the PDF
- Parts and controls p. 2
- Technical data p. 10
- Safety instructions p. 11, 12, 13, 14
Table of contents
Manual images
Click an image to enlargeQuick guide from the manual
The Hilti DCG 230-D and DAG 230-D are professional angle grinders designed for cutting and grinding metal and mineral materials. Important: Always read the full safety instructions before use. Ensure the side handle is fitted for all types of work. The tool must be connected to a power supply matching the voltage on the identification plate. Always wear appropriate personal protective equipment (eye protection, hard hat, ear protection, gloves, breathing protection).
Product description
The power tool features an on/off switch (hold to run), a vibration-absorbing grip, and a pivotable hoop grip. It includes advanced safety features such as ATC (Active Torque Control), which detects disc sticking and switches the tool off, and a restart interlock, which prevents the tool from starting automatically after a power interruption.
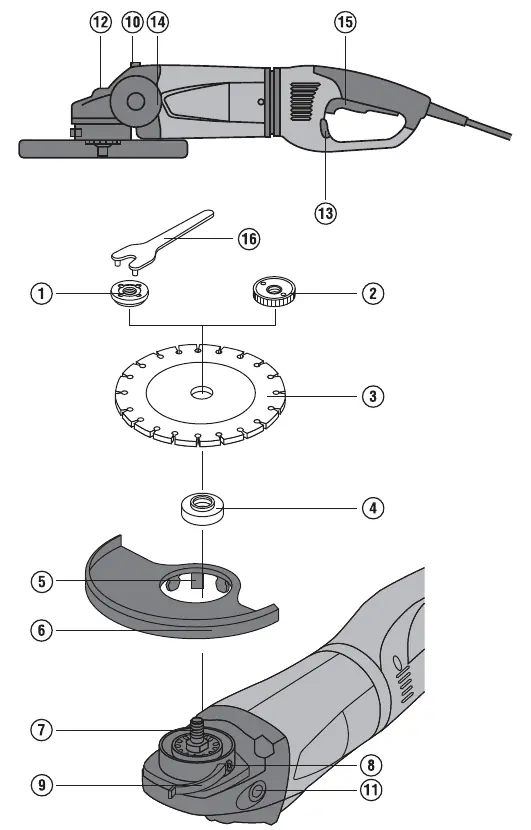
Assembly and installation
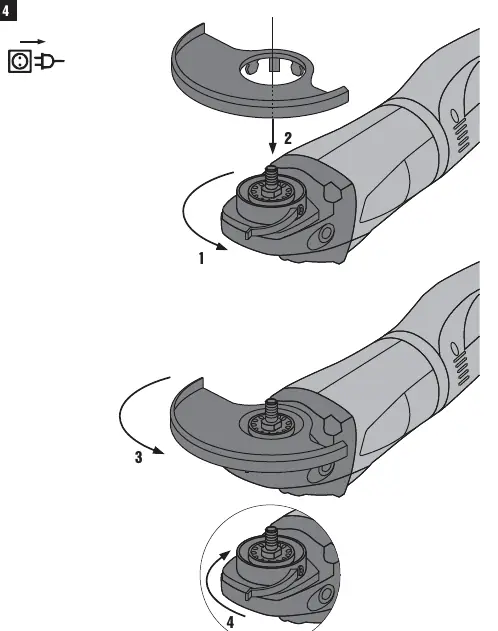
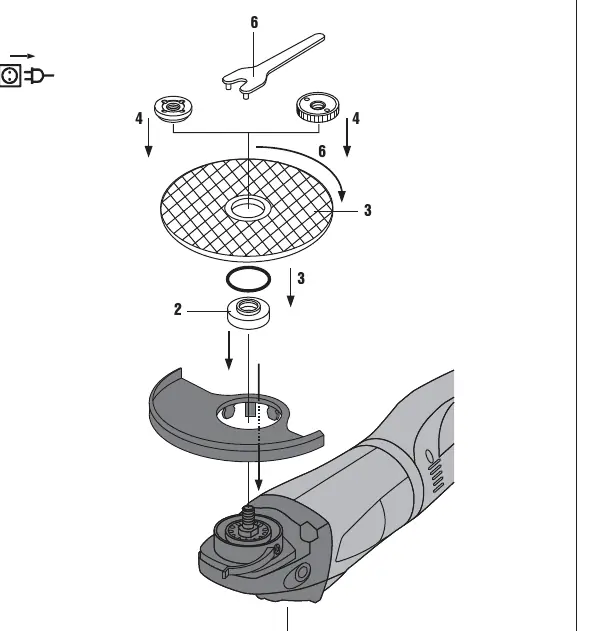

- Side handle: Must be fitted for all types of work; can be screwed onto the right or left side.
- Guard: The closed side of the guard must always face the operator. To fit, release the clamping lever, engage the keyed locating lug in the recess, rotate to the desired position, and secure by closing the lever.
- Disc installation: Ensure the disc speed rating is at least 6500/min. Clean the clamping flange and fit it onto the drive spindle. Fit the insert tool, then screw on the clamping nut. Use the wrench to tighten while holding the spindle lockbutton.
- Kwik-Lock nut: An optional quick-release nut that requires no tools for changing discs. Ensure the arrow on the nut is within the index marks.
Operation
To switch on, slide the on/off switch forward and press it as far as it will go. To switch off, release the switch. When cutting, apply moderate feed pressure and do not tilt the disc. For rough grinding, maintain an angle of 5° to 30° with the working surface.
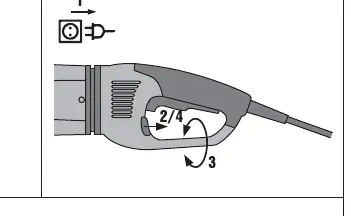
Care and maintenance
Regularly clean the air vents with a dry brush to prevent dust accumulation, which can cause electrical hazards. Do not use spray or running water for cleaning. If the tool starts with a jolt, the electronic control unit may be defective; have it repaired by Hilti Service. Check the supply cord regularly for damage.
Troubleshooting
If the tool does not start, check the power supply, the supply cord/plug, or if the carbon brushes are worn. If the tool does not achieve full power, check if the extension cord conductor cross-section is adequate or if there is a malfunction in the ATC system.
Manufacturer information
Hilti Corporation
Practical help
Common problems
Tool does not start
Check power supply, inspect supply cord/plug, check if carbon brushes are worn, or if the electronic restart interlock is active (switch off and on again).
Tool does not achieve full power
Ensure the extension cord has an adequate conductor cross-section or check for a malfunction in the ATC system.
Before use
- Check disc condition (no cracks, chips, or damage)
- Ensure the guard is securely fitted with the closed side facing the operator
- Ensure the side handle is fitted
- Verify the power supply voltage matches the tool's identification plate
- Wear required PPE (eye, ear, head, hand, and breathing protection)
Show more Show less
Specs in practice
- Max disc diameter
- 230 mm
- Max disc thickness
- 8 mm
- Peripheral speed
- 80 m/sec
Images and diagrams
- Page 2: Exploded view of parts including clamping nut, flange, guard, and spindle.
- Page 3: Guard installation procedure.
- Page 4: Disc installation procedure.
- Page 5: Grip adjustment procedure.
Model compatibility
- Designed for metal and mineral materials.
- Do not use for materials hazardous to health (e.g., asbestos).
- Do not use water or liquid coolants.

Manual page author
Michael Turner
Technical manual editor