General / Other Manuals
Hilti NCR 120-22 and NCR 120C-22 Crimping Tool User Guide
Quick guide for the Hilti NCR 120-22 and NCR 120C-22 cordless electro-hydraulic crimping tools, covering setup, operation, safety, and troubleshooting.
Table of contents
Quick guide from the manual
This document provides essential operating instructions for the Hilti NCR 120-22 and NCR 120C-22 cordless electro-hydraulic crimping tools. These tools are designed for crimping copper (Cu) or aluminum (Al) connection materials. Always perform a risk assessment before starting work, especially when working near electrical installations.
Product Overview
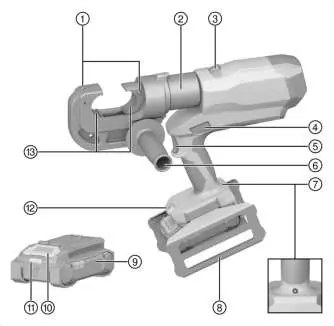
The tool features a crimping head, control switch, piston return switch, and a side handle. The NCR 120C-22 model includes a specialized two-layer PVC-coated crimping head for added safety.
Operation
Inserting/Removing the Battery: Ensure the tool is switched off before inserting the battery. Push the battery into the tool until it clicks audibly. To remove, press the battery release button.
Starting Lock: The tool features an optional starting lock. When activated, the control switch must be pressed twice to initiate the crimping process. To toggle this, remove the battery, press and hold the control switch, insert the battery, and release the switch.
Crimping Procedure: Ensure the crimping dies are correctly positioned. Turn the crimping head to the desired position, insert the connection material, and press and hold the control switch until the piston retracts. If the piston does not retract, use the manual return switch.
Safety and Maintenance
Always wear personal protective equipment. Inspect the crimping head coating before every use; if the red inner layer is visible or warning symbols are illegible, do not use the tool. Clean air vents with a dry, soft brush. Do not use silicone-based cleaning agents. Hilti recommends an overhaul by Hilti Service after 15,000 crimping operations.
Troubleshooting
The battery status indicator provides feedback on charge levels and potential faults. If the red LED flashes or lights up continuously, consult the troubleshooting table in the manual or contact Hilti Service.
Manufacturer information
Hilti Corporation
Practical help
Common problems
Battery runs down faster than usual
Allow the battery to warm up slowly to room temperature.
Battery does not engage with an audible click
Clean the retaining lugs on the battery and reinsert.
Red LED lights continuously with warning tone
Technical problem; contact Hilti Service.
Red LED flashes at long intervals with warning tone
Crimping pressure not achieved; check application and crimped part.
Before use
- Inspect the black coating on the crimping head for damage or aging.
- Ensure the locking pin is fully inserted and engaged.
- Check that the battery is fully charged and clean.
- Verify that the correct crimping dies are installed and aligned.
- Ensure the work area is free of live cables if possible, or use appropriate PPE.
Specs in practice
- Max. crimping force
- 120 kN
- Crimping time
- 8 to 9 seconds
- Max. crimping capacity
- 400 mm² for both Copper (Cu) and Aluminum (Al)
Images and diagrams
- 1: Crimping-die release button
- 2: Crimping head
- 4: Piston return switch
- 5: Control switch
Model compatibility
- Use only Hilti Nuron Li-ion batteries of the B 22 series.
- Use only Hilti chargers approved for the B 22 series.

Manual page author
Michael Turner
Technical manual editor
Reviews PDF manuals for structure, safety notes, and practical product details so readers can find the right information quickly.