Electronics / Televisions
Hisense Smart Screen Photo Wall Setup Guide
A step-by-step guide on how to upload and display personal photos on your Hisense smart screen device using the Photo Wall feature via Bluetooth.
Table of contents
Manual images
Jump to the sectionUnderstanding the Photo Wall Feature
The Photo Wall feature on your Hisense smart screen allows you to personalize your device by displaying your own images. This functionality transforms your screen into a digital frame, making it easy to showcase your favorite memories directly on the interface. The process involves a simple transfer method using Bluetooth connectivity from your mobile device to the screen.
Preparing for Photo Transfer
Before you begin, ensure that your mobile device has Bluetooth enabled and is ready to pair. The smart screen acts as a receiver for your image files. It is important to note that this feature is designed for quick and efficient photo sharing, allowing you to manage your display content without needing complex network configurations or external storage devices.
Step-by-Step Setup Process
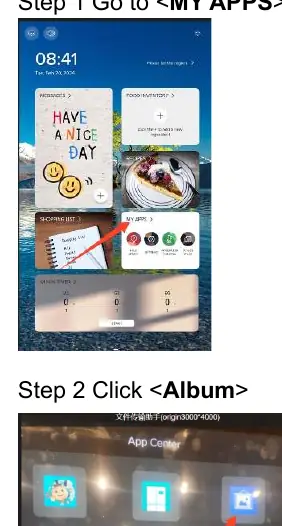
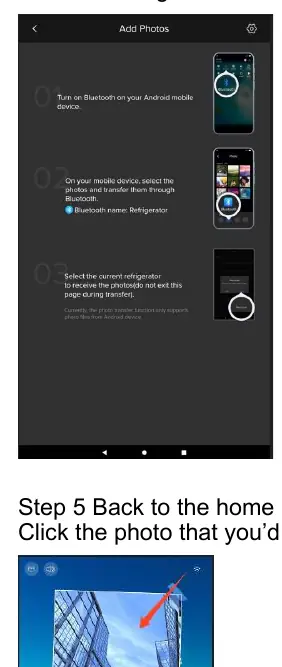
To start using the Photo Wall, navigate to the MY APPS section on your home screen. From there, locate and open the Album application. Inside the Album, you will find a plus button which initiates the upload process. The screen will display specific instructions for the Bluetooth connection. On your smartphone, search for the device named Refrigerator and initiate the transfer of your chosen photos. Once the transfer is complete, the images will be stored locally on the device.
Customizing Your Display
After your photos have been successfully uploaded, you can easily update the images shown on your Photo Wall. Navigate back to the home screen and swipe to the second page where the Photo Wall widget is located. Tap on the specific photo you wish to replace. A list of your uploaded images will appear, with the most recently added photos located at the bottom of the list. Simply select the desired image to confirm the change. Your new photo will immediately be applied to the display, completing the customization process. This intuitive system ensures that you can refresh your screen's appearance whenever you like, keeping your home interface fresh and personalized with your latest captures.
Manufacturer information
Hisense
Practical help
Common problems
Photo not appearing in the list
Ensure the Bluetooth transfer was completed successfully and check the bottom of the photo list in the Album app.
Cannot find the device during Bluetooth pairing
Verify that the device name Refrigerator is visible on your phone and that Bluetooth is active on both devices.
Before use
- Ensure the smart screen is powered on and connected to the home network.
- Enable Bluetooth on your mobile device.
- Ensure you have the photos you wish to transfer saved on your phone.
- Verify that the Album app is accessible via the MY APPS menu.
Images and diagrams
- The interface uses a standard grid-based Album layout for managing images.
- The plus icon is the primary trigger for adding new content to the library.
- The home screen swipe gesture is required to access the secondary page where the Photo Wall widget resides.
Model compatibility
- Currently, the photo transfer function only supports photo files from Android devices.

Manual page author
Emily Carter
User documentation editor
Prepares concise manual descriptions and highlights the most useful setup, operation, and maintenance information for readers.