Electronics / Projectors
Hisense 100L5H Laser TV Ultra Short Throw Projector User Guide
Comprehensive setup and operation guide for the Hisense 100L5H Laser TV, covering installation, safety, maintenance, and troubleshooting.
Table of contents
Manual images
Jump to the sectionProduct Overview
The Hisense 100L5H is an Ultra Short Throw Laser TV designed to provide a cinematic viewing experience. This device utilizes advanced laser technology to project high-quality 4K images onto a dedicated screen. It is essential to handle the unit with care, as it is a precision optical device.

Safety Information
Important: This device is a Class 1 Laser Product. Never look directly into the lens while the device is powered on, as the laser light can cause permanent eye damage. The unit features an eye protection sensor that shuts down the projector if it detects proximity to the lens. Keep the air vents clear of obstructions to prevent overheating, and do not place any objects on top of the device.
Setup and Installation
For optimal performance, ensure the Laser TV is positioned on a stable, level surface parallel to the screen. Proper ventilation is critical; maintain at least 20 cm of space on the sides and 5 cm above the unit. Connect your external devices, such as cable boxes, DVD players, or gaming consoles, using the provided HDMI ports. The device also supports USB media playback and Ethernet connectivity for smart features.
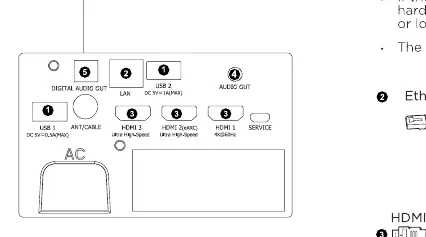
Image Adjustment
The 100L5H includes geometric correction tools to ensure the projected image perfectly aligns with your screen. Use the leveling feet to adjust the tilt and rotation of the projector. If the image is not rectangular or does not fit the screen borders, use the built-in geometric correction menu to adjust the corners and midpoints. For the best results, use the automatic geometric correction feature via the mobile app.
Remote Control and Operation
The included remote control provides quick access to all system functions, including input selection, volume, and smart TV navigation. To pair the remote, keep it within 10 feet of the unit and hold the back and home buttons simultaneously for at least 3 seconds. The remote operates via infrared, requiring a clear line of sight to the receiver on the front of the unit.
Maintenance
Keep the lens clean by using a professional optical cleaning kit. Never touch the lens with your fingers. If the exterior becomes dusty, wipe it gently with a soft, dry cloth. Do not use chemical cleaners or liquids on the device. If you encounter issues, such as no sound or picture, verify all cable connections and ensure the unit is not in standby mode.
Manufacturer information
Hisense
Practical help
Common problems
No sound or picture
Check if the power cord is connected to a live outlet and press the power button on the remote to exit standby mode.
Black and white picture
Unplug the Laser TV from the power outlet, wait 60 seconds, and plug it back in.
Distorted or wavy picture
Move nearby electrical appliances away from the Laser TV or try a different power outlet.
Remote control not working
Ensure the remote has fresh batteries installed correctly and that it is within range of the unit.
Clicking sound from cabinet
This is normal behavior caused by the expansion and contraction of the cabinet due to temperature changes.
Before use
- Ensure two people are available to move the unit safely.
- Verify the surface is level and stable.
- Check that all cables are securely connected.
- Ensure the lens is clean and free of obstructions.
- Confirm the area around air vents is clear for ventilation.
- Install fresh batteries in the remote control.
- Ensure the screen is properly mounted and level.
Specs in practice
- Screen Resolution
- 3840 x 2160 pixels, providing native 4K Ultra HD image quality.
- Connectivity
- Built-in 2x2 dual-band wireless and multiple HDMI/USB ports for external devices.
- Power Consumption
- 350W during standard operation.
- Operating Temperature
- Must be operated between 5°C to 35°C (41°F to 95°F).
Images and diagrams
- The front panel contains the remote receiver and power indicator.
- The top surface features the lens, eye protection sensor, and power button.
- The rear panel houses all input/output ports including HDMI, USB, and Audio Out.
- Air vents are located on both sides of the unit for cooling.
- The leveling feet are used to adjust the image geometry on the screen.
Model compatibility
- USB ports support memory sticks for media playback; max current 1A.
- HDMI ports support high-speed connections for external AV devices.
- Audio Out supports external speakers or amplifiers via adapter.
- Compatible with standard VHF/UHF antennas for broadcast TV.

Manual page author
Emily Carter
User documentation editor
Prepares concise manual descriptions and highlights the most useful setup, operation, and maintenance information for readers.