Furniture / Sofas & Couches
Installation Guide for Homcom 2-Seater Small Sofa Bed 839-214
A comprehensive installation and usage guide for the Homcom 2-Seater Small Sofa Bed (839-214). This manual includes a detailed parts list, step-by-step assembly instructions, and essential safety and maintenance guidelines.
Quick answers from the manual
Quick answer
- This manual provides assembly and usage instructions for the Homcom 2-Seater Small Sofa Bed (839-214). It covers parts identification, step-by-step assembly, and safety precautions. p. 1, 9, 10, 11
Key actions
- Assemble the sofa bed p. 9, 10, 11, 12
- Adjust the backrest angle p. 12
First start
- Ensure the assembly area is clean and dry, and verify all parts are present before beginning. p. 3
Maintenance and reset
- Clean with a soft fabric and check the seating structure regularly. p. 3
Where to find it in the PDF
- Parts List p. 2, 9
- Assembly Steps p. 9, 10, 11, 12
Table of contents
Manual images
Click an image to enlargeImportant Information
This product is intended for domestic use only. Before beginning assembly, ensure you have a clean, dry, and flat area to work on. Verify that all parts listed in the packing details are present and undamaged. The manufacturer is not responsible for damages caused by improper installation.
Parts List
The product is delivered in two boxes. Ensure you have all components before starting:
- Legs: A (x1), B (x1), C (x4)
- Sofa Sections: G (Left), F (Right)
- Armrests: I (Left), H (Right)
- Hardware Kit: Includes bolts (M6*25) and an Allen key (E).
Assembly Instructions
Follow these steps to assemble your sofa bed:
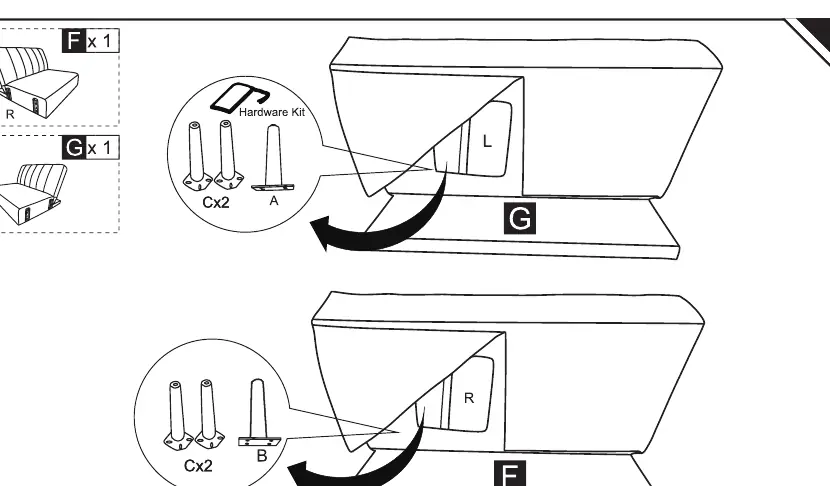

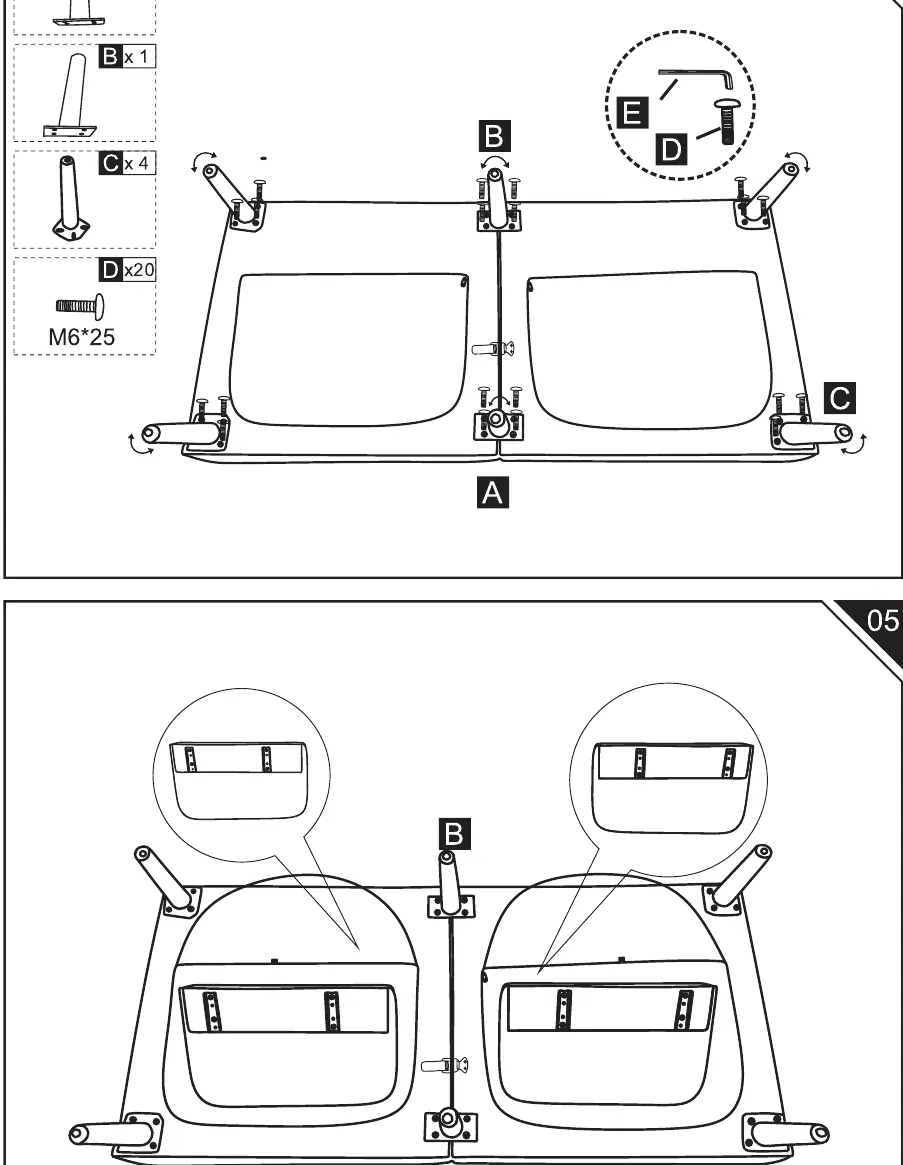
- Step 01: Attach the legs (A, B, C) to the bottom of the sofa sections (G, F) using the provided bolts.
- Step 02-03: Align the two sofa sections (G and F) and connect them securely.
- Step 04: Ensure all legs are tightened using the Allen key (E) and bolts (D).
- Step 05: Verify the stability of the legs and the connection between the two main sections.
- Step 06: Attach the armrests (H, I) to the sides of the sofa.
Usage and Adjustment
The sofa bed features an adjustable backrest. You can set the angle to 100°, 135°, or 180° (flat) to suit your needs.
Safety and Maintenance
- Safety: Keep away from open flames and heat sources. Avoid overloading the sofa. Beware of crushing and cutting hazards during assembly.
- Maintenance: Clean the fabric with a soft cloth. Check the structure regularly to ensure stability.
- Storage: Store in a clean, dry place to prevent mold.
- Repairs: If the sofa is equipped with powered height adjustments, repairs must only be performed by qualified personnel.
Manufacturer information
HOMCOM
Practical help
Common problems
Sofa is unstable
Ensure the sofa is placed on a flat, level floor and that all leg bolts are fully tightened.
Missing parts
Verify all parts against the packing list on page 2 before starting assembly. If parts are missing, contact customer support.
Before use
- Prepare a clean and dry mounting area.
- Verify that the product is not damaged.
- Check that none of the pieces are missing.
- Ensure the floor surface is flat and stable.
Images and diagrams
- Step 01: Attaching legs to the base sections.
- Step 02-03: Connecting the two main sofa sections.
- Step 06: Attaching the armrests to the main frame.
- Step 07: Adjusting the backrest angle.
Model compatibility
- Intended for domestic use only.
- Not suitable for outdoor use or exposure to weather.

Manual page author
David Miller
Documentation analyst
Organizes user manual content into clear summaries, with attention to model details, product context, and everyday usability.