Furniture / Kitchen Furniture
Installation Guide for Homcom 2-Tier Side Table with Drawer 838-130
Step-by-step assembly instructions for the Homcom 2-Tier Side Table with Drawer (Model 838-130). Includes parts list, hardware guide, and wall-mounting safety instructions.
Quick answers from the manual
Quick answer
- This manual provides assembly instructions for the Homcom 2-Tier Side Table (838-130). It includes a parts list, step-by-step assembly diagrams, and instructions for installing the anti-dumping safety belt. p. 1, 4, 5, 6
Key actions
- Assemble the drawer p. 5
- Assemble the main frame p. 6
- Secure the table to the wall p. 9
Where to find it in the PDF
- Assembly Instructions p. 5, 6, 7, 8
Table of contents
Quick guide from the manual
This guide covers the assembly of the Homcom 2-Tier Side Table. Ensure you have all parts listed before starting. Assembly requires approximately 1 hour. Always use the provided anti-dumping belt to secure the furniture to the wall for safety.
Parts and hardware
The package includes panels numbered 1-11 and hardware labeled A-J. Verify all components are present before beginning assembly.
Assembly instructions
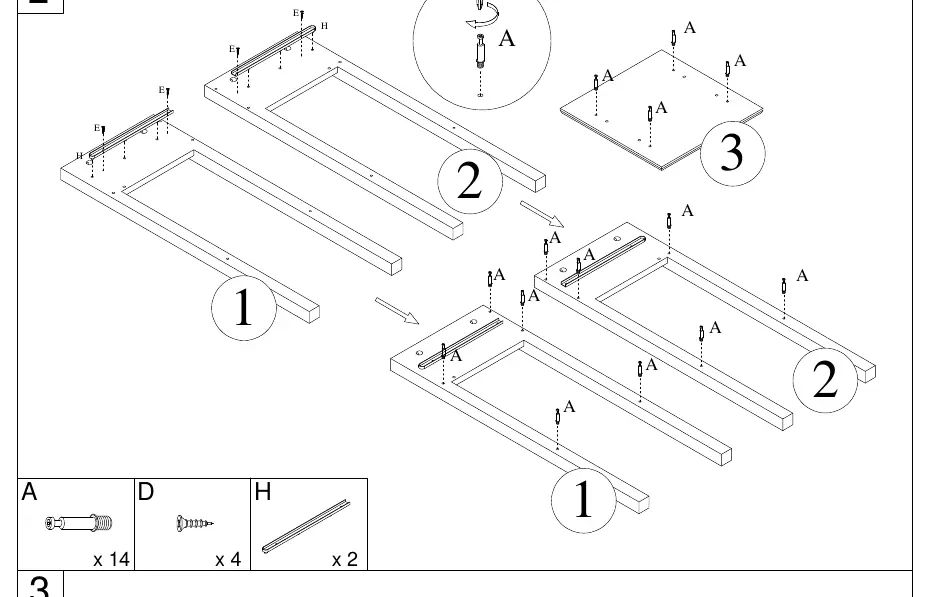
Step 1: Drawer assembly
Assemble the drawer using panels 7, 8, 9, 10, 11 and hardware A, B, E, F, G. Ensure cam locks (B) are tightened correctly.
Step 2: Frame assembly
Assemble the main frame using panels 1, 2, 3, 4, 5, 6 and hardware A, B, C, D, H. Connect the side panels and shelves using cam locks (B) and wooden dowels (C).
Step 3-7: Final assembly
Continue connecting the frame components as shown in the diagrams. Attach the drawer to the frame using hardware I. Ensure all cam locks are fully tightened.
Safety instructions
The anti-dumping belt is included to fix the product to the wall. It is recommended for stability. If installing on a solid wall, use expansion screws. For wooden walls, use self-tapping screws. Do not overtighten the screws.
Manufacturer information
HOMCOM
Practical help
Common problems
Drawer not fitting
Ensure cam locks are tightened correctly and panels are aligned.
Unstable table
Check that all cam locks are fully tightened and the anti-dumping belt is installed if necessary.
Before use
- Verify all parts (1-11) and hardware (A-J) are present.
- Clear a workspace of at least 1 hour.
- Have a screwdriver ready (not included).
Images and diagrams
- Cam lock and quickfit: Ensure the quickfit head is in the center of the cam lock before tightening.
- Anti-dumping belt: Use the provided strap to secure the table to the wall to prevent tipping.
Model compatibility
- Suitable for solid walls and wooden walls (requires different screw types).

Manual page author
David Miller
Documentation analyst
Organizes user manual content into clear summaries, with attention to model details, product context, and everyday usability.