Home / Seasonal Decorations
User Manual for Home Decorators Collection 22PG90175 Christmas Tree
Quick guide for the Home Decorators Collection 22PG90175 Christmas Tree. Includes assembly instructions, light controller operation, demo mode settings, lamp replacement, and troubleshooting.
Quick answers from the manual
Quick answer
- This manual covers the assembly, operation, and maintenance of the 22PG90175 Christmas Tree, including light controller settings and demo mode deactivation. p. 1, 2, 3
Key actions
- Assemble the tree p. 1
- Deactivate Demo Mode p. 3
- Replace Battery p. 2
First start
- Assemble tree, connect sections, plug into wall, and deactivate Demo mode. p. 1, 3
Show 3 more answers Show less
Problems and fixes
Tree does not light
Check connections, wall plug, foot pedal, and bulbs.
p. 3Maintenance and reset
- Deactivate Demo mode by holding the FUNCTION button for 5 seconds. p. 3
Where to find it in the PDF
- Assembly p. 1
- Operation & Maintenance p. 2
- Safety & Troubleshooting p. 3
Table of contents
Manual images
Click an image to enlargeQuick guide from the manual
This Christmas tree features a Quick Set design for fast assembly and a dual-color light controller. The tree is preset to Demo mode upon first use; you must deactivate this mode to access all light functions. Ensure you use only the provided power adapter to avoid damage.
Assembly
Follow these steps to assemble your tree:
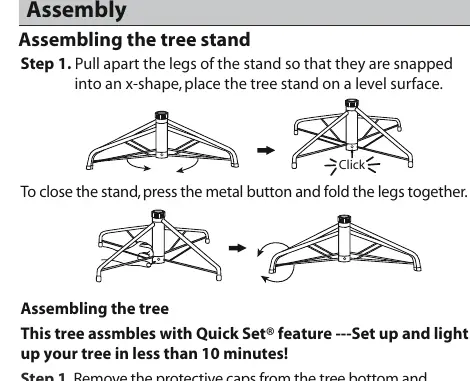
- Stand Setup: Pull the legs of the stand apart into an x-shape and place on a level surface.
- Tree Assembly: Remove protective caps from the pole bottom. Insert the pole into the stand.
- Sectioning: Insert upper tree sections into the lower sections until the tree top is attached.
- Shaping: Work from the bottom to the top. Fan out branches in a star shape. Ensure wires are free of branch hinges.
- Power: Insert the adapter into a wall outlet.
- Finishing: Slightly upsweep branch tips for a uniform look.
Operation and Light Control
The tree includes an in-line light controller and a remote control.
Demo Mode
The tree is preset to Demo mode. To deactivate it:
- Plug the tree into a wall outlet.
- Press and hold the FUNCTION button on the in-line light controller for 5 seconds.
- The multi-light will flash 5 times, indicating Demo mode is off.
Light Functions
Use the selector button on the remote or in-line controller to cycle through 8 modes: Warm White-Multi Fading, Warm White Fading, Warm White-Multi Alternating, Warm White Steady, Warm White-Multi Slow Fading, Multi Steady, Multi Fading, and Combination.
Maintenance and Care
Lamp Replacement
- Unplug the power adapter.
- Lift the lamp lock tab and pull the lamp and plastic base straight out of the holder.
- Replace with a new spare lamp provided with the product.
Battery Replacement
The remote control uses a CR2032 button cell battery.
- Loosen the screw on the battery cover.
- Replace the battery, ensuring correct polarity (+ and -).
- Retighten the screw.
Troubleshooting
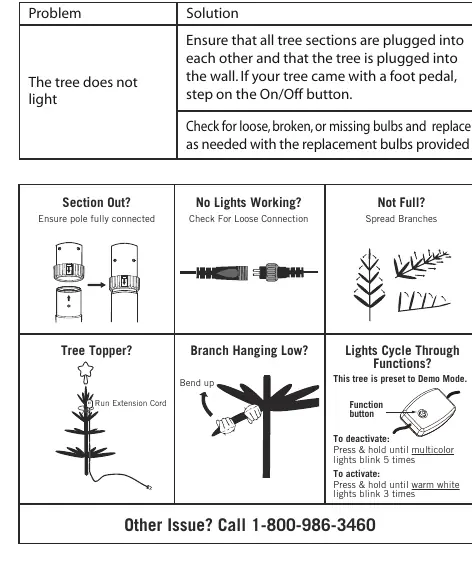
- Tree does not light: Ensure all sections are plugged into each other and the adapter is plugged into the wall. If equipped with a foot pedal, ensure it is switched on. Check for loose, broken, or missing bulbs.
- Not Full: Spread the branches thoroughly.
- Lights Cycle Through Functions: This indicates the tree is in Demo mode. Follow the deactivation steps above.
Manufacturer information
Home Decorators Collection
Practical help
Common problems
Tree does not light
Check that all sections are connected, the adapter is plugged in, and the foot pedal (if present) is on. Inspect for loose or broken bulbs.
Tree is in Demo mode (cycles through functions automatically)
Hold the FUNCTION button on the in-line controller for 5 seconds until the lights flash 5 times.
Before use
- Inspect product for damaged wires or loose connections.
- Ensure all tree sections are fully connected.
- Remove the insulation tab from the remote control.
- Deactivate Demo mode if necessary.
Show more Show less
Images and diagrams
- Assembly: Snap legs into x-shape, insert pole into stand, connect sections, shape branches.
- Light Controller: Use the in-line button or remote to cycle through 8 light functions.
Model compatibility
- Use only the provided power adapter.
- The controller and remote are specific to this product.

Manual page author
Emily Carter
User documentation editor