Home / Seasonal Decorations
User Guide for Home Decorators Collection 7.5 ft. Kenwood Flocked Fraser Fir
Quick guide for the Home Decorators Collection 7.5 ft. Kenwood Flocked Fraser Fir (21HD10008). Includes assembly instructions, lighting operation, care, and troubleshooting.
Quick answers from the manual
Quick answer
- To assemble the tree, place section C into the stand (D) and secure with the eyebolt (E). Stack sections B and A on top. Plug the foot pedal into an outlet to control lighting modes (Twinkle, Steady, Off). p. 4, 5
Key actions
- Assemble tree sections p. 4
- Operate lighting p. 5
First start
- Plug the foot pedal into a wall outlet and press the button to cycle through lighting modes. p. 4, 5
Show 4 more answers Show less
Problems and fixes
Tree does not light
Check connections between sections and press the foot pedal button.
p. 5Maintenance and reset
- Disassemble by lifting sections straight up and folding branches towards the pole. Store in a cool, dry place. p. 5
Technical specifications
| Parameter | Value | Meaning | Pages |
|---|---|---|---|
| Input | 120V, 60 Hz | Power input requirements | p. 2 |
| Output | DC29V, 0.83A, 24W | Power output specifications | p. 2 |
Where to find it in the PDF
- Safety Information p. 2
- Parts List p. 3
- Installation p. 4
- Operation and Troubleshooting p. 5
Table of contents
Manual images
Click an image to enlargeQuick Guide
This guide covers the assembly and operation of the 7.5 ft. Kenwood Flocked Fraser Fir. Ensure all parts are present before assembly. The tree is for indoor use only. Do not use staples or nails to secure wiring. The tree features a foot pedal for controlling lighting modes.
Safety Information
- Indoor Use Only: Do not use seasonal products outdoors unless marked suitable.
- Electrical Safety: Do not connect extra light sets or tree toppers to the existing light sets.
- Placement: Do not mount or place the tree near gas or electric heaters, fireplaces, candles, or other combustible sources.
- Wiring: Do not secure wiring with staples or nails. Do not hang ornaments from the cord or light string.
- Transformer: Rated at 120V, 60 Hz (input) and DC29V, 0.83A, 24W (output).
Package Contents
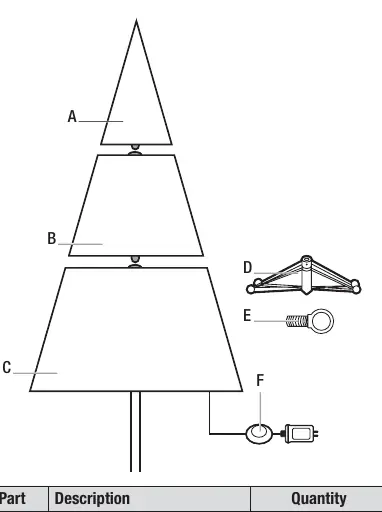
- A: Tree Section A
- B: Tree Section B
- C: Tree Section C (with plug)
- D: Tree Stand
- E: Eyebolt Screw (3)
- F: Foot Pedal
Installation
Preparing the Tree and Stand
- Lay tree sections on the ground in alphabetical order.
- Remove plastic protective caps from the ends of each pole (save for storage).
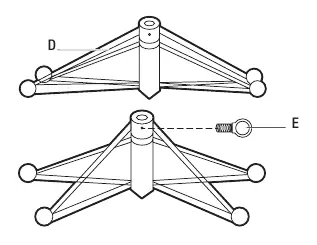
- Open the metal stand (D) to form an "X" shape and align the holes.
- Thread the eyebolt (E) through the stand until it is flush with the inside of the tube.
- Place the stand on a stable, even surface.
Assembling the Tree
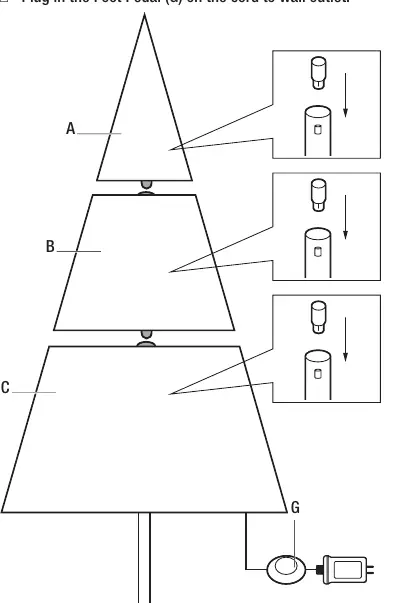
- Place tree section C firmly into the stand (D) and secure with the eyebolt (E). Ensure it stands straight.
- Insert tree section B into the top of section C.
- Insert tree section A into the top of section B.
- Shape the branches by bending tips downward and upward to fill gaps and create a fuller appearance.
- Plug the foot pedal (G) into a wall outlet.
Operation
To turn the lights on, plug the cord into an outlet. Use the foot pedal (G) to cycle through lighting options:
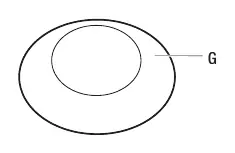
- Press 1: Twinkle (Warm White)
- Press 2: Steady (Warm White)
- Press 3: OFF
Care and Storage
- Disassembly: Unplug the tree and remove all ornaments. Do not pull on the cord.
- Folding: Lift the tree top straight up to remove from the center section. Fold all branches towards the pole. Repeat for all sections.
- Storage: Use protective caps on poles to prevent damage. Store in a cool, dry location away from sunlight. Keep out of reach of children and pets.
Troubleshooting
If the tree does not light when plugged in, ensure all tree sections are securely connected to each other. Press the On/Off button on the foot pedal to cycle through modes.
Manufacturer information
Home Decorators Collection
Practical help
Common problems
Tree does not light when plugged in
Ensure all tree sections are securely connected to each other. Press the On/Off button on the foot pedal.
Before use
- Verify all parts (A, B, C, D, E, F) are present.
- Ensure the stand is placed on a stable, even surface.
- Remove plastic protective caps from poles before assembly.
- Do not use staples or nails to secure wiring.
- Ensure the tree is kept away from heat sources like fireplaces or heaters.
Show more Show less
Specs in practice
- Transformer Input
- 120V, 60 Hz
- Transformer Output
- DC29V, 0.83A, 24W
Images and diagrams
- The tree is assembled in three sections (A, B, C) starting from the bottom (C) to the top (A).
- The stand (D) is secured using an eyebolt (E).
- The foot pedal (F/G) controls the lighting modes.
Model compatibility
- Indoor use only.
- Do not connect extra light sets or tree toppers.

Manual page author
Michael Turner
Technical manual editor