Electronics / Marine Navigation
Installation Guide for Humminbird MEGA Live TargetLock Foot Pedal
Quick installation and pairing guide for the Humminbird MEGA Live TargetLock Foot Pedal. Includes mounting instructions, drilling tips, and pairing procedures for APEX, SOLIX, and HELIX series control heads.
Table of contents
Manual images
Click an image to enlargeQuick Guide from the Manual
This guide covers the installation and wireless pairing of the Humminbird MEGA Live TargetLock Foot Pedal. Before starting, ensure you have a pencil or marking tool and a drill with a #2 Phillips driving bit.
Installation Preparation
Before mounting the foot pedal, consider the following:
- Examine the boat to ensure you will not drill into obstructions.
- Ensure the mounting surface is flat and clear. You may need to shim or modify the surface to create a flat area.
- Mount the pedal in an area with a clear line of communication to your Humminbird control head.
- Ensure the location does not create a tripping hazard.
Installing the Foot Pedal
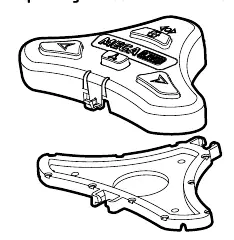
- Separate the pedal: Squeeze the tabs on both sides of the foot pedal and pull the pedal and base apart.
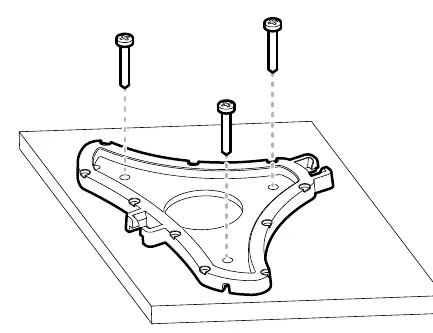
- Mark the location: Position the base at the selected location and mark the three mounting holes with a pencil.
- Secure the base: Place the base on the deck (ensure the three pads on the bottom are facing down). Use the three provided #8 screws and a drill with a #2 Phillips bit to secure the base. Do not overtighten.
- Reattach: Snap the foot pedal back onto the base until the tabs click into place.
Pairing the Foot Pedal
APEX/SOLIX Series:
- Press the HOME key.
- Navigate to Settings > CHIRP Sonar > MEGA Live > Pair TargetLock Foot Pedal.
- On the foot pedal, press and hold the Left and Right buttons simultaneously until the LEDs at the top scroll. Release the buttons.
HELIX Series:
- Press the MENU key twice.
- Select the Accessories tab > MEGA Live > MEGA Live Installation.
- Select Pair TL Foot Pedal and press the RIGHT Cursor key.
- On the foot pedal, press and hold the Left and Right buttons simultaneously until the LEDs at the top scroll. Release the buttons.
If 30 seconds pass without successful pairing, repeat the procedure. If the lights blink in a scrolling pattern after pairing, the control head is updating the pedal; repeat the pairing process once the update is complete.
Safety Warning
This product contains a lithium button battery. Keep out of reach of children. If swallowed, seek immediate medical attention.
Practical help
Common problems
Pairing times out
If 30 seconds pass while in Pairing Mode and they do not successfully pair, an error message will display. Repeat the procedure.
Lights blink in a scrolling pattern after pairing
This indicates the control head is updating the foot pedal. Once the software update is complete, the pairing process must be repeated.
Before use
- Pencil or similar marking tool
- Drill with a #2 Phillips driving bit
- Flat mounting surface
- Clear line of communication to the Humminbird control head
Specs in practice
- Button Battery
- The device contains a lithium button battery that can cause severe injuries if swallowed.
Images and diagrams
- Separating the foot pedal from the base by squeezing the side tabs.
- Securing the base to the deck using three #8 screws.
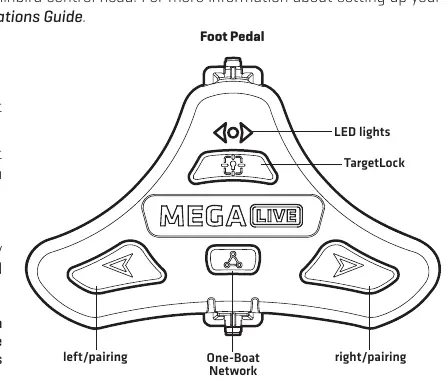
- Foot pedal control layout including Left/Pairing, Right/Pairing, and TargetLock buttons.
Model compatibility
- Compatible with APEX, SOLIX, and HELIX series control heads.

Manual page author
Emily Carter
User documentation editor
Prepares concise manual descriptions and highlights the most useful setup, operation, and maintenance information for readers.