Tools / Drills
Humminbird Fishin' Buddy 110-140c User Manual
Quick guide for the Humminbird Fishin' Buddy 110, 120, 130, and 140c fishfinders. Includes instructions for installation, battery setup, menu navigation, sonar settings, maintenance, and troubleshooting.
Table of contents
Quick Guide
The Humminbird Fishin' Buddy is designed for easy operation. Simply power on the unit to begin fishing. The device automatically determines depth and adjusts settings to keep the bottom and fish visible. Warning: Do not use this device as a navigational aid to prevent collision or grounding. Always operate the boat at slow speeds when the Fishin' Buddy is attached.
Installation
Follow these steps to set up your unit:
- Directional Handle: Screw the handle into the socket on the side of the battery well.
- Batteries: Install six AA alkaline batteries into the battery pack, ensuring the gasket is present and the cap is hand-tightened.
- Control Head: Assemble the mounting bracket on the battery cap, secure with the provided screws, and attach the control head using the mounting knob.
- Cables: Connect the transducer and power cables from the battery well to the keyed connectors on the back of the control head.
- Mounting: Use the C-clamp for temporary mounting or the permanent mounting slots to bolt the bracket to the boat. Ensure the transducer is submerged when the boat is in the water.
Operation
Press and release the POWER-MENU key to turn the unit on. Press and hold the key to power off. Upon startup, you can select Start-Up (normal use), Simulator (learning mode), or SetUp (additional menu choices).
Menu Settings
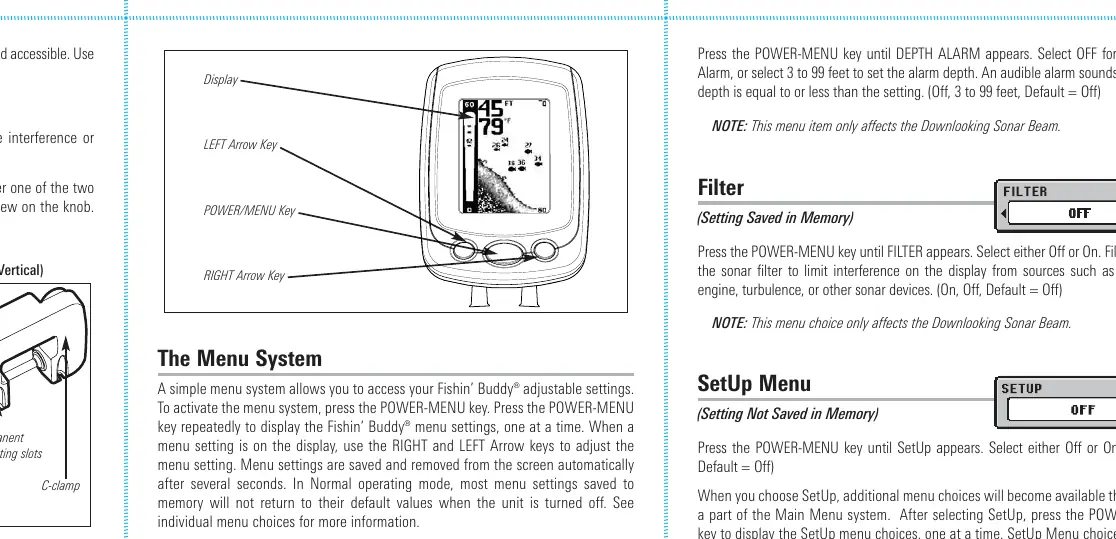
Access the menu system by pressing the POWER-MENU key. Use the arrow keys to adjust settings:
- Light: Adjust backlight level (0-5).
- Sensitivity: Controls detail shown on the display (0-10).
- Depth Range: Set to Auto or manual ranges.
- Zoom: Magnify the area around the bottom.
- Chart Speed: Adjust the speed at which sonar information moves across the display (1-5).
- Fish Alarm: Set alarm for Large, Large/Medium, or All fish.
- Depth Alarm: Set audible alarm for shallow water (3-99 feet).
- Filter: Reduce interference from the boat engine or turbulence.
- SetUp Menu: Access additional options like Contrast, Fish ID+, Bottom View, Battery Alarm, Language, and Units.
Maintenance
Keep the unit in top condition by wiping surfaces with a cloth dampened in fresh water if exposed to salt spray. Do not use chemical glass cleaners on the lens. If the transducer remains out of water for long periods, clean the face with liquid detergent before use to remove air bubbles.
Troubleshooting
If you encounter issues, check the following:
- Unit won't turn on: Check power cable connections and battery status.
- Transducer not detected: Ensure the connector is plugged in, the cable is undamaged, and the transducer is fully submerged.
- No bottom reading: Increase sensitivity or check transducer placement.
- Display fading: Adjust contrast or replace batteries.
- Noise/Interference: Turn off nearby electronics or check for propeller cavitation.
Specifications
Key technical specifications include:
- Depth Capability: 240 ft (73 m).
- Power Output: 1000 Watts (Peak-To-Peak).
- Operating Frequency: 200 kHz (Downlooking); 455 kHz (SideFinding on 120/130/140c models).
- Target Separation: 2 1/2 Inches (63.5 mm).
- Power Requirement: 6 AA Alkaline Batteries.
Practical help
Common problems
Unit does not turn on
Check power cable connection at both ends and verify battery charge.
Transducer not detected
Ensure the transducer connector is fully plugged in, check for cable damage, and ensure the transducer is submerged.
No bottom reading
Increase sensitivity manually or check if the transducer is properly submerged.
Display fading
Adjust contrast settings (monochrome models) or replace batteries.
Noise or interference on display
Turn off nearby electronics, check for engine noise, or ensure the transducer is at least 15 inches from the propeller.
Before use
- Install 6 AA alkaline batteries.
- Attach the directional handle to the battery well.
- Assemble the control head mounting bracket.
- Connect transducer and power cables to the control head.
- Mount the unit securely using the C-clamp or permanent mount.
- Ensure the transducer is submerged in water before powering on.
Specs in practice
- Depth Capability
- Maximum depth the sonar can reliably read (240 ft).
- Power Output
- 1000 Watts (Peak-To-Peak) for sonar signal strength.
- Operating Frequency
- 200 kHz for standard sonar; 455 kHz for SideFinding (select models).
- Target Separation
- Minimum distance between two objects to be seen as separate (2.5 inches).
Images and diagrams
- Mounting Bracket: Shows C-clamp and permanent mounting options.
- Control Head Assembly: Illustrates attaching the head to the battery cap.
- Cable Connection: Shows keyed connectors on the back of the control head.
Model compatibility
- 110/120 models have fixed shaft length.
- 130/140c models have adjustable telescoping shafts.
- SideFinding sonar is only available on 120, 130, and 140c models.

Manual page author
Michael Turner
Technical manual editor
Reviews PDF manuals for structure, safety notes, and practical product details so readers can find the right information quickly.