HVAC / Sauna Heaters
HUUM CLIFF Electric Sauna Heater User Manual
Quick guide for the HUUM CLIFF electric sauna heater. Includes installation requirements, electrical connection steps, stone placement instructions, and sauna room preparation guidelines.
Table of contents
Manual images
Click an image to enlargeImportant Information
The HUUM CLIFF electric sauna heater is designed for heating sauna rooms. Installation must be performed by a certified electrician. The heater requires a control panel with a timer function. The delivery set includes the electric heater, installation and operation manual, and 2 blocks for disassembling the heater slats.
Safety Warnings
- The heater is not intended for use by children or persons with reduced physical, sensory, or mental capabilities without supervision.
- Children must be supervised to ensure they do not play with the appliance.
- The heater must be installed in a way that prevents physical contact during the heating process.
- Do not cover the heater; this causes a fire hazard.
- Only tap water may be used for making steam.
- Sauna doors must always open outwards.
- Do not use the sauna for any purpose other than its intended use.
- Do not leave small children unattended in the sauna.
Installation
Positioning: The heater must be positioned to maintain safe distances from flammable materials. Ensure there is sufficient air circulation around the heater elements.
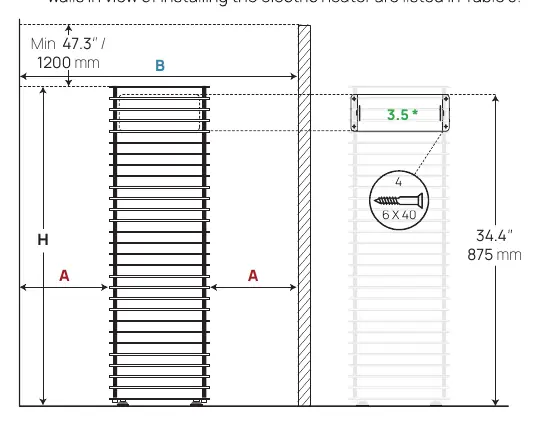

Electrical Connection: A method to disconnect all poles from the mains (a circuit breaker) must be installed on the power circuit before the sauna controller. The power cable must meet UL 62 (US) or CSA 49 (Canada) requirements. Use only heat-resistant cables with PVC isolation. The joint box must be waterproof and located up to 20 inches (50 cm) from the floor.
Stone Placement
Important: Too sparsely filled stone containers cause fire hazards. We recommend a specialist to lay the stones.
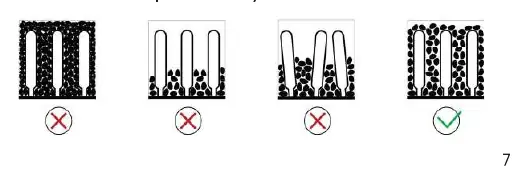
- Wash the stones before filling the receptacle.
- Stack stones sparsely between the heating elements to ensure sufficient air circulation.
- Heating elements must not be visible.
- Use stones with a diameter of 1.2–1.9 inches (3–5 cm).
- Ceramic stones are allowed.
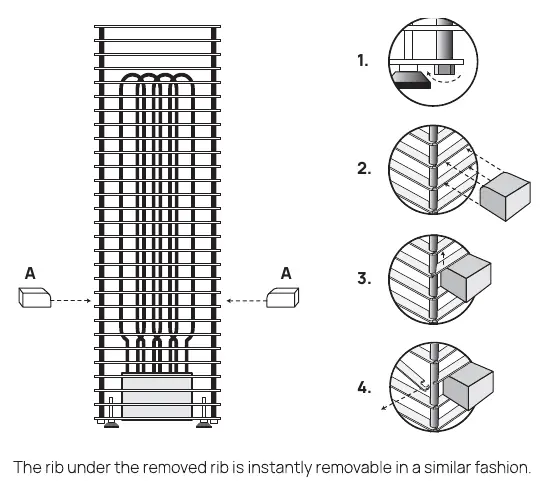
- If necessary, remove the heater ribs to facilitate stone placement.
Sauna Room Requirements
Insulation: All massive heat-accumulating wall surfaces (brick, glass brick, etc.) must be insulated. A 4-inch (100 mm) insulation wool layer is recommended, with a 0.4-inch (10 mm) air gap between damp protection and boarding.
Ventilation: Ensure efficient ventilation. Direct fresh air into the sauna room from above the heater or from under the heater. Install an exhaust valve in the opposite wall from the inlet valve, at least 7.9 inches (20 cm) above the height of the inlet valve.
First-time Use
Before switching the heater on, moisture may have seeped into the insulating layer during storage. The moisture will evaporate in 1–2 hours of heating. Ensure the sauna room is ventilated during this process.
Warranty
The warranty applies only to electric heaters used according to the manual. It does not cover heating elements (consumable parts) or wear from natural usage. Warranty is void if the product has been damaged by carelessness, overload, incorrect installation, or modification. For support, contact the reseller or email [email protected] or [email protected].
Manufacturer information
HUUM
Practical help
Common problems
Heater stones crumbling
Use ceramic stones or replace with proper size (1.2-1.9 in) and ensure they are washed before use.
Heater overheating
Check that stones are not stacked too densely between elements and ensure proper ventilation.
Moisture in insulation
Heat the sauna for 1-2 hours on the first use to allow moisture to evaporate.
Before use
- Ensure a certified electrician performed the electrical installation.
- Verify the sauna room volume matches the heater output (kW).
- Check that the heater is filled with stones correctly (not too dense).
- Ensure the sauna door opens outwards.
- Confirm the control panel is compatible and has a timer function.
Specs in practice
- Safety distance
- Minimum clearance from walls and ceiling as specified in the installation table.
Images and diagrams
- Stone placement: Stack stones sparsely between heating elements to ensure airflow.
- Rib removal: Follow the 4-step process to remove ribs for easier stone placement.
Model compatibility
- Requires a control panel with a timer function.
- Not for use with non-heat-resistant cables.
- Must be connected to a circuit breaker.

Manual page author
Michael Turner
Technical manual editor
Reviews PDF manuals for structure, safety notes, and practical product details so readers can find the right information quickly.