HVAC / Sauna Heaters
Harvia 136 and 136E Electric Sauna Heater User Manual
Quick guide for the Harvia 136 and 136E electric sauna heater. Includes installation, electrical connection, stone placement, operation, and troubleshooting.
Table of contents
Manual images
Click an image to enlargeQuick guide from the manual
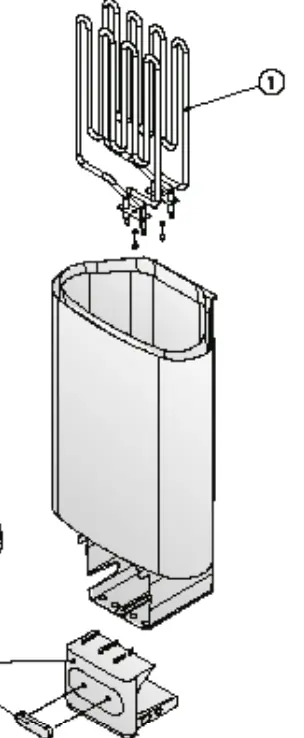
The Harvia 136 and 136E are electric sauna heaters designed for heating sauna rooms to bathing temperatures. The 136 model features an integrated timer and thermostat, while the 136E model requires a separate control unit.
Stone placement
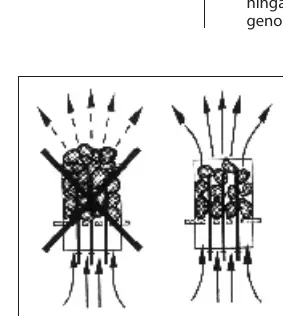
Proper stone placement is critical for safety and performance. Use only stones approved for sauna heaters (peridotite, olivine diabase, olivine, or vulcanite) with a diameter of 5–10 cm. Wash dust off before use. Do not wedge stones tightly between heating elements; they should support each other without putting weight on the elements.
Operation
Heater 136: Use the timer to set the on-time (0–4 hours) or pre-set time (0–8 hours). Use the thermostat to set the desired temperature.
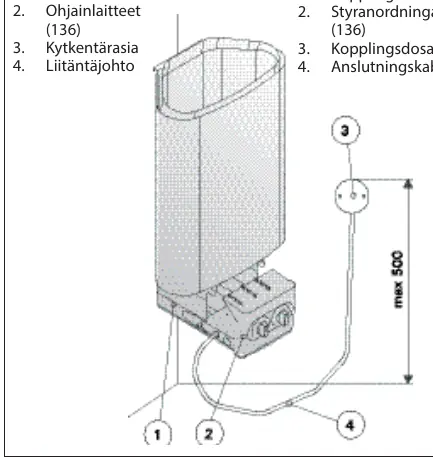
Heater 136E: Controlled via a separate control unit. Refer to the control unit's specific manual.
Installation
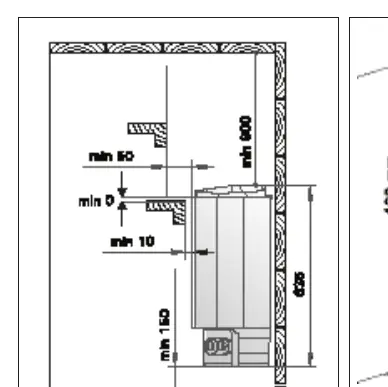
The heater must be installed by a professional electrician in accordance with local regulations. Ensure the sauna room is properly insulated and ventilated. The heater must be wall-mounted using the provided rack. Ensure safety distances are maintained as specified in the manual.
Maintenance and Troubleshooting
Rearrange stones at least once a year to maintain optimal heating and prevent overheating. If the heater does not heat, check the fuses, connection cable, and ensure the overheat protector has not tripped. The overheat protector reset button is located inside the electrical box.
Manufacturer information
Harvia
Practical help
Common problems
Heater does not heat
Check fuses, connection cable, timer setting, thermostat setting, and ensure the overheat protector has not tripped.
Sauna heats slowly
Check fuses, heating elements, thermostat setting, heater output, stone placement, and sauna ventilation.
Heater emits smell
Normal on first use; ensure the sauna room is efficiently ventilated.
Before use
- Check that no objects are on or near the heater.
- Ensure stones are properly placed (5-10 cm diameter).
- Verify sauna room ventilation is correct.
- Check that the heater is properly connected to the electrical network.
Specs in practice
- Sauna Volume
- 2.0 - 4.5 m³
Images and diagrams
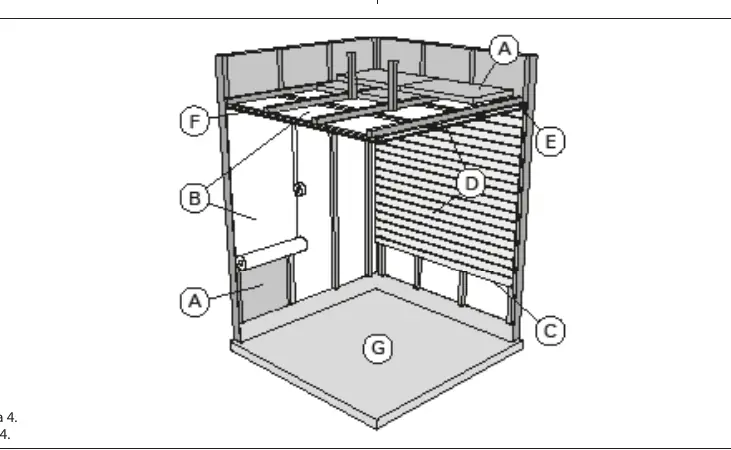
- Figure 4: Sauna room structure showing insulation, moisture protection, and ventilation.
- Figure 6: Safety distances for installation.
- Figure 9: Electrical connections for the heater.
- Figure 14: Overheat protector reset button location.
Model compatibility
- 136E model requires a separate control unit.
- Only one electric heater may be installed in the sauna room.

Manual page author
David Miller
Documentation analyst
Organizes user manual content into clear summaries, with attention to model details, product context, and everyday usability.