HVAC / Heat Pumps
User Manual for Hygger HG233 Aquarium Air Pump
Quick guide for the Hygger HG233 PowerGo Aquarium Air Pump. Learn how to set up, adjust airflow, charge, and troubleshoot your device for optimal performance.
Table of contents
Manual images
Click an image to enlargeQuick guide from the manual
The Hygger PowerGo Aquarium Air Pump is a portable, rechargeable device designed for aquariums, outdoor fishing, and emergency backup during power outages. Before first use, it is recommended to charge the unit for 3-5 hours until all indicators are green and soak the air stones in water for 1-2 hours. Always ensure the pump is placed on a flat surface or hung securely. If the pump is placed below the water level, you must use a check valve to prevent water backflow.
Product Overview
The device features an intelligent touch screen for airflow adjustment and a battery capacity indicator. It operates on AC power when connected and automatically switches to DC battery mode during power outages. The unit is IPX4 waterproof, meaning it is protected against water splashes but should not be immersed in water.
Installation and Setup
There are three primary installation methods to ensure safety and prevent water backflow:
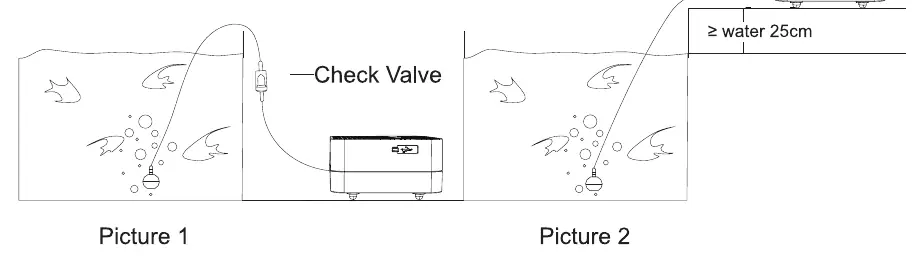
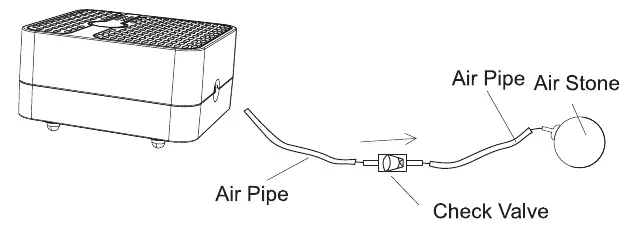
- Using a Check Valve: If the air pump is placed below the level of the tank's water surface, you must install the included check valve between the pump and the air stone. Ensure the flapper end of the valve faces toward the air pump.
- Above Water Level: To avoid water backflow without a check valve, place the air pump at least 25 cm (approximately 10 inches) higher than the tank's water surface.
- Outdoor Use: The pump can be used as a live bait aerator for outdoor fishing.
Operation
To operate the pump, follow these steps:
- Connect the air tube to the outlet of the air pump.
- Connect the air tube to the air stone (ensure the check valve is installed if required).
- Press and hold the ON/OFF key for about 5 seconds to start or stop the pump.
- Adjust the airflow by touching the ON/OFF key to set the speed level from 1 to 4. The red indicator lights in the second row will light up from left to right.
- To switch between normal mode and intermittent mode, touch the ON/OFF key twice. A flashing blue light in the second row indicates intermittent mode.
Charging and Battery
The remaining capacity level is displayed by the upper row of indicator lights. When all five lights are green, the power is fully charged. When the first indicator light flashes, the device is out of power and should be charged immediately. Do not unplug the charging cable immediately after a full charge; wait for a while.
Safety and Maintenance
- Operating Temperature: Use the pump only in temperatures between 33.8°F and 95°F (1°C to 35°C).
- Water Safety: Do not immerse the pump in water. If the pump falls into water, unplug it immediately before retrieving it.
- Placement: Place the pump on a flat surface. Using a towel or rubber mat underneath can help minimize vibration and noise.
- Storage: Do not store or install the pump where it will be exposed to extreme weather or freezing temperatures.
- Disassembly: Do not disassemble the pump yourself, as this will damage the circuit and void the warranty.
Troubleshooting
If you encounter issues, check the following:
- Noticeable Noise: Ensure the pump is on an even surface. Placing a towel underneath can reduce noise.
- Reduced Airflow: Check if the water is too deep (shorten the distance), ensure the air stone was soaked before use, or clean/replace the air tube and air stone.
- Pump Not Working: Check if the battery is low and needs charging, or contact the seller if the unit is damaged.
Manufacturer information
Hygger Aquarium Inc
Practical help
Common problems
Noticeable noise
Ensure the pump is placed on an even surface; place a towel or rubber mat under the pump to reduce vibration.
Reduced airflow
Shorten the distance between the pump and the water surface, soak the air stone in water for 30 minutes before first use, or clean/replace the air tube and air stone.
Pump not working
Charge the device if the battery is low, or contact the seller if the unit is damaged.
Before use
- Charge the unit for 3-5 hours until all indicators are green.
- Soak air stones in water for 1-2 hours before first use.
- Ensure the check valve is installed if the pump is placed below the water level.
- Place the pump on a flat, stable surface.
- Verify the operating temperature is between 1°C and 35°C.
Specs in practice
- Input Voltage
- AC100-240V ~50/60Hz
- Output Voltage
- DC 5V
- Waterproofing
- IPX4 (protects against water splashes only; do not immerse)
- Operating Temperature
- 33.8°F to 95°F (1°C to 35°C)
Images and diagrams
- The control panel features an ON/OFF key, capacity level indicators (upper row), and airflow level indicators (lower row).
- Installation requires a check valve if the pump is below the water level to prevent backflow.
- Alternatively, place the pump at least 25cm above the water level.
Model compatibility
- Suitable for household, aquarium, and outdoor fishing use.
- Not suitable for use in freezing temperatures.
- Do not use attachments not recommended by the manufacturer.

Manual page author
David Miller
Documentation analyst
Organizes user manual content into clear summaries, with attention to model details, product context, and everyday usability.