Hvac / Heat Pumps
User Manual for Hygger HG253 Precise Aquarium Heater
Quick guide for the Hygger HG253 aquarium heater. Learn how to install, calibrate, set heating modes, and troubleshoot common errors like E2, E3, and E4.
Table of contents
Manual images
Jump to the sectionQuick guide from the manual
The Hygger HG253 is a precise aquarium heater designed for both freshwater and saltwater tanks. The controller is not waterproof and must be kept away from water. The heater features dry-run protection, temperature calibration, and two heating modes (Precise and Energy-saving). Always unplug the device and wait 15 minutes before removing it from the water or performing maintenance.
Product Features
- Reliable and Durable: Made of explosion-proof quartz glass with a nickel-chromium heating wire.
- Malfunction Protection: Automatically cuts off power if exposed to air and triggers a buzzing alarm.
- Two Heating Modes: Precise Mode and Energy-saving Mode.
- Temperature Calibration: Internal calibration function for accurate measurements.
- Children Protection: Requires holding buttons for 3 seconds to unlock settings.
Installation and Placement
Proper placement is critical for the heater's safety and performance:
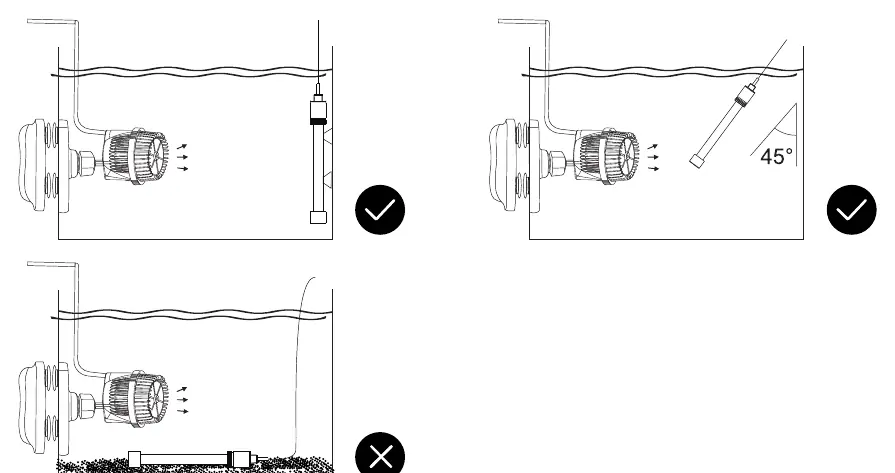
- The heater must be fully submerged in water during operation.
- Place the heater in an area with good water flow (e.g., near the water inlet).
- Tilt the heater at a 30-45 degree angle for more accurate temperature readings.
- Do not bury the heating rod in the substrate or sand.
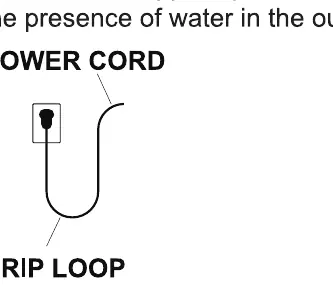
- Create a drip loop with the power cord to prevent water from running down the cord into the electrical outlet.
Temperature Settings and Modes
Setting the Temperature:
- Press and hold any button on the side of the controller for 3 seconds until the display flashes.
- Use the upper button to increase and the lower button to decrease the temperature (Range: 15°C-34°C / 59°F-93°F).
- The setting will save automatically if no buttons are pressed for 3 seconds.
Switching Modes:
- Press and hold the upper button for 6 seconds to toggle between Energy-saving Mode and Precise Mode.
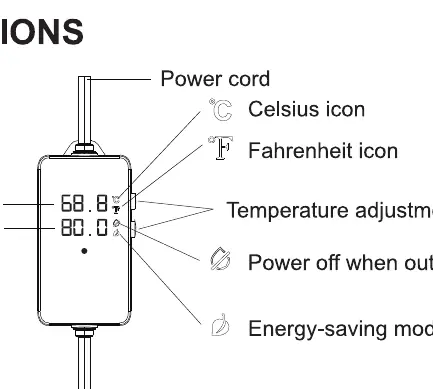
- The green energy-saving icon indicates the mode is active.
Calibration and Units:
- Calibration: Hold the upper button while plugging in the power cord until the screen shows H01. Adjust the value using the buttons.
- Switching F/C: Hold the upper button while plugging in the power cord until the screen shows H02. Use the lower button to switch between FFF (Fahrenheit) and CCC (Celsius).
Maintenance
- Regularly check the temperature display for alarms.
- Clean the water level detection area (top of the rod) every three months by wiping off algae or biofilm with your fingers.
- Remove scale buildup by soaking the rod in a specialized descaling agent.
Troubleshooting
- E2 (Overheating): Check if the heating rod is still heating. Ensure water circulation is adequate.
- E3 (Probe malfunction): Check if the heater is dry burning. If it is, let it cool down. If the error persists, it may require repair.
- E4 (Communication failure): Do not share the power socket with other high-power devices.
- L1, L2, H1, H2 (Probe malfunction): The unit likely requires factory repair.
Manufacturer information
Hygger Aquarium Inc
Practical help
Common problems
E2 Error
Indicates overheating. Check water circulation and ensure the heater is not buried.
E3 Error
Indicates probe malfunction or dry burning. Allow the unit to cool down; if it persists, contact support.
E4 Error
Communication failure. Ensure the heater is not sharing a socket with other devices.
L1/L2/H1/H2 Errors
Probe malfunction. The unit requires factory repair.
Before use
- Ensure the heater is fully submerged in water.
- Create a drip loop on the power cord to prevent water from reaching the outlet.
- Place the heater in an area with active water flow.
- Do not bury the heating rod in sand or substrate.
- Keep the external controller dry at all times.
Specs in practice
- Control Range
- 15°C-34°C (59°F-93°F)
- Temp Accuracy
- 0.5°F (0.5°C)
- Display Accuracy
- 0.1°F (0.1°C)
Images and diagrams
- The drip loop is a section of the cord hanging below the outlet level to prevent water from traveling along the cord.
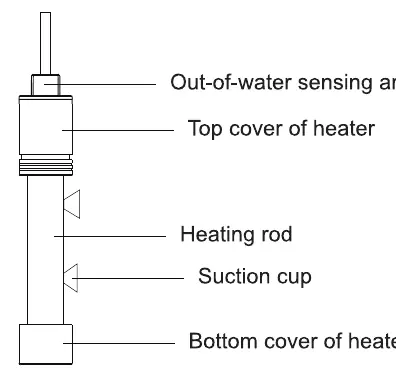
- The out-of-water sensing area is located at the top of the heating rod.
Model compatibility
- Suitable for both freshwater and saltwater aquariums.
- Do not use with incompatible voltages; check your local power standard (110V vs 220V).

Manual page author
Michael Turner
Technical manual editor
Reviews PDF manuals for structure, safety notes, and practical product details so readers can find the right information quickly.