Hvac / Heat Pumps
User Manual for Hygger HG172 Aquarium Wave Maker
Quick guide for the Hygger HG172 Aquarium Wave Maker. Learn how to install, operate wave modes, troubleshoot error codes, and maintain your pump for optimal performance.
Table of contents
Manual images
Jump to the sectionQuick guide from the manual
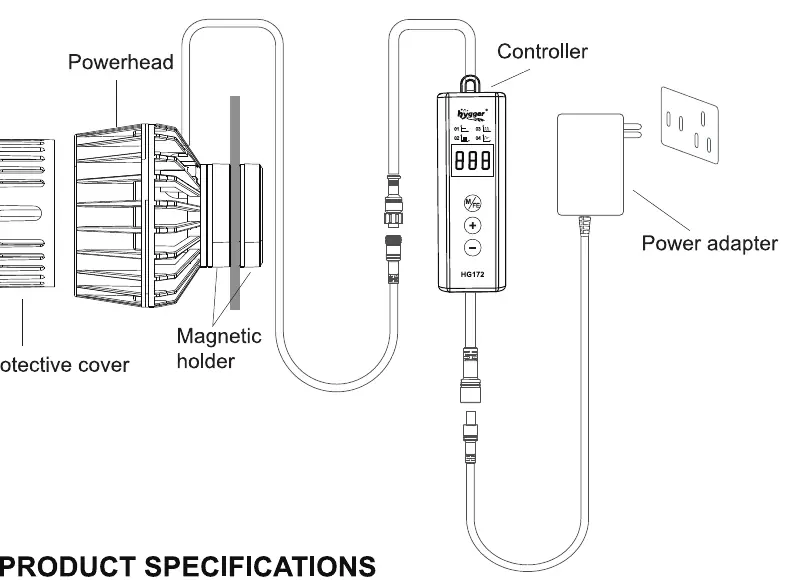
The Hygger HG172 is a DC pump designed for aquarium water circulation. It features adjustable wave modes, flow rates, and frequencies. The controller is not waterproof and must be kept dry. The pump must never run dry; it requires full submersion to operate safely and prevent damage.
Product Features
- Adjustable wave modes, flow rate, and wave frequency.
- Sine wave technology for ultra-quiet operation.
- Strong magnetic holder for easy installation on glass up to 3/8 inch (8mm) thick.
- Suitable for freshwater, saltwater, and reef aquariums.
Installation
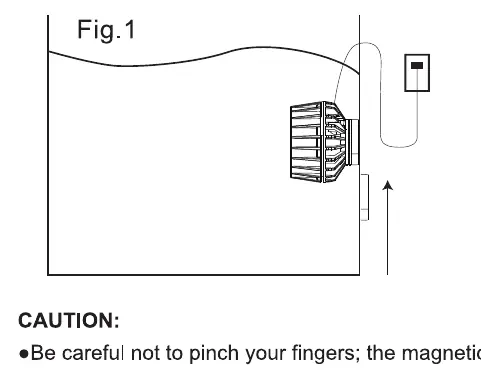
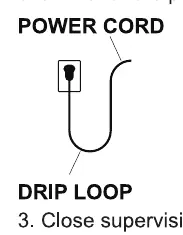
Detach the magnetic holder from the pump body. Place the pump at least 3 inches (7.6 cm) underwater and secure it to the aquarium's outer glass using the magnetic holder. Connect the wave pump to the controller and the controller to the power adapter. Always create a drip loop with the power cord to prevent water from reaching the electrical outlet.
Controller Operation
The controller features an LED display and three buttons (M/FE, +, -). Press the M button to cycle through four wave modes:
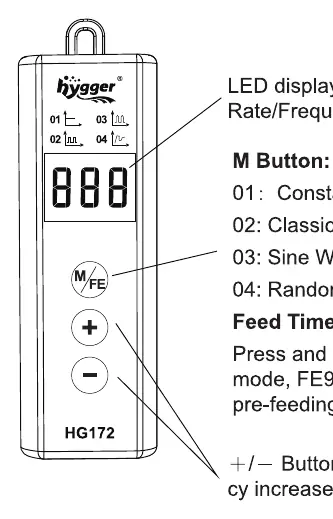
- 01: Constant Wave Mode (Adjust flow rate F01-F10)
- 02: Classic Pulse Wave Mode (Adjust frequency P01-P10)
- 03: Sine Wave Mode (Adjust frequency P01-P10)
- 04: Random Wave Mode (Adjust frequency P01-P10)
To use the feeding mode, press and hold the M button to enter the countdown (FE9 to FE1). Press and hold M again to exit.
Maintenance
Always disconnect the power supply before performing maintenance. To clean, remove the pump from the water, detach the cover, and remove the impeller and axle. Clean all parts with a soft brush in clear water. Ensure the plug connections remain dry during cleaning.
Troubleshooting
If the pump does not work, check for a damaged power supply, blocked impeller, or dry run condition. Error codes are displayed on the controller:
- E1: Overvoltage (Replace controller)
- E2: Undervoltage (Replace controller)
- E3: Overcurrent (Replace controller)
- E4: Dry running (Submerge pump completely)
- E5: Motor blockage (Reassemble impeller)
Manufacturer information
Hygger Aquarium Inc
Practical help
Common problems
Pump does not work
Check for damaged power supply, blocked impeller, or dry run protection. Disconnect from power for two seconds and reconnect.
Insufficient water current
Clean the impeller and ensure the water inlet or outlet is not blocked.
Pump switches off after a short time
Check if water is dirty or if the water temperature exceeds 35°C.
Error codes E1-E5
E1-E3 usually require controller replacement. E4 requires submerging the pump. E5 requires reassembling the impeller.
Before use
- Ensure the protective cover is installed on the wave pump.
- Verify the aquarium glass thickness is 3/8 inch (8mm) or less.
- Ensure the power supply meets the voltage requirements (100-240V).
- Create a drip loop for the power cord to prevent water from reaching the outlet.
- Ensure the pump is placed at least 3 inches (7.6 cm) underwater.
Specs in practice
- Max flow rate
- 792GPH (3000L/H) for 6W model; 2114GPH (8000L/H) for 12W model.
- Operating temperature
- The device operates in water between 4°C (39°F) and 35°C (95°F).
- Glass thickness
- Compatible with glass up to 3/8 inch (8mm) thick.
Images and diagrams
- The controller display shows the current wave mode (01-04) and flow/frequency settings.
- The drip loop diagram illustrates how to position the power cord to prevent water from dripping into the outlet.
Model compatibility
- Suitable for freshwater, saltwater, and reef aquariums.
- Do not use in flammable, acidic, or corrosive liquids.
- The controller is not waterproof; keep it away from water and high-humidity areas.

Manual page author
Emily Carter
User documentation editor
Prepares concise manual descriptions and highlights the most useful setup, operation, and maintenance information for readers.