Furniture / Storage Cabinets
Assembly Instructions for IKEA KULLEN 2-Drawer Chest
A comprehensive assembly guide for the IKEA KULLEN 2-drawer chest. This manual provides step-by-step instructions, a complete hardware list, and essential safety guidelines, including mandatory wall-anchoring procedures to prevent tipping.
Quick answers from the manual
Quick answer
- This document is the assembly manual for the IKEA KULLEN 2-drawer chest. It details the hardware required, step-by-step assembly, and mandatory wall-anchoring instructions. p. 1, 16
Key actions
- Assemble the main frame using cam locks and wooden dowels. p. 4, 7
- Attach the back panel using the provided nails. p. 8, 9
- Anchor the chest to the wall for safety. p. 10, 11
Where to find it in the PDF
- Safety and Tools p. 2
- Hardware List p. 3
- Assembly Steps p. 4, 14
Table of contents
Manual images
Click an image to enlargeQuick guide from the manual
This document provides the assembly instructions for the IKEA KULLEN 2-drawer chest. Before beginning, ensure you have a clear workspace on a soft surface, such as a rug or carpet, to prevent damage to the furniture panels. Important: The unit must be anchored to the wall to prevent tipping. Please read all safety warnings on page 2 before starting.
Required tools
To assemble this furniture, you will need the following tools:
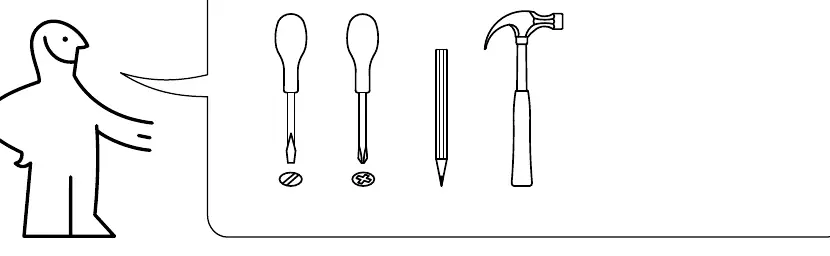
- Flathead screwdriver
- Phillips screwdriver
- Hammer
- Pencil
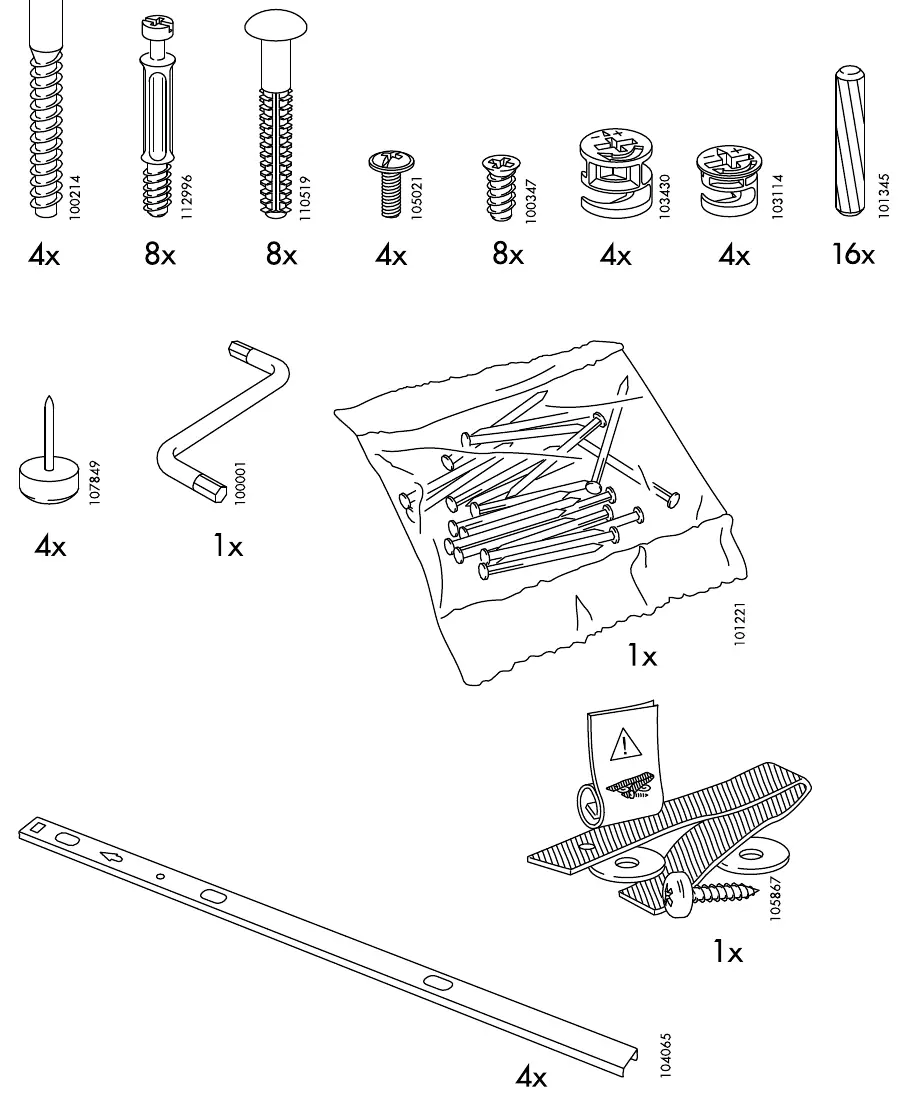
Parts list
Before assembly, verify that all hardware components are present. The manual includes a detailed list of screws, cam locks, dowels, and drawer runners. Each part is identified by a specific number (e.g., 100214, 112996) which corresponds to the diagrams in the assembly steps.
Assembly instructions
The assembly process is divided into logical steps:
- Frame Assembly: Attach the drawer runners to the side panels using the provided screws. Insert wooden dowels and cam locks into the designated holes.
- Structure Construction: Connect the side panels to the base and top panels. Tighten all cam locks securely to ensure structural integrity.
- Back Panel: Attach the back panel using the provided nails. Ensure the frame is square before nailing.
- Drawer Assembly: Assemble the drawer boxes by attaching the sides to the drawer front and back, then secure the drawer bottom.
- Final Installation: Insert the drawers into the frame.
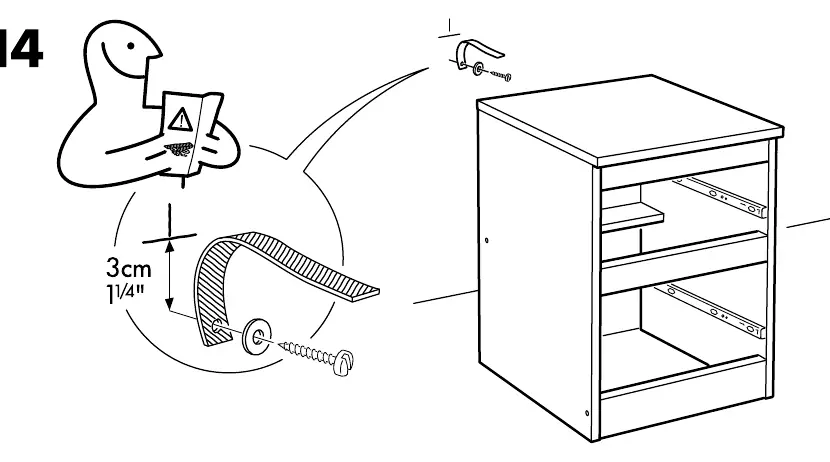
Safety and wall anchoring
For safety reasons, this furniture must be permanently fixed to the wall. Use the included wall anchoring kit. If you are unsure about the wall material in your home (e.g., drywall, concrete, wood), consult a local hardware store to select the appropriate screws and wall plugs for your specific wall type.
Manufacturer information
IKEA
Practical help
Common problems
Drawer does not slide smoothly
Check that the drawer runners are installed correctly and that all cam locks are fully tightened.
Furniture feels unstable
Ensure the unit is properly anchored to the wall using the provided safety bracket.
Before use
- Gather required tools: flathead screwdriver, Phillips screwdriver, hammer, and pencil.
- Clear a workspace on a soft surface to prevent scratching the furniture.
- Verify all hardware parts listed on page 3 are present.
- Identify the correct wall type in your home to select appropriate wall plugs/screws if the provided ones are not suitable.
Images and diagrams
- Arrows indicate the direction of movement or insertion for parts.
- Circles with numbers (e.g., 100214) identify specific hardware components.
- Crossed-out symbols indicate incorrect assembly methods to avoid.
Model compatibility
- Must be anchored to the wall to prevent tipping.

Manual page author
Michael Turner
Technical manual editor
Reviews PDF manuals for structure, safety notes, and practical product details so readers can find the right information quickly.