Furniture / Storage Cabinets
IKEA NORDKISA Open Wardrobe with Sliding Door Instruction Manual
Quick guide for assembling the IKEA NORDKISA open wardrobe with sliding door. Includes safety warnings, wall-anchoring instructions, and step-by-step assembly procedures.
Table of contents
Manual images
Jump to the sectionQuick guide from the manual
This document provides assembly instructions for the IKEA NORDKISA open wardrobe with a sliding door. It is essential to follow the assembly steps carefully to ensure stability. The most critical safety requirement is to anchor the furniture to the wall using the provided tip-over restraints to prevent serious or fatal crushing injuries.
Safety and warnings
- Wall anchoring: Always secure this furniture to the wall using the included tip-over restraints.
- Stability: Place the heaviest items in the lower sections.
- Child safety: Never allow children to climb or hang on the shelves, doors, or frame.
- Installation: Assembly should be performed by two people to avoid damage or injury.
Assembly and installation
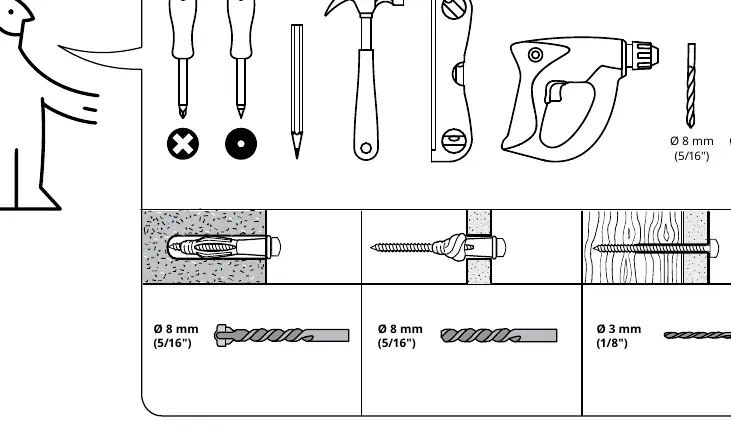
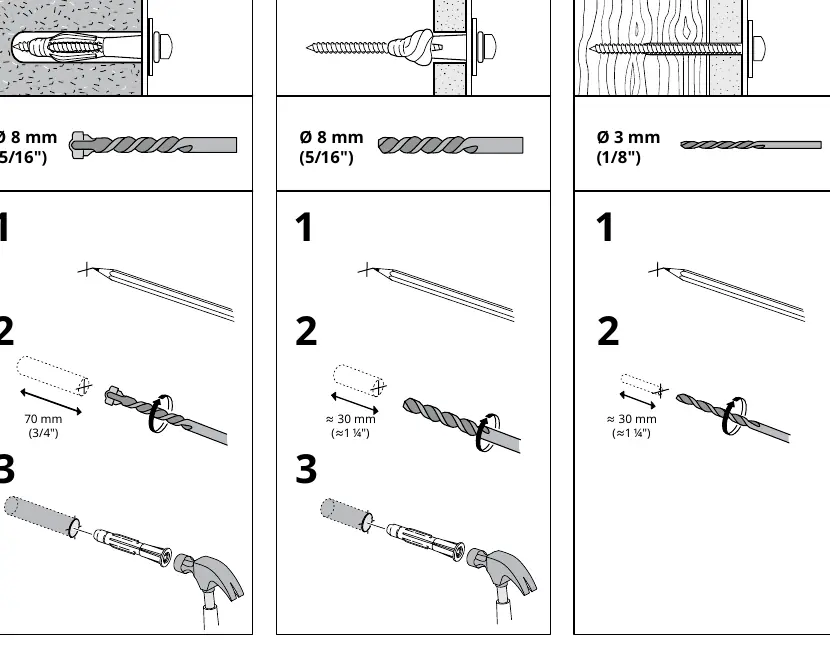
The assembly process involves building the frame, installing the shelves, and attaching the sliding door mechanism. Ensure you have the necessary tools: a screwdriver, hammer, pencil, spirit level, and a drill with appropriate bits for your wall type (8mm for masonry, 3mm for wood).
- Assemble the side and internal frame sections using the provided dowels and screws.
- Connect the frame components to form the main structure.
- Install the shelves and the sliding door track.
- Mount the sliding door into the track.
- Once assembled, use a spirit level to ensure the unit is level.
- Mark the wall for the safety bracket, drill the holes, and secure the unit to the wall using the provided hardware.
Maintenance
Periodically check all screws and fittings to ensure they remain tight. If the unit becomes unstable, re-check the wall anchoring.
Manufacturer information
IKEA
Practical help
Common problems
Furniture instability
Ensure the unit is properly leveled using a spirit level and that it is securely anchored to the wall using the provided tip-over restraints.
Difficulty during assembly
Assembly requires two people. Ensure all dowels and screws are inserted correctly as shown in the diagrams before tightening.
Before use
- Verify all parts listed in the inventory are present.
- Ensure you have the correct tools: screwdriver, hammer, pencil, spirit level, and drill.
- Identify the wall type (masonry or wood) to select the correct drill bit size (8mm or 3mm).
- Clear a large, flat area for assembly to avoid damaging the bamboo components.
- Ensure two people are available for the assembly process.
Specs in practice
- Wall drill bit (masonry)
- Use an 8mm drill bit for concrete or brick walls.
- Wall drill bit (wood)
- Use a 3mm drill bit for wooden wall studs.
Images and diagrams
- The manual uses icons to indicate when two people are required for assembly.
- Specific icons warn against using a hammer on certain parts to prevent breakage.
- Diagrams show the exact placement of dowels and screws for each step.
Model compatibility
- The included wall fasteners are for general use; ensure they are appropriate for your specific wall material.

Manual page author
Michael Turner
Technical manual editor
Reviews PDF manuals for structure, safety notes, and practical product details so readers can find the right information quickly.