Furniture / Storage Cabinets
IKEA TONSTAD Sideboard 121x47x90 cm Assembly Instructions
Quick assembly guide for the IKEA TONSTAD sideboard. Includes essential safety warnings, wall-anchoring instructions, and step-by-step assembly procedures.
Table of contents
Manual images
Jump to the sectionQuick guide from the manual
This document provides assembly instructions for the IKEA TONSTAD sideboard. The most critical safety requirement is to always secure the furniture to the wall using the included tip-over restraints to prevent serious or fatal crushing injuries. Do not allow children to climb on drawers, doors, or shelves, and place the heaviest items in the lower drawer.
Safety and Warnings
- Tip-over hazard: Serious or fatal crushing injuries can occur from furniture tip-over.
- Wall anchoring: The furniture must be permanently fixed to the wall using the provided hardware.
- Usage: Do not place TVs or other heavy objects on top of the sideboard.
- Children: Never allow children to climb or hang on drawers, doors, or shelves.
Assembly
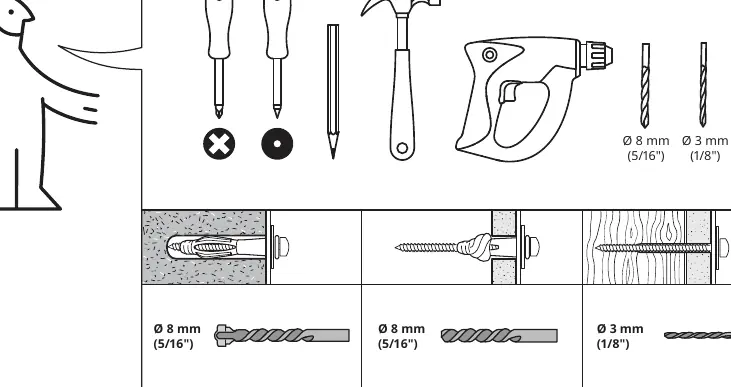
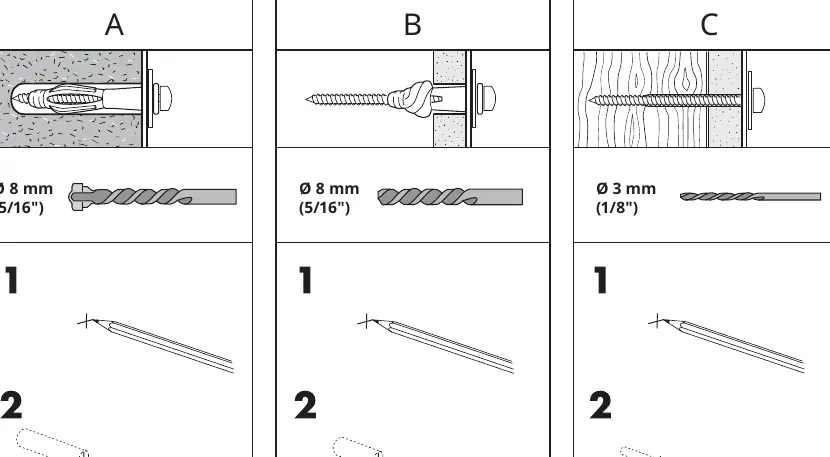
The assembly process involves multiple steps, including preparing the side panels, installing drawer runners, and connecting the main frame. Ensure you have the necessary tools, including a screwdriver, pencil, hammer, and drill (with 8mm and 3mm bits depending on your wall type).

- Preparation: Assemble on a soft surface (like a rug) to avoid damaging the furniture finish.
- Wall Mounting: The provided screws and plugs are suitable for most solid and hollow walls. For solid wood, use screws without plugs. If you are uncertain about your wall type, seek professional advice.
- Drawer Assembly: Follow the specific steps for drawer construction, ensuring all cam locks and screws are tightened correctly.
- Hinge Adjustment: The doors feature adjustable hinges to ensure proper alignment.
Maintenance
Periodically check that all fasteners are tightened. Clean with a damp cloth and mild cleaner, then wipe dry with a clean cloth.
Manufacturer information
IKEA
Practical help
Common problems
Furniture instability or tipping risk
Always use the included wall-anchoring kit to secure the unit to the wall.
Difficulty with wall mounting
The provided hardware is for most solid and hollow walls. If you have solid wood, use screws without plugs. Consult a professional if you are unsure about your wall type.
Door misalignment
Use the adjustment screws on the hinges to align the doors correctly.
Before use
- Ensure all parts listed in the manual are present.
- Have a screwdriver, hammer, and drill ready.
- Identify your wall type (solid, hollow, or wood) to select the correct mounting method.
- Clear a large, soft area for assembly.
Specs in practice
- Drill bit size (Wall)
- 8 mm for most walls, 3 mm for solid wood.
Images and diagrams
- The manual uses icons to indicate required tools and safety warnings.
- Steps 1-13 cover the initial frame and runner assembly.
- Steps 14-24 focus on the base and structural assembly.
- Steps 25-30 detail the wall-anchoring procedure.
- Steps 31-36 cover final assembly, including drawers and door installation.
Model compatibility
- Wall mounting hardware is included but must be adapted to your specific wall type.
- Not suitable for placing TVs or heavy electronics on top.

Manual page author
Emily Carter
User documentation editor
Prepares concise manual descriptions and highlights the most useful setup, operation, and maintenance information for readers.