Furniture / Storage Cabinets
Assembly Manual for IKEA SONGESAND Wardrobe
Comprehensive assembly guide for the IKEA SONGESAND wardrobe. Includes step-by-step instructions, essential safety warnings regarding wall anchoring, and detailed procedures for hinge adjustment.
Quick answers from the manual
Quick answer
- This manual provides step-by-step assembly instructions for the IKEA SONGESAND wardrobe, including critical safety warnings regarding wall anchoring to prevent furniture tip-over. p. 2, 9, 36
Key actions
- Secure the furniture to the wall using the provided tip-over restraints to prevent serious or fatal crushing injuries. p. 2, 6, 22, 29
- Adjust the wardrobe doors using the hinge adjustment screws. p. 37
Where to find it in the PDF
- Safety Warnings p. 2
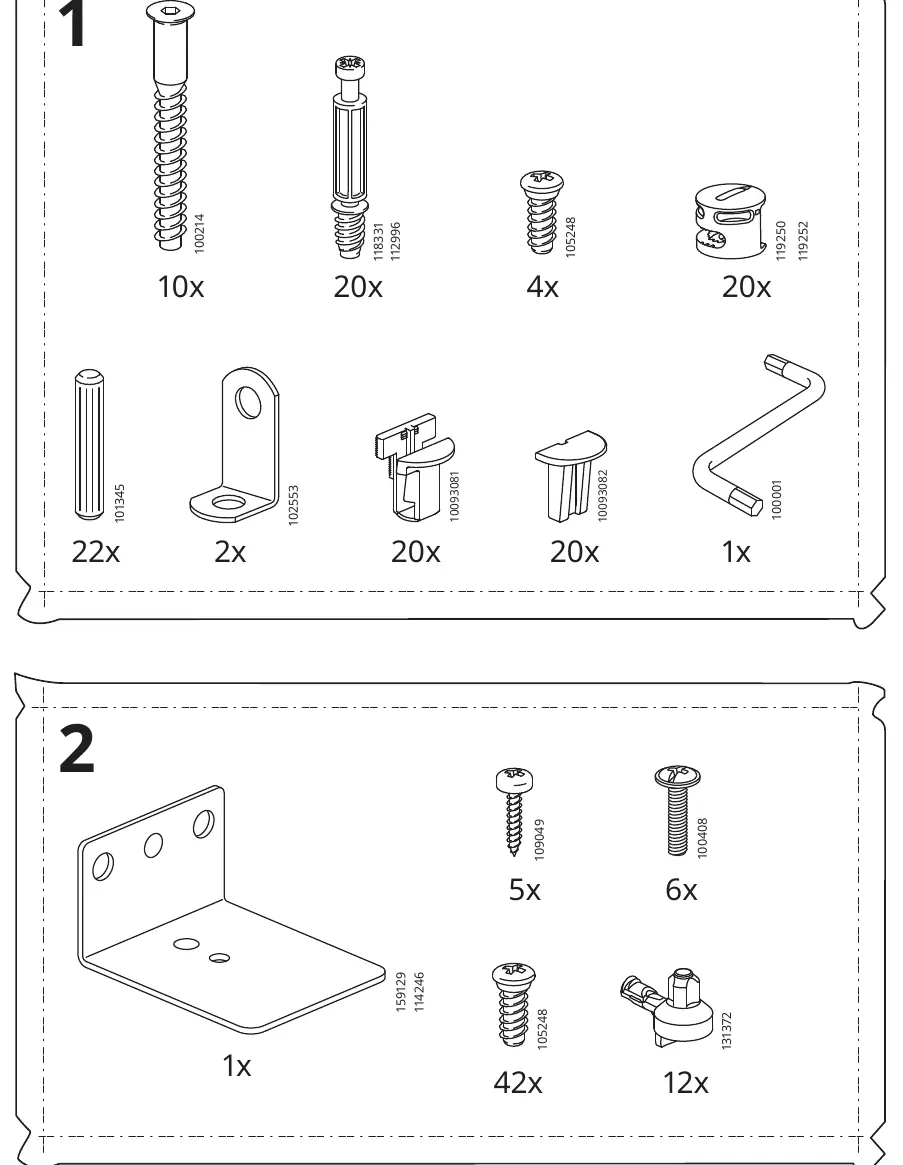
- Parts List p. 6, 7, 8
- Assembly Instructions p. 9, 36
- Hinge Adjustment p. 37
Table of contents
Manual images
Click an image to enlargeQuick Guide and Safety Information
This manual provides instructions for assembling the IKEA SONGESAND wardrobe. Crucial Safety Warning: Serious or fatal crushing injuries can occur from furniture tip-over. You must secure this furniture to the wall using the provided tip-over restraints. To further reduce risk, place the heaviest items in the lower drawer, do not set TVs or heavy objects on top, and never allow children to climb or hang on drawers, doors, or shelves.
Tools Required
Before beginning assembly, ensure you have the following tools:
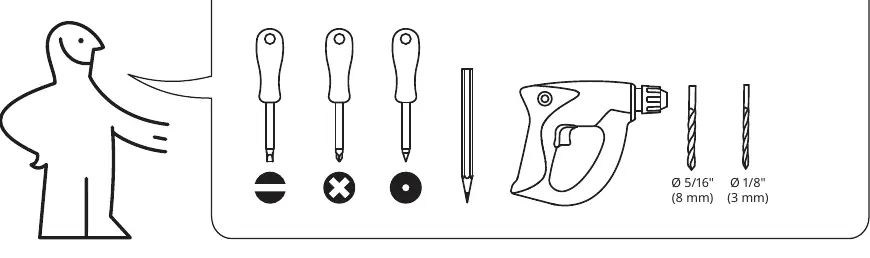
- Flathead screwdriver
- Crosshead screwdriver
- Pencil
- Power drill with 8mm (5/16") and 3mm (1/8") drill bits
Assembly Overview
The assembly process is divided into 51 steps. It is recommended to assemble the frame on a soft surface, such as a rug, to prevent damage to the panels. The process involves:
- Frame Assembly (Steps 1-29): Preparing panels with dowels and cam locks, then connecting the side, top, and bottom panels.
- Back Panel Installation (Steps 30-33): Attaching the back panels using the provided clips and fasteners.
- Door Installation (Steps 43-47): Attaching hinges to the doors and mounting them to the wardrobe frame.
- Final Touches (Steps 48-51): Installing handles, clothes rails, and hooks.
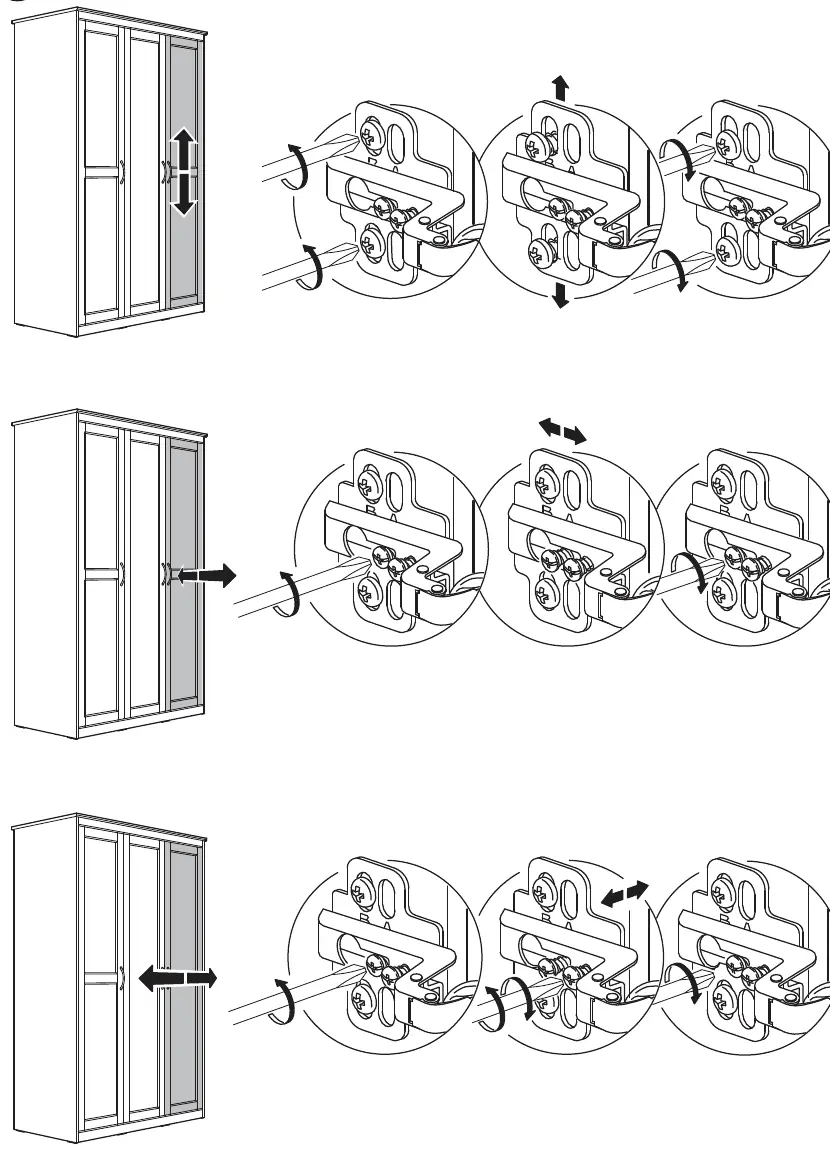
Hinge Adjustment
If the doors are not aligned correctly, you can adjust them using the hinge screws. Refer to the adjustment guide on page 37, which illustrates how to adjust the door height, depth, and lateral position using the screws on the hinge plate.
Disassembly and Reversal
The manual includes a section on page 38 detailing how to reverse the assembly process (50 to 1) if you need to disassemble the wardrobe.
Manufacturer information
IKEA
Practical help
Common problems
Wardrobe tipping over
Always secure the furniture to the wall using the provided tip-over restraints.
Doors misaligned
Use the hinge adjustment screws shown on page 37 to adjust the door position (height, depth, and lateral).
Before use
- Ensure you have all necessary tools: flathead screwdriver, crosshead screwdriver, pencil, and power drill.
- Verify that you have enough space to assemble the wardrobe.
- Check that all parts are present before starting.
- Prepare a soft surface (like a rug) to assemble the frame to prevent damage.
- Identify the wall type to ensure you have the correct wall mounting hardware (not always included).
Specs in practice
- Wall Anchoring
- Mandatory safety step to prevent serious injury from furniture tip-over.
Images and diagrams
- Steps 1-29 cover the main frame assembly.
- Steps 30-33 involve back panel installation.
- Steps 43-47 cover door installation and hinge attachment.
Model compatibility
- Requires wall mounting hardware suitable for your specific wall type.

Manual page author
David Miller
Documentation analyst
Organizes user manual content into clear summaries, with attention to model details, product context, and everyday usability.