Automotive / Exhaust Systems
Installation Manual for JBA Performance Exhaust 1627S and 1628S Series
Quick installation guide for JBA Performance Exhaust 1627S and 1628S series headers. Includes step-by-step mounting instructions, required vehicle modifications, and safety tips for Ford F-150, F-250, and Bronco models.
Table of contents
Manual images
Click an image to enlargeQuick Guide from the Manual
This document provides installation instructions for JBA Performance Exhaust Cat4Ward Headers (models 1627S and 1628S). These headers are designed for specific Ford F-150, F-250, and Bronco models. Key requirements include working on a lift or using quality jack stands, allowing the engine to cool completely, and performing specific modifications to the dipstick tube bracket, plenum support, and secondary air injection tubes depending on the vehicle year and engine configuration.

Installation Preparation
Before beginning the installation, ensure you have all parts listed in the parts list. Work in a safe environment, preferably on a lift. If a lift is unavailable, use quality jack stands on level ground. Never rely solely on a jack. Disconnect the negative battery cable and spray penetrating oil on all hardware and fittings that need to be removed to ease the process.


Removal of Factory Manifolds
- Unbolt the Y-Pipe assembly from the collector flanges of the factory headers.
- Unbolt the dipstick tube bracket from the engine and remove it.
- Unbolt the driver's side exhaust manifold and remove it.
- Remove all old gaskets, gasket material, and carbon deposits from the head surface.
- Unbolt the passenger side manifold and EFI plenum support.
- For specific models (1986 & 1996 5.0), remove the O2 sensor from the rear of the manifold.
- For 1986-96 5.8 models without air injection, remove the EGR fitting from the front of the passenger side exhaust manifold.
Header Installation and Modifications
Driver's Side: Apply anti-seize to header bolts if installing on aluminum heads. Bolt the header on using the supplied gasket, bolts, and lock washers. Tighten bolts from the center out. The dipstick tube bracket may require grinding to fit between the header tube and the header bolt.
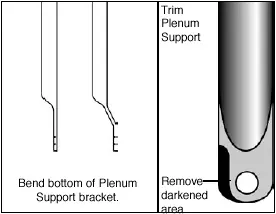
Passenger's Side: Install the header temporarily with a few bolts to test fit surrounding components. The bottom portion of the plenum support bracket must be ground to clear the new header tubes and bent slightly to attach closer to the engine. Secondary air injection tube modifications are required for certain models (use the included steel extension bracket for 1986-96 5.8 models without air injection).
Final Checks
After modifications, remove the temporarily installed header, clean the head surface, and perform the final installation using the supplied gaskets and hardware. Apply a thin coating of high-temperature, oxygen sensor-safe silicone sealant to the collector dome on each header. Attach the headers to the Y-Pipe. Reinstall spark plug wires, ensuring they do not rest against header tubes. Reinstall the negative battery cable. Start the engine, let it warm up, check for leaks, and re-check that all bolts are tight after the engine cools.
Parts List
- (1) Driver’s Side Header Assembly
- (1) Passenger’s Side Header Assembly
- (16) 3/8” x 1” header bolts & lock washers
- (2) Header gaskets (Header to Head flange)
- (4) Collector Bolts & Nuts
- (1) Secondary Air Injection Tube Adapter Bracket & Fastener (1628 models only)
- (2) Dipstick/Air injection tube spacers
- (1) CARB Sticker
Practical help
Common problems
Exhaust leaks at the collector
Apply a thin coating of high-temperature, oxygen sensor-safe silicone sealant to the collector dome on each header.
Bracket interference
The dipstick tube bracket and plenum support bracket may require grinding or bending to clear the new, larger header tubes.
Header bolts seizing
Apply anti-seize to the header bolts, especially when installing on aluminum heads.
Before use
- Verify all parts from the parts list are present.
- Ensure the vehicle is on a lift or supported by quality jack stands.
- Allow the engine to cool completely.
- Disconnect the negative battery cable.
- Apply penetrating oil to all hardware to be removed.
- Clean the sealing surface on the head of any old gasket debris or carbon build-up.
Specs in practice
- High-temp silicone
- Used on the collector dome to ensure a leak-free seal.
Images and diagrams
- Dipstick tube modification: Grind the bracket to allow it to fit between the header tube and the header bolt.
- Plenum support modification: Trim the bottom of the support bracket to clear header tubes and bend it slightly to attach closer to the engine.
Model compatibility
- Compatible with Ford F-150, F-250, and Bronco models from 1986-1996.
- Specific modifications required for secondary air injection tubes on 1986-96 5.8 models without air injection.
- 1628 models include a specific secondary air injection tube adapter bracket.

Manual page author
Michael Turner
Technical manual editor
Reviews PDF manuals for structure, safety notes, and practical product details so readers can find the right information quickly.