Electronics / Security Cameras
User Manual for Mirabella Genio 15S Full HD Doorbell Camera
Quick start guide and setup instructions for the Mirabella Genio 15S Full HD Doorbell Camera. Learn how to install, pair with Wi-Fi, set up the wireless chime, and troubleshoot common connection issues.
Table of contents
Manual images
Click an image to enlargeQuick Start Guide
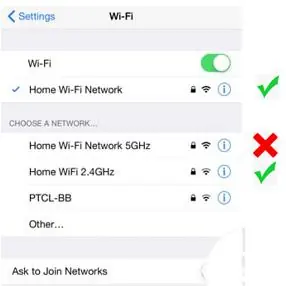
This guide provides essential steps to set up your Mirabella Genio 15S Full HD Doorbell Camera. Before beginning, ensure your smartphone is connected to a 2.4GHz Wi-Fi network, as the device does not support 5GHz networks. Ensure you have a strong Wi-Fi signal (at least two bars) at the installation location.
What's Included
- Bell 15S Doorbell Camera
- USB charging cable
- USB chime
- Wall mount screw sets
Product Details
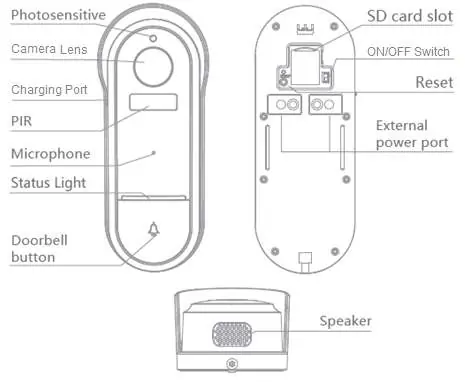
The doorbell features a camera lens, photosensitive sensor, PIR motion sensor, microphone, status light, and doorbell button on the front. The rear/side contains the SD card slot, ON/OFF switch, reset button, and external power port. A speaker is located on the bottom.
Installation
Battery Charging: Remove the plastic cover on the side to expose the charging port. Use the supplied USB cable and a standard 5V 1A phone charger (not included) to charge the battery.
Micro SD Card: Remove the rubber cap to expose the slot. Insert a Micro SD card (8GB-128GB, FAT32 format only). The camera does not support NTFS file systems.
Mounting:
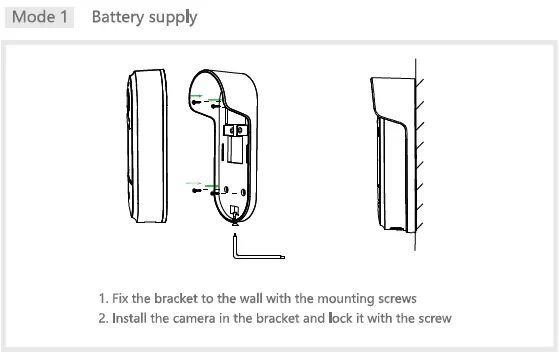
- Mode 1 (Battery Supply): Fix the bracket to the wall using the mounting screws, then install the camera in the bracket and lock it with the screw.
- Mode 2 (AC Supply): Prepare the necessary accessories, connect the bracket to the 12-24V AC power supply, then install the camera in the bracket and lock it with the screw.
Pairing the Camera
- Remove the back cover and slide the switch to ON.
- Press the doorbell button and wait 6-30 seconds until the outer ring blinks red slowly (1 blink every two seconds). If it blinks fast, press and hold the reset button until you hear a sound.
- Open the Mirabella Genio App, tap '+', choose 'Security & Sensor', and select your doorbell camera.
- Confirm the LED is blinking slowly, enter your 2.4GHz Wi-Fi credentials, and tap 'Continue'.
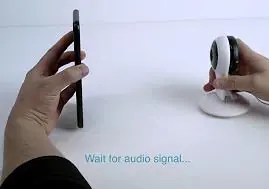
- A QR code will appear on your phone screen. Hold it 15-20cm in front of the camera until you hear a sound and the indicator changes to blinking blue.
- Wait for the indicator to turn solid blue, then tap the 'beeped/indicator switch' button in the app.
Pairing the Wireless Chime

- Plug the chime into a USB outlet within 5 meters of the doorbell.
- In the app, go to Doorbell -> Settings -> Bell Setting -> Wireless Chime.
- Press and hold the reset button on the back of the chime until the blue light blinks continuously for more than 10 seconds.
- In the app, go to Ring Setting -> Add (or Bell Setting -> Bind).
- The chime light will stop blinking once paired.
App Settings
Access settings via the pencil icon in the camera interface. Key settings include:
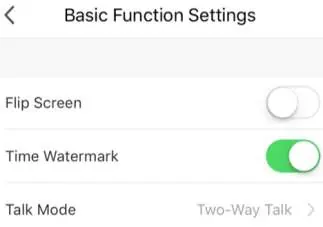
- PIR: Motion detection on/off and sensitivity adjustment.
- Basic Function Settings: Ensure 'Talk Mode' is set to 'Two-Way Talk'.
- Memory Card Settings: Visible only when a compatible SD card is inserted.
- Bell Settings: Manage wireless chime connections.
Troubleshooting
- Camera won't pair: Ensure you are using 2.4GHz Wi-Fi and the indicator is blinking red slowly. Disable 5GHz on your router if necessary.
- Poor performance: If the signal is less than 60%, relocate the camera or use a Wi-Fi extender.
- QR code not scanning: Ensure the camera is in pairing mode and hold the phone 15-20cm away.
Battery Safety
Always use the specified battery charger. Do not disassemble, puncture, or expose the battery to fire, water, or high temperatures. If the battery leaks or emits an odor, remove it immediately and keep away from flames. Dispose of batteries according to local council regulations.
Practical help
Common problems
Camera fails to pair with the app
Ensure your phone is connected to a 2.4GHz Wi-Fi network (not 5GHz). Verify the indicator light is blinking red slowly. If not, reset the camera.
Poor performance or slow loading
Check Wi-Fi signal strength. If it is below 60%, consider moving the camera closer to the router or using a Wi-Fi extender.
Camera does not scan the QR code
Ensure the camera is in pairing mode (blinking red slowly). Hold the phone screen 15-20cm away from the camera lens.
Cannot find device error
Manually disable the 5GHz Wi-Fi signal on your router settings during the pairing process.
Before use
- Ensure your smartphone is connected to a 2.4GHz Wi-Fi network.
- Charge the battery using a 5V 1A charger.
- Insert a Micro SD card (8GB-128GB, FAT32 format) if recording is required.
- Check for a strong Wi-Fi signal (at least two bars) at the installation site.
- Ensure the camera is in pairing mode (blinking red slowly).
Specs in practice
- 2.4GHz Wi-Fi
- The required frequency for the camera to connect to the internet; 5GHz networks are not supported.
Images and diagrams
- Battery supply installation: Secure the bracket to the wall, then attach the camera.
- AC supply installation: Connect the bracket to a 12-24V AC power source before attaching the camera.
Model compatibility
- Requires 2.4GHz Wi-Fi network.
- Micro SD card must be FAT32 format.
- Compatible with 12-24V AC power supply for hardwired installation.

Manual page author
Michael Turner
Technical manual editor
Reviews PDF manuals for structure, safety notes, and practical product details so readers can find the right information quickly.