Electronics / Trail Cameras
User Manual for Moultrie GameSpy 145s Digital Camera
Quick guide for the Moultrie GameSpy 145s digital camera. Learn how to install batteries, mount the device, configure settings, and manage photos.
Table of contents
Manual images
Click an image to enlargeQuick Start Guide
To begin using your Moultrie GameSpy 145s, follow these steps:
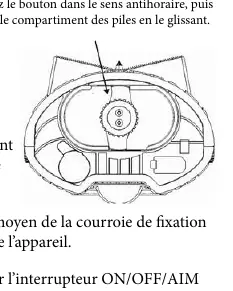
- Install Batteries: Turn the knob counter-clockwise to remove the battery compartment. Insert four (4) D-cell alkaline batteries, observing the polarity markings. Reinsert the compartment and turn the knob clockwise to lock.
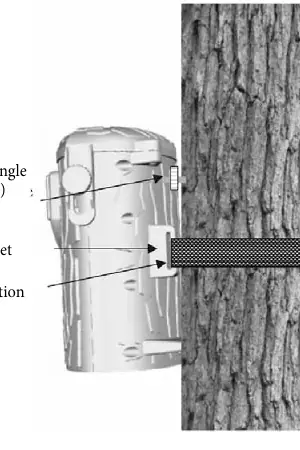
- Mounting: Secure the camera to a tree or post using the provided strap through the eyelets on the back of the unit.
- Power On: Slide the switch to the ON position.
- Setup: Press the MODE button to access the Camera Setup menu. Use the ENTER button to select fields and the UP/DOWN/LEFT/RIGHT buttons to adjust the date and time.
- Operation: Press the MODE button until AUTO is displayed. The camera will now automatically take photos when motion is detected.
Device Overview
The camera features several controls and ports:
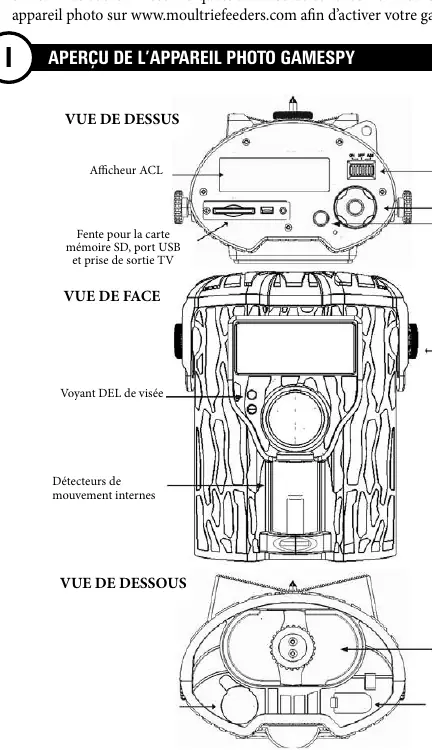
- Top View: Contains the LCD screen, SD card slot, USB port, TV out jack, On/Off/Aim switch, and navigation buttons (Mode, Enter, Scroll Ring).
- Front View: Features the aiming LED and internal motion sensors.
- Bottom View: Houses the battery compartment and PowerPanel port.
Operation Modes
The camera operates in three main modes, accessible via the MODE button:
- Auto: The standard operating mode for capturing photos/videos.
- Camera Setup: Allows customization of settings like date/time, capture mode, and image quality.
- Cellular Setup: Used for configuring optional cellular connectivity (if the accessory is installed).
Camera Settings
You can customize the following settings in the Camera Setup menu:
- Capture Mode: Choose between Still (photo) or Video.
- Photo Quality: Options include Low, Medium, High, and Enhanced.
- Photo Delay: Set the interval between photos (1, 5, 10, 30, or 60 minutes).
- Multi-Shot: Configure the camera to take 1, 2, or 3 photos per trigger.
- Video Settings: Adjust video resolution (Low/High) and duration (5, 15, or 30 seconds).
- Camera ID: Assign a unique name to the camera for identification on photos.
- Temperature: Choose between Fahrenheit or Celsius for the info strip.
- Flash: Toggle the flash ON or OFF.
Advanced Features

- USB Viewing: Connect the camera to a computer using the provided USB cable to view JPG images and AVI videos.
- Image Info Strip: Displays temperature, moon phase, time, and camera ID on captured photos.
- Default Settings: You can reset the camera to factory defaults via the DEFAULT SETTINGS menu.
Technical Specifications
- Resolution: Up to 4.0 Mpx.
- Internal Memory: 128 MB.
- SD Card Support: Up to 16 GB.
- Detection Range: Approximately 35 +/- 5 feet.
- Power Source: 4 D-cell alkaline batteries.
- Field of View: 52 degrees.
Practical help
Common problems
Camera not capturing images
Check battery levels, ensure the SD card is inserted correctly, and verify the camera is in 'Auto' mode.
Cannot view images on computer
Ensure the USB cable is securely connected to both the camera and the computer, or use an SD card reader.
Date/Time is incorrect
Access the 'Camera Setup' menu and re-configure the date and time settings.
Before use
- Install 4 fresh D-cell alkaline batteries.
- Insert an SD card (up to 16GB).
- Mount the camera securely using the provided strap.
- Set the current date and time in the setup menu.
- Ensure the camera is switched to 'Auto' mode.
Specs in practice
- Detection Range
- The distance at which the motion sensor can trigger the camera (approx. 35 feet).
Images and diagrams
- Top View: Shows the location of the LCD screen, SD slot, and control buttons.
- Front View: Identifies the motion sensors and aiming LED.
- Bottom View: Shows the battery compartment and PowerPanel port.
Model compatibility
- Compatible with Moultrie PowerPanel (sold separately).
- Supports SD cards up to 16GB.

Manual page author
Michael Turner
Technical manual editor
Reviews PDF manuals for structure, safety notes, and practical product details so readers can find the right information quickly.