Electronics / Trail Cameras
User Manual for Wildgame Innovations Terra Extreme 12MP IR Trail Camera
Quick guide for the Wildgame Innovations Terra Extreme 12MP IR Trail Camera. Learn how to install batteries, set up SD cards, configure custom settings, mount the camera, and troubleshoot common issues.
Table of contents
Manual images
Click an image to enlargeQuick guide from the manual
The Wildgame Innovations Terra Extreme is a digital scouting camera designed for outdoor use. To get started, ensure you have a compatible SD card (up to 32GB, FAT32) and fresh batteries. The camera features three pre-programmed Quick Sets for easy operation, or you can use the CUSTOM setting to adjust resolution, burst mode, and delay intervals. Always ensure the door is latched securely to maintain the moisture seal.
Battery and SD Card Installation
Battery Installation:
- Open the door at the bottom of the camera by pulling the latch.
- Slide the orange EJECT latch to the left to drop the battery tray.
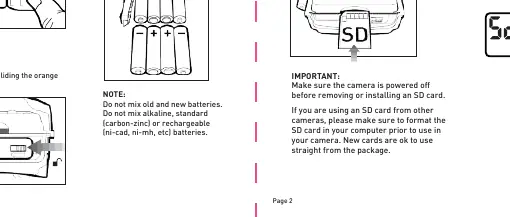
- Insert batteries as shown on the tray. Do not mix old and new batteries or different battery types (alkaline, carbon-zinc, rechargeable).
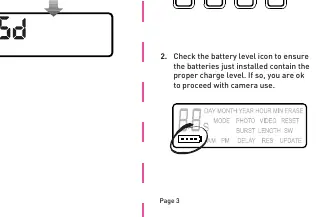
- Check the battery level icon on the screen after powering on.
SD Card Installation:
- Ensure the camera is powered off.
- Insert an SD memory card (up to 32GB) into the slot with the notch first and metal pins facing you.
- If the card is missing or corrupted, a "No SD card" message will appear upon power-up.
Power and Quick Settings
To turn the unit on, slide the power switch to a QSET (Quick Set) or CUSTOM setting. To turn the unit off, slide the switch all the way up.
Quick Sets:
- Quick Set 1: 3 Photo Burst, 8MP resolution.
- Quick Set 2: Single Photo, 8MP resolution.
- Quick Set 3: 10 sec Video, 1280x720 resolution.
- CUSTOM: Allows manual adjustment of settings.
Once a setting is selected, the screen will display a 9-second countdown before the camera becomes active.
Custom Settings and Configuration
To modify settings, the power switch must be set to CUSTOM.
- Date/Time: Press MENU, then ENTER to set the Day, Month, Year, Hour, Minute, and AM/PM. Use arrow buttons to adjust and ENTER to confirm.
- Photo/Video Mode: Press MENU, navigate to MODE, press ENTER, and use arrow buttons to toggle between Photo and Video.
- Photo Burst: Navigate to BURST in the menu to select 1-3 photos per trigger.
- Video Length: Navigate to VIDEO LENGTH to select 5, 10, or 20-second videos.
- Delay: Navigate to DELAY to set the interval between photos or videos (5, 10, 15, 30, or 60 seconds).
- Resolution: Navigate to RES to select 4, 8, or 16MP photo resolution.
Mounting and Usage
When mounting to a tree, remove the clip from one end of the strap to slide it through the slots on the back of the camera. Reattach the clip, wrap the strap around the tree, and pull the excess material to secure the camera tightly.
Important Tips:
- Recommended distance from the target area is 25-30 feet.
- Avoid mounting the camera facing the rising or setting sun to prevent direct sunlight into the lens.
- Clean the lens cover, flash cover, and PIR sensor cover regularly, especially in dusty environments.
- Ensure the door is latched securely to activate the moisture seal.
Troubleshooting and Maintenance
If you encounter issues with your SD card, you can format it using the camera:
- Press and hold the MENU button while in CUSTOM Quick Set.
- "ERASE" will appear on the screen. Press ENTER.
- Press an arrow key until a blinking "Y" appears.
- Press ENTER to format.
Note: Formatting will delete all files on the SD card. If the camera is writing to memory, the LCD screen will not wake up when buttons are pressed.
Practical help
Common problems
No SD card message
Ensure the SD card is inserted correctly (notch first, pins facing you) or format the card.
Camera not saving images
Check if the SD card is full or corrupted; format the card using the camera or a computer (FAT32).
LCD screen does not wake up
The screen will not wake up while the camera is writing to memory.
Before use
- Insert fresh batteries (do not mix old/new or different types).
- Insert a compatible SD card (up to 32GB, FAT32 format).
- Check battery level icon on the screen.
- Format the SD card before first use.
Images and diagrams
- Battery tray: Accessed by sliding the orange EJECT latch to the left.
- SD card slot: Located on the side; insert with notch first.
- Power switch: Located on the control panel; slide to QSET or CUSTOM.
Model compatibility
- Supports SD cards up to 32GB.
- SDXC cards are not supported.
- Requires FAT32 file system for SD cards.

Manual page author
David Miller
Documentation analyst
Organizes user manual content into clear summaries, with attention to model details, product context, and everyday usability.