Home / Pest Control
User Manual for Oypla 3120 Gas Patio Heater
Quick guide for the Oypla 3120 Gas Patio Heater. Includes assembly steps, operating instructions, safety warnings, maintenance tips, and troubleshooting.
Table of contents
Manual images
Click an image to enlargeQuick guide from the manual
The Oypla 3120 Gas Patio Heater is designed for outdoor use only. Before first use, it is mandatory to perform a gas leakage test using a soap solution. Ensure the heater is placed on a stable surface and anchored if necessary. Always turn off the gas supply at the cylinder when the heater is not in use.
Safety Instructions
Warning: Failure to follow these instructions may result in injury or damage.
- Use only propane or butane gas.
- For outdoor use only. Never operate in an explosive atmosphere or near flammable materials.
- Do not move the appliance while it is in operation.
- Ensure all bolts are secured before use.
- Keep children and pets away from high-temperature surfaces.
- Do not obstruct ventilation holes in the cylinder housing.
- If you smell gas, turn off the gas valve immediately.
- Do not use the heater until all connections have been leak tested.
Assembly Instructions
Ensure you have the following tools: open-end wrench (10 & 13 mm), adjustable wrench (20 cm), slip joint pliers (23 cm), Phillips screwdriver, and a spray bottle with soap solution.
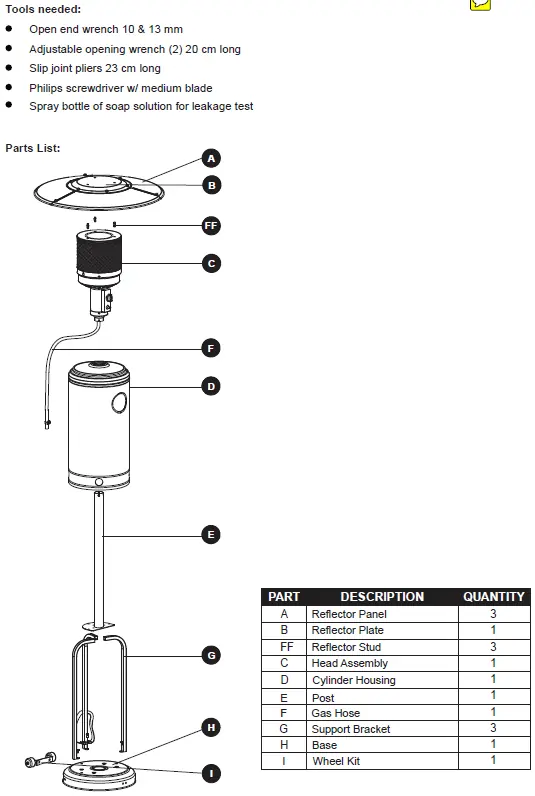
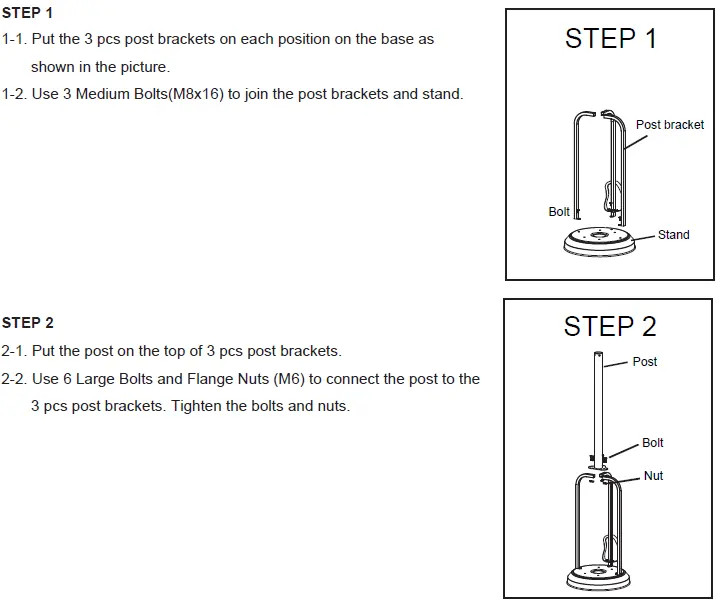
- Base Assembly: Attach the 3 post brackets to the base using 3 medium bolts (M8x16).
- Post Installation: Place the post on top of the brackets and secure with 6 large bolts and flange nuts (M6).
- Tank Housing: Place the tank housing onto the stand.
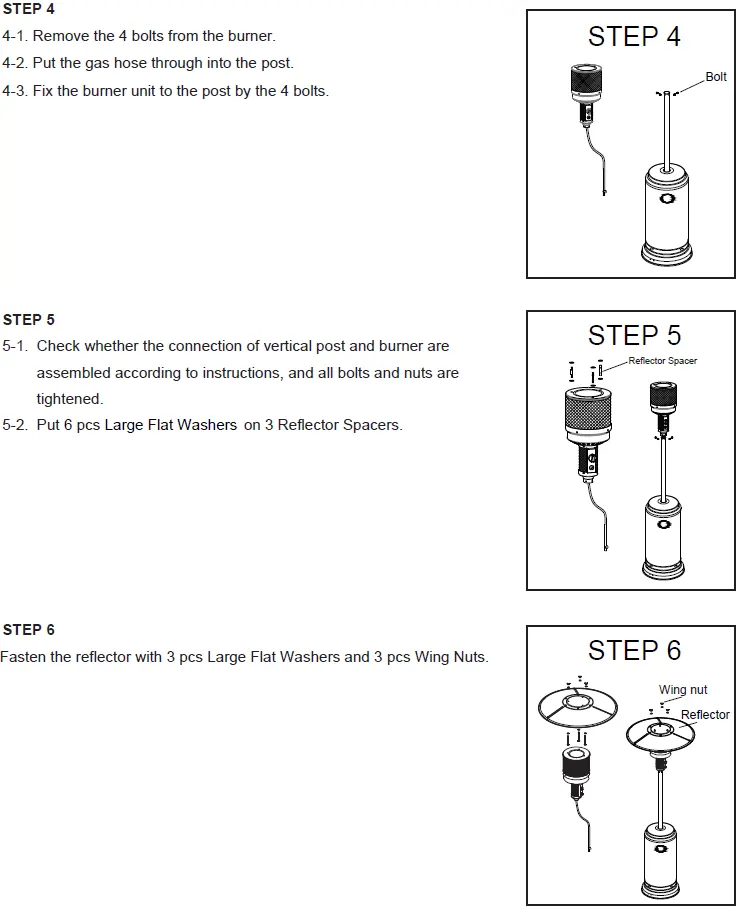
- Burner Unit: Remove the 4 bolts from the burner, pass the gas hose through the post, and fix the burner unit to the post using the 4 bolts.
- Reflector Assembly: Install 6 large flat washers on the 3 reflector spacers. Fasten the reflector using 3 large flat washers and 3 wing nuts.
- Final Connections: Connect the gas hose to the regulator and the regulator to the gas tank. Secure the tank with the propane tank strap.
Operating Instructions
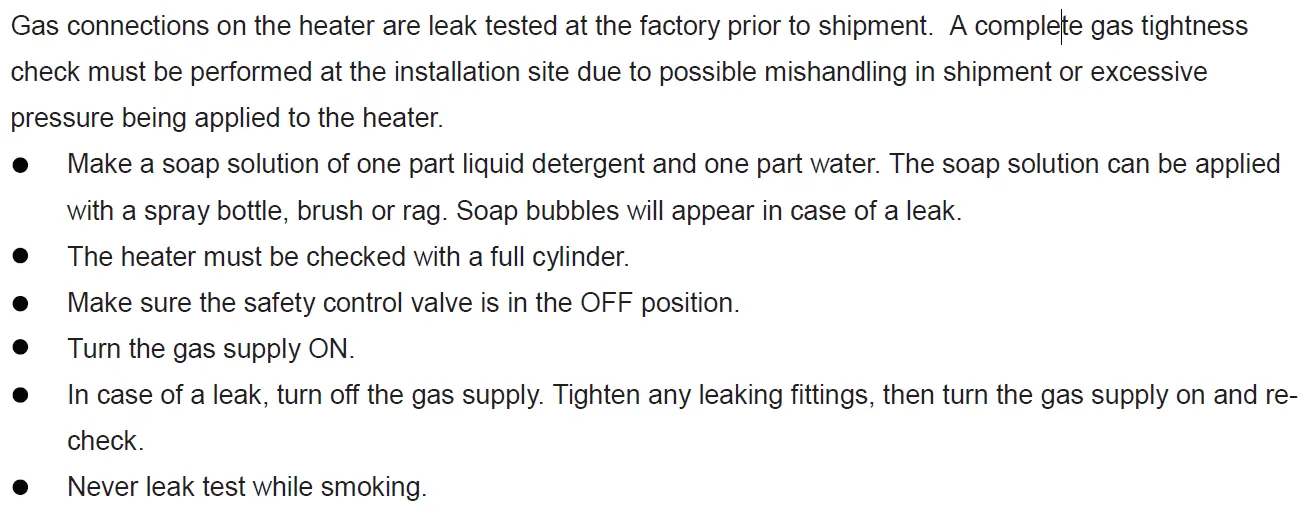
Gas Leak Test: Before first use, create a soap solution (one part liquid detergent, one part water). Apply to connections. If bubbles appear, there is a leak; tighten fittings and re-test. Never leak test while smoking.
Turning On:
- Turn on the gas supply valve completely.
- Turn the variable control knob to the PILOT position (counter-clockwise 90 degrees).
- Press and hold the variable control knob for 90 seconds. While holding, press the igniter button repeatedly until the pilot flame lights.
- Once lit, release the knob. If it goes out, repeat the process.
- After the pilot flame is established, turn the knob to the maximum position for at least 5 minutes before adjusting to the desired temperature.
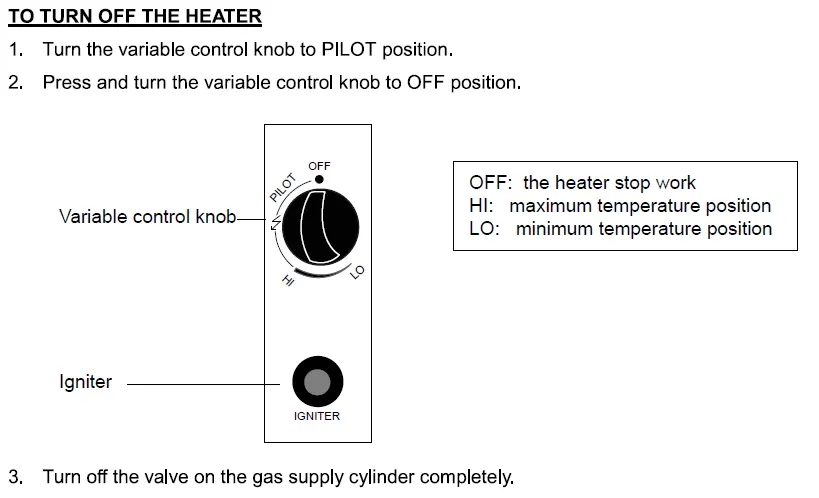
Turning Off:
- Turn the variable control knob to the PILOT position.
- Press and turn the knob to the OFF position.
- Close the gas valve on the cylinder completely.
Cleaning & Maintenance
- Wipe powder-coated surfaces with a soft, moist rag. Do not use industrial cleaning substances.
- Never clean the heater while it is hot or in use.
- Always close the gas valve after use.
- Remove the pressure controller and hose when storing.
- Check the gas valve for damage regularly.
- Store in a well-ventilated area; never store liquid gas cylinders in sub-terrain locations.
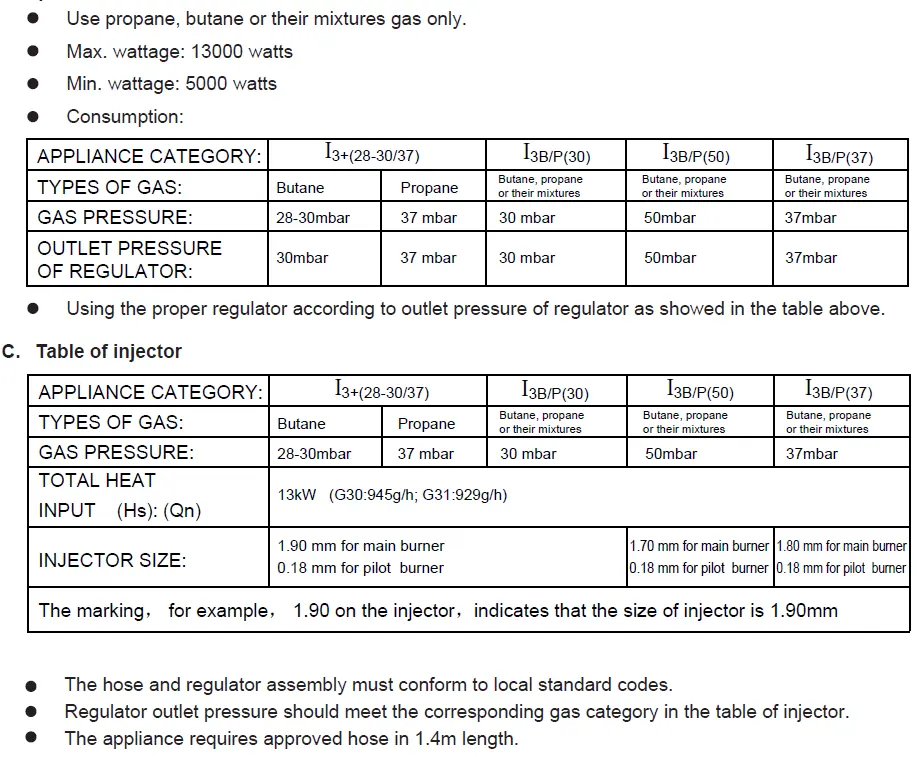
Technical Information
- Gas Types: Propane, Butane, or mixtures.
- Max Wattage: 13000 watts.
- Min Wattage: 5000 watts.
- Hose Length: 1.4m.
- Injector Size: 1.90mm (main burner) / 0.18mm (pilot burner) for standard categories.
Troubleshooting
If the pilot will not light, check if the gas valve is off, the tank is empty, or if there is air in the supply system. If the pilot will not stay on, check for loose connections, debris around the pilot, or a faulty thermocouple. If the burner will not light, ensure the control is on and the pilot assembly is correctly positioned.
Practical help
Common problems
Pilot will not light
Check if gas valve is open, refill LPG tank, clean/replace opening, or purge air from lines.
Pilot will not stay on
Tighten loose connections, clean debris around pilot, or replace faulty thermocouple.
Burner will not light
Check if tank is empty, ensure control is turned on, or reposition pilot light assembly.
Before use
- Perform a gas leak test using a soap solution.
- Ensure all bolts are securely tightened.
- Verify the gas cylinder is in accordance with local regulations.
- Ensure the heater is placed on a stable, flat surface.
- Check that the area is well-ventilated and free of flammable materials.
Images and diagrams
- Assembly diagram shows parts A-I including reflector, head assembly, post, and base.
- Operating diagram shows the variable control knob with PILOT, OFF, HI, and LO positions.
Model compatibility
- Requires propane or butane gas.
- Hose and regulator must conform to local standard codes.

Manual page author
Michael Turner
Technical manual editor
Reviews PDF manuals for structure, safety notes, and practical product details so readers can find the right information quickly.