Garden / Outdoor Heaters
User Manual for Dellonda DG124 Gas Patio Heater
Quick guide for the Dellonda DG124 gas patio heater. Includes assembly instructions, leak testing procedures, operation steps, and troubleshooting tips for safe outdoor use.
Table of contents
Manual images
Click an image to enlargeQuick Guide
The Dellonda DG124 is a 13kW freestanding gas patio heater designed for outdoor use in commercial and domestic settings. Before use, ensure the heater is placed on level ground with adequate ventilation. Always perform a leak test on all gas connections before the first use and after changing gas cylinders. The unit requires a AAA battery for the ignition system.
Safety Instructions
- Outdoor Use Only: Never use the heater indoors or in enclosed spaces. Ensure the area has at least 25% open surface area for ventilation.
- Clearance: Maintain a minimum clearance of 100cm from the top and sides to combustible materials.
- Gas Safety: If you smell gas, shut off the cylinder valve immediately, extinguish flames, and evacuate the area. Do not operate electrical switches.
- Handling: Do not move the heater while in operation or until it has fully cooled down.
- Maintenance: Installation and repairs must be carried out by a qualified person. Keep ventilation holes clear of debris.
Assembly
Assembly requires basic tools and should be done carefully to avoid damaging components.
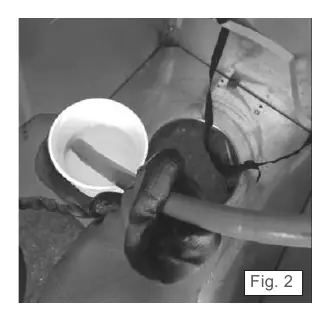
- Hose Connection: To assist in connecting the rubber hose to the regulator and burner control valve, place the hose end in boiling hot water to expand it. Slide the hose clip over the hose, push the hose onto the inlet, and tighten the clip with a screwdriver.
- Wheel Assembly: Attach the wheel assembly to the base using the provided M8 bolts, washers, and nuts.
- Cylinder Housing: Connect the cylinder housing to the base using the connector bracket and M6/M8 bolts.
- Reflector: Assemble the reflector sections using M6 bolts and cap nuts. Attach the reflector to the top mesh using spacers and wing nuts.
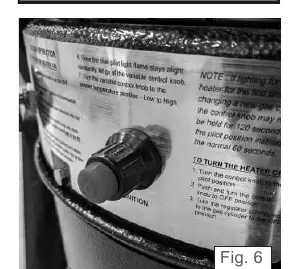
- Ignition: Insert the supplied AAA battery into the ignition switch by unscrewing the collar.
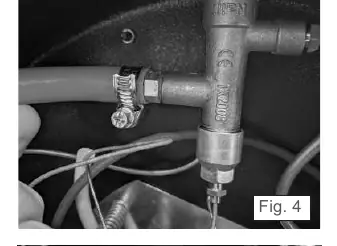
Gas Requirements and Leak Testing
The heater is designed for use with propane gas. Butane may be used with an appropriate regulator, but it is not recommended for cold temperatures as it freezes at 0°C. The gas cylinder must not exceed 15kg capacity (31.8cm diameter x 58cm height).
Leak Test Procedure:
- Ensure the safety control valve is in the OFF position.
- Prepare a soap solution (one part detergent, one part water).
- Apply the solution to all gas connections using a spray bottle, brush, or rag.
- Turn the gas supply ON.
- If bubbles appear, a leak is present. Turn off the gas immediately, tighten the connection, and re-test.
Operation
To turn the heater ON:
- Turn the valve on the gas supply cylinder to the ON position.
- Push the control knob in and turn it to the pilot position.
- Press the igniter button several times to light the burner. Hold the knob for 30 seconds after ignition.
To turn the heater OFF:
- Turn the variable control knob to the pilot position.
- Push the control knob in and turn it to the OFF position.
- Turn the regulator connected to the gas bottle to the OFF position.
Cleaning and Storage
Wipe painted areas with a moist cloth. Avoid strong chemicals or corrosive products. Remove debris from the burner to ensure safe operation. When not in use, disconnect the gas regulator from the bottle and store the cylinder in a dry, well-ventilated area.
Practical help
Common problems
Pilot will not light
Check if the gas valve is ON, the cylinder is empty, the opening is blocked, or if there is air in the system (purge lines).
Pilot will not stay on
Clean debris around the pilot, tighten connections, or replace the thermocouple.
Burner will not light
Check for low fuel pressure (refill cylinder), ensure the control valve is ON, or check if the pilot light assembly is bent.
Before use
- Perform a full leak test on all connections using soap solution.
- Ensure the heater is on level, firm ground.
- Verify the gas cylinder is within size limits (max 15kg, 31.8cm x 58cm).
- Install the AAA battery into the ignition switch.
- Ensure adequate ventilation (outdoor use only).
Images and diagrams
- Fig 2-3: Hose connection process using boiling water to expand the rubber.
- Fig 6: Ignition switch battery installation.
- Fig 7-8: Leak test points on the gas system.
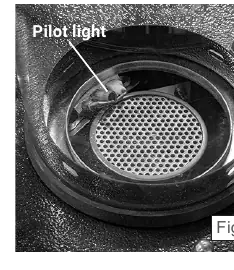
- Fig 9: Location of the pilot light at the base of the glass column.
Model compatibility
- Designed primarily for Propane gas.
- Butane can be used with the correct regulator but is not suitable for cold temperatures (freezes at 0°C).
- Requires a regulator and hose assembly (supplied).

Manual page author
David Miller
Documentation analyst
Organizes user manual content into clear summaries, with attention to model details, product context, and everyday usability.