Garden / Outdoor Heaters
User Manual for Dellonda 13KW Outdoor Garden Gas Patio Heater
Quick guide for the Dellonda 13KW Outdoor Garden Gas Patio Heater (Models DG1.V2, DG2.V2). Includes assembly steps, safety instructions, gas connection, operation, and troubleshooting.
Table of contents
Manual images
Click an image to enlargeQuick guide from the manual
This manual provides instructions for the Dellonda 13KW Outdoor Garden Gas Patio Heater (Models DG1.V2 and DG2.V2). This appliance is designed for outdoor use only in well-ventilated areas. It features a 13kW heat output and is compatible with propane gas cylinders up to 15kg.
Safety Instructions
WARNING: This heater is for outdoor use only. Do not use in enclosed areas. An amply ventilated area must have a minimum of 25% of the surface area open.
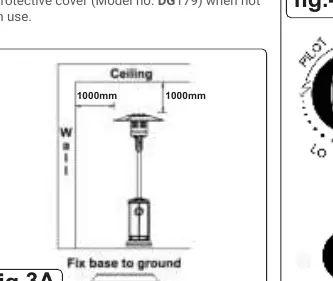
- Always maintain a minimum clearance of 1000mm from the top and sides to combustible materials.
- Do not store or use petrol or other flammable substances near the heater.
- Installation and repair must be carried out by a qualified person.
- Do not move the appliance while in operation or until it has cooled down.
- Ensure the heater is placed on level, solid ground.
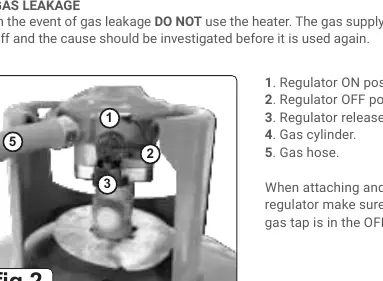
- If you smell gas, shut off the gas supply immediately and extinguish any open flames.
Assembly
Assembly requires basic tools and should be performed with care. Wear protective gloves during assembly.
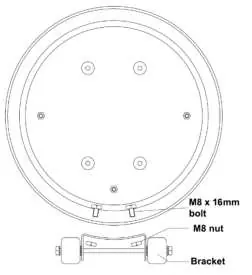
- Fix the wheel bracket to the base.
- Fix the 3 post brackets to the stand using the provided bolts.
- Fix the post to the 3 post brackets using bolts and nuts.
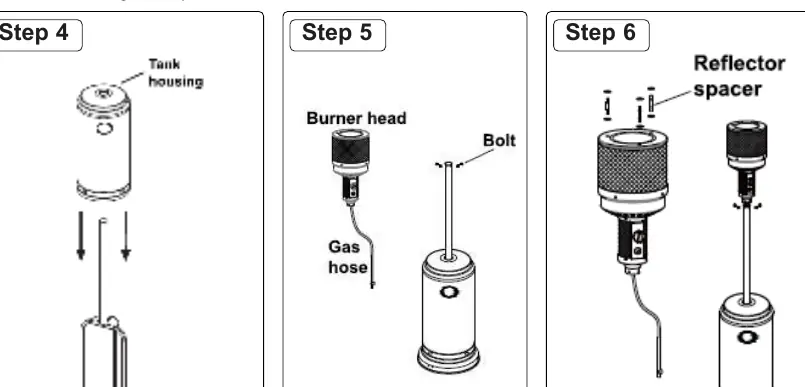
- Place the tank housing over the post.
- Remove four bolts from the base of the burner, pass the gas hose down through the post, and fix the burner to the post.
- Place large washers on the 3 reflector spacers.
- Fix the reflector onto the reflector spacers using wing nuts.
- Raise the tank housing and rest it on the post plate, then connect the gas hose to the regulator and place the LPG cylinder on the stand.
Operation
Connecting the Gas Cylinder: Ensure the regulator is in the OFF position before connecting. Use only the supplied regulator and hose. Check the regulator seal before use.
Lighting the Heater:
- Turn the cylinder valve fully on.
- Press in and turn the variable control knob to the PILOT position (counter-clockwise 90 degrees).
- Hold the knob down for 90 seconds.
- While holding the knob, press the igniter button several times until the pilot flame lights.
- Release the knob once the pilot flame is lit.
- Turn the variable flame knob to the maximum position and leave for 5 minutes before adjusting to the desired heat.
Turning Off: Turn the variable control knob to the pilot position, push it in, and move to the OFF position. Turn off the cylinder valve completely.
Maintenance and Storage
- Check the hose and regulator for damage or leaks regularly. Replace the hose if it shows signs of cracking or deterioration.
- Keep the burner, control compartment, and air passageways clean.
- Wipe surfaces with a soft, moist rag. Do not use combustible or corrosive cleaners.
- Always turn off the gas valve on the cylinder after use and disconnect the valve for storage.
- Do not store gas cylinders in cellars or areas without adequate ventilation.
Troubleshooting
If the pilot will not light, check if the gas valve is open, the cylinder is empty, or if there is air in the supply system. If the pilot will not stay on, check for debris around the pilot, loose connections, or a faulty thermocouple. If the burner will not light, ensure the pressure is sufficient and the control is set correctly.
Practical help
Common problems
Pilot will not light
Check if gas valve is open, cylinder is empty, or if there is air in the supply system. Tighten loose connections.
Pilot will not stay on
Clean debris around the pilot, tighten connections, or replace a faulty thermocouple.
Burner will not light
Check for low fuel pressure (renew cylinder), blocked opening, or ensure the control is set to ON.
Before use
- Ensure the heater is on level, solid ground.
- Verify the area is well-ventilated (minimum 25% open area).
- Check the regulator seal and hose condition.
- Perform a leak test using a soap solution on all connections.
- Ensure the gas cylinder is the correct type (Propane) and size (max 15kg).
Specs in practice
- Max Gas Bottle Size
- Diameter 325mm x Height 700mm, 15kg maximum capacity.
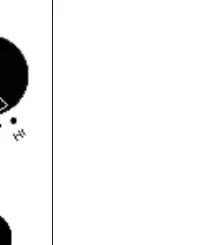
Images and diagrams
- Fig 1: Illustrates the requirement for an amply ventilated area (25% open).
- Fig 2: Shows the regulator operation (ON/OFF positions, release button).
- Fig 3A: Shows the required 1000mm clearance from combustible materials.
- Fig 4: Shows the control knob positions (PILOT, OFF, LO, HI).
Model compatibility
- Use Propane gas only.
- Do not use regulators with US POL inlet fittings.
- Use only the regulator and hose assembly supplied with the heater.

Manual page author
Emily Carter
User documentation editor
Prepares concise manual descriptions and highlights the most useful setup, operation, and maintenance information for readers.