Automotive / Suspension Kits
Installation Guide for Pacbrake 10387-X Air Suspension Kit
Step-by-step installation guide for the Pacbrake 10387-X Extreme Duty Air Suspension Kit for Ford F-250, F-350, and F-450 Super Duty trucks. Includes assembly, mounting, and air line routing instructions.
Table of contents
Manual images
Click an image to enlargeQuick guide from the manual
This document provides installation instructions for the Pacbrake 10387-X Extreme Duty Air Suspension Kit, designed for Ford F-250, F-350, and F-450 Super Duty trucks. The kit is rated for up to 7500 lbs of load-leveling capacity. Important: Never exceed the manufacturer's recommended Gross Vehicle Weight Rating (GVWR). Always maintain a minimum of 10 psi in the air springs to avoid damage and voiding the warranty.
Required tools
- Hoist or floor jack and safety stands
- Torque wrench
- Standard combination wrenches
- 7/32” Hex Allen wrench
- 1-1/8” wrench or deep socket
- Ratchet and sockets (metric & standard)
- Hose cutter (included) or sharp utility knife
- Pipe thread sealant
- Spray bottle with dish soap/water
- Air compressor/compressed air source
Preparation
Before starting, ensure the vehicle application information is correct. If the vehicle has a rear wheel brake proportioning valve, consult the manufacturer. It is recommended to use anti-seize on all fasteners to prevent corrosion.
Installation steps
1. Measure stock ride height
Park on a level surface, remove unnecessary weight, and measure the distance between the center of the wheel hub and the bottom of the fender well for all four corners.
2. Remove rear wheels
Use wheel chocks, raise the rear of the truck, and support the axle with jack stands before removing the wheels.
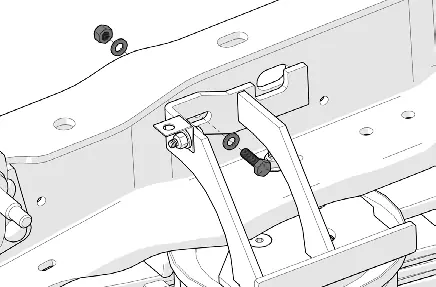
3. Remove existing hardware
Remove the flange nut securing the jounce bumper. If equipped with an aftermarket 5th wheel hitch or emission lines, follow specific relocation or removal instructions provided in the manual.
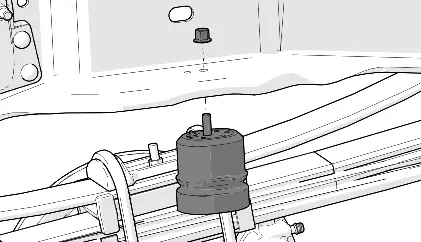
4. Install air fittings
Install the straight brass fitting into each air spring. Thread finger tight plus an additional 1.5 turns. Use thread sealant or Teflon tape. Place a roll plate on the top surface of the air spring.

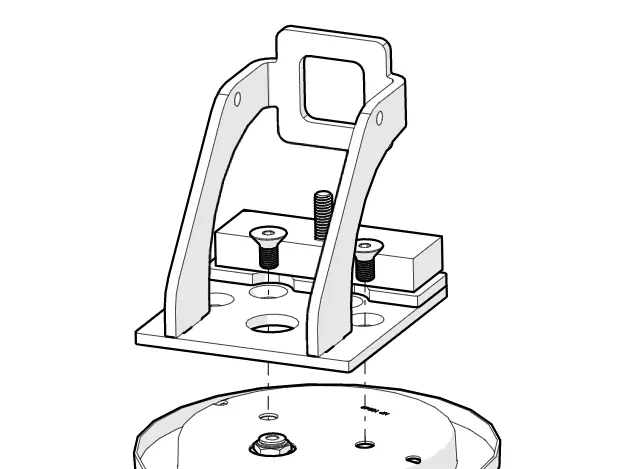
5. Bracket assembly
Assemble the upper and lower brackets according to the provided explosion diagrams. Ensure spacers are oriented correctly (long side facing away from mounting holes). When pre-assembling lower brackets, ensure bolts are inserted from the inside to avoid interference with lift blocks.
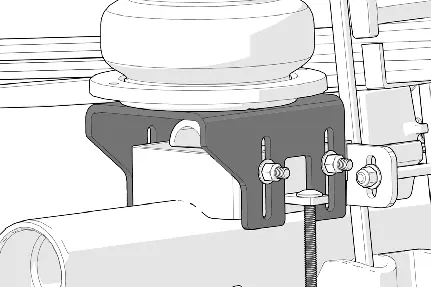
6. Install spring assemblies
Attach the upper brackets to the air springs and secure the assemblies to the truck frame. Follow the specific instructions for your vehicle configuration (e.g., with or without 5th wheel hitch). Torque all fasteners to the specified values (e.g., 20 ft-lbs for air spring bolts, 27 ft-lbs for upper bracket bolts).
7. Install air lines
Cut the air line into two equal lengths using the provided hose cutter. Route the lines to the air springs, ensuring they are away from moving parts and heat sources. Install the fill valves (commonly in the license plate fastener holes).

Testing and maintenance
Check system for leaks
Inflate both air springs to 90 psi. Spray all connections with a mixture of dish soap and water. Large, expanding bubbles indicate a leak. Repair as necessary and retest.
Operating requirements
Never operate the vehicle with less than 10 psi or more than 100 psi in the air springs. Check pressure daily for the first few days. Re-torque all fasteners after the first 500 miles of driving.
Practical help
Common problems
Air leak at connection
Ensure the nylon airline is cut squarely using the provided hose cutter; do not use scissors or wire cutters as they distort the line.
Interference with lift blocks
Ensure bolts on the lower bracket assembly are inserted from the inside.
Air spring damage
Never allow the air spring to limit the travel of the axle when lifting the vehicle; always jack the vehicle on the axle.
Before use
- Verify vehicle make, model, and year compatibility
- Gather all required tools including torque wrench and hose cutter
- Check for rear wheel brake proportioning valve
- Ensure all kit contents (A-II) are present
- Remove unnecessary weight from the vehicle
Specs in practice
- Operating Pressure
- 10 psi (minimum) to 100 psi (maximum).
- Load Capacity
- Rated for up to 7500 lbs of load-leveling capacity.
- Torque Specs
- Vary by bolt; refer to assembly diagrams (e.g., 20 ft-lbs for air spring bolts, 27 ft-lbs for upper bracket bolts).
Images and diagrams
- Explosion diagrams on pages 4 and 5 show the assembly order for driver and passenger sides.
- Figure 1 illustrates how to measure stock ride height.
- Figure 18 demonstrates the leak testing procedure using soap and water.
Model compatibility
- Fits Ford F-250, F-350, & F-450 Super Duty (2WD/4WD).
- Requires specific hardware adjustments for trucks with factory or aftermarket 5th wheel hitches.

Manual page author
Emily Carter
User documentation editor
Prepares concise manual descriptions and highlights the most useful setup, operation, and maintenance information for readers.