Automotive / Exterior Accessories
Installation Guide for Rugged Ridge Fabric Replacement Top 13705.XX
Comprehensive installation and maintenance guide for the Rugged Ridge Fabric Replacement Top (13705.XX) designed for 1997-2006 Jeep Wrangler/TJ vehicles. Includes step-by-step removal of the old top, installation of the new fabric, zipper...
Table of contents
Manual images
Click an image to enlargeQuick guide from the manual
This guide provides instructions for installing the Rugged Ridge Fabric Replacement Top on 1997-2006 Jeep Wrangler/TJ vehicles. For ease of installation, it is highly recommended to perform the installation at a temperature above 72°F (22°C). Below this temperature, the fabric may contract, making it difficult to fit. It is normal for the fabric to have wrinkles upon unpacking; these will relax within a few days.
Tools needed
- Shoe Horn
- Safety Glasses
- Razor Knife
- Phillips screwdriver
Removing the Old Top
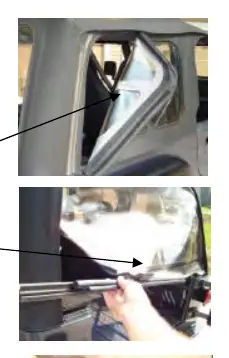
- Windows and Tailgate Bar: Remove quarter windows and rear window. Remove the metal tailgate bar from the bottom of the rear window and set it aside for reuse. Pull down and out on the plastic strips above the doors to release them from the channel.
- Header Latch: Release the latch securing the header to the windshield by pulling up on the lever, then down and out to release the hook.
- Rear Corners: Pull gently down and out to release the plastic strip from the vehicle retainer.
- Bows: Unfasten the flap around the middle bow. Unsnap the fabric from the rear bow and allow the bow to drop onto the tailgate.
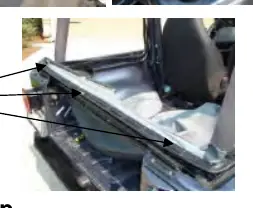
- Header Removal: Collapse the bow assembly onto the tailgate. Remove the screws fastening the corners of the header and set them aside. Flip the fabric back to expose the plastic strip along the edge. Remove the 8 or 14 screws securing the fabric to the header and remove the old top.
Installing the New Top
- Preparation: If installing on a 1997 vehicle, remove the slip-on plastic extrusion on the door surround.
- Header Attachment: Ensure center and rear bows are in the folded down position. Lay the new fabric backing side up, aligning the plastic strip with the front edge of the header. Locate the center round hole, install a screw to secure and center the fabric, then install screws in the remaining holes.
- Draping: Flip the fabric over to wrap around the header. Raise the header slightly to work the pockets over the corners and secure with oval head screws.
- Bow Assembly: Raise the header and bow assembly towards the windshield. Snap the fabric to the rear bow (6 snaps total).
- Securing: Ensure the center bow is centered in the hook and loop flap (do not fasten yet). Pull down on the rear bow to work the plastic strip into the vehicle retainer. Close the header latches. Fasten the hook and loop flaps around the center bow.
- Windows: Orient quarter windows with the zipper slider 10-12 inches along the top. Roll the plastic into the door surround channel. Close the zipper, roll the bottom plastic into the retainer, and fasten hook and loop strips.
- Rear Window: Slide the "C" channel of the tailgate bar onto the tubed strip of the rear window. Insert the bar into the mounts on the tailgate.
- Zipper Finalization: Pull sliders down to catch the pin. Close the zipper carefully, ensuring no extra fabric is caught.
Folding the Top Down
- Remove quarter panels and rear window.
- Release the front header. Raise the front deck and collapse the rear bows. Tuck the plastic strips above the door opening and the stay pad on the rear bow inside the bows. Wrap the fabric around the bows and tuck the rear legs under the bows.
Care and Maintenance
- Washing: Use soap, warm water, and a soft bristle brush. Rinse thoroughly.
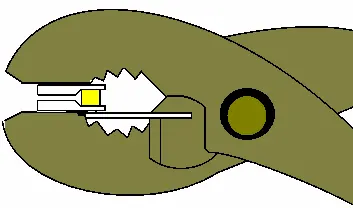
- Zippers: Keep clean and lubricated with silicone. If a zipper opens behind the slider, use pliers to gently squeeze the slider sides back into parallel.
- Water: Use 3M Scotchgard on the inside of seams to stop seepage. Use Bondex iron-on patches for fabric rips.
- Snaps: Keep clean and lubricated. If stuck, use a small flat head screwdriver to gently pry apart.
- Windows: Do not use brushes. Wash with a water-soaked cloth and mild detergent. Never wipe dry. Do not roll in cold weather to prevent cracking.
Practical help
Common problems
Zipper opens behind the slider
The slider may have spread apart. Use pliers to gently squeeze the sides of the slider back into parallel.
Fabric is hard to fit
Install at temperatures above 72°F. The fabric contracts in cold weather.
Snap stuck to stud
Use a small flat head screwdriver to gently pry the snap apart from the stud.
Water seeping through seams
Apply 3M Scotchgard to the inside of the seams.
Before use
- Ensure ambient temperature is above 72°F (22°C)
- Gather tools: Shoe Horn, Safety Glasses, Razor Knife, Phillips screwdriver
- Verify all parts are present (Fabric Top, Quarter Windows, Rear Window)
- For 1997 models, remove slip-on plastic extrusion on door surround
Images and diagrams
- Zipper repair: Using pliers to fix a spread-apart slider.
- Header installation: Aligning the plastic strip with the header.
Model compatibility
- Fits 1997-2006 Wrangler / TJ vehicles.
- 1997 models may require removal of slip-on plastic extrusion on door surround.

Manual page author
David Miller
Documentation analyst
Organizes user manual content into clear summaries, with attention to model details, product context, and everyday usability.