Automotive / Car Seats
Installation Guide for Rugged Ridge MultiMount Ultra Reclinable Front Seat
Step-by-step installation guide for the Rugged Ridge MultiMount Ultra Reclinable Front Seat. Includes mounting patterns, hardware configuration, torque specifications, and vehicle-specific instructions for Jeep TJ, LJ, and XJ models.
Table of contents
Manual images
Click an image to enlargeQuick guide from the manual
This guide covers the installation of the Rugged Ridge MultiMount Ultra Reclinable Front Seat. Before beginning, verify your vehicle model and year (97-06 TJ/LJ or 84-01 XJ) as mounting patterns and hardware configurations vary. Ensure you have the necessary tools, including a 21/64th drill bit for 03-06 TJ/LJ models. Note that seat adjustment levers for TJ models are sold separately.
Preparation and Compatibility
The MultiMount system is designed for specific Jeep models. Mounting patterns are mirror images for left and right sides and are offset from the center. Always read the instructions completely before starting.
- 97-01 XJ / 97-02 TJ: Uses specific mounting patterns and hardware.
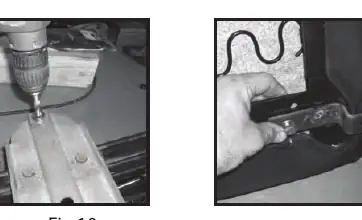
- 03-06 TJ/LJ: Requires drilling out outbound threaded seat mounts on the factory riser using a 21/64th drill bit.
- 84-96 XJ: Follows specific seat base disconnection procedures.
Installation Steps
Follow these general steps, paying close attention to your specific vehicle model:
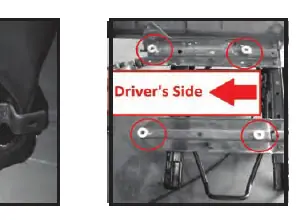
- Remove Factory Seat: Remove the four bolts holding the factory seat and riser to the vehicle. Disconnect the seat belt warning harness if equipped.
- Remove Mounting Nuts: Remove the four M13 factory seat mounting nuts. Do not discard these, as they may be reused.
- Disconnect Cables: Disconnect the factory seat adjuster cable from the seat riser.
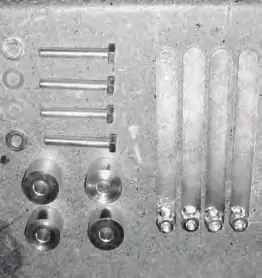
- Prepare Mounting: Depending on your model, use the supplied step brackets, nut plates, spacers, M13 bolts, and flat washers. Do not fully tighten bolts until the seat is secured to the factory riser to allow for adjustment.
- Drilling (03-06 TJ/LJ only): Drill out the two outbound threaded seat mounts on the factory riser.
- Install New Seat: Place the new seat onto the factory riser. Secure with step brackets and original nuts. Apply thread lock to riser studs.
- Torque Specifications: Tighten riser studs to 27ft-lbs and mounting bolts to 30ft-lbs.
- Final Assembly: Reinstall seat belt, plastic side cover plates, and adjuster knobs. Reconnect seat belt warning light.
Technical Support
For technical assistance, contact OMIX-ADA Tech Support at 1-800-449-6649 or visit www.omix-ada.com.
Official resources from the manual
Practical help
Common problems
TJ seat adjustment levers are missing or not functioning
TJ seat adjustment must be made from under the seat. Levers can be purchased separately: part 13201.09 for 1997-2002 models, and 13201.10 for 2003-2006 models.
Mounting holes do not align on 03-06 TJ/LJ
Ensure you have drilled out the two outbound threaded seat mounts on the factory riser using a 21/64th drill bit as required for these models.
Before use
- Verify vehicle model and year (TJ, LJ, or XJ).
- Ensure all hardware (spacers, nut plates, bolts) is present.
- Have a 21/64th drill bit ready (if installing on 03-06 TJ/LJ).
- Prepare thread lock for riser studs.
- Check if seat adjustment levers are needed for your specific model.
Images and diagrams
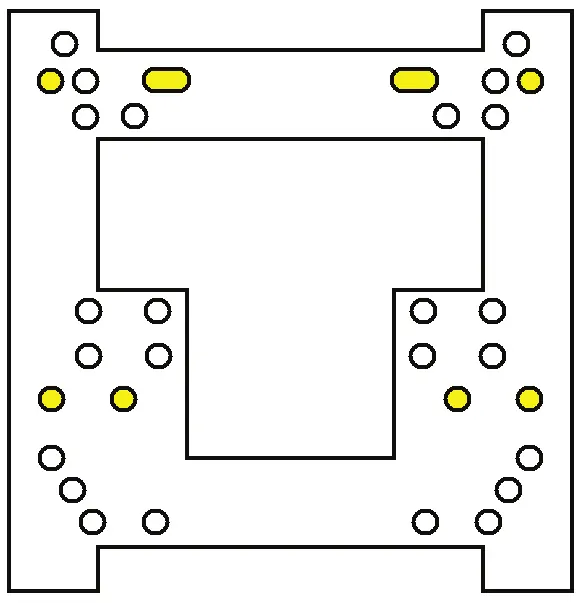
- Mounting patterns vary by vehicle year (97-01 XJ/97-02 TJ vs 03-06 TJ/LJ vs 84-96 XJ).
- Seat mounting is off-set of center; left and right sides are mirror images.
Model compatibility
- Compatible with 97-06 Jeep TJ/LJ and 84-01 Jeep XJ.
- TJ seat adjustment levers are sold separately.

Manual page author
Emily Carter
User documentation editor
Prepares concise manual descriptions and highlights the most useful setup, operation, and maintenance information for readers.