Home Appliances / Vacuum Cleaners
Ryobi 18V 1/2 in. 2-Speed Drill-Driver PCL206 User Manual
Quick guide for the Ryobi 18V 1/2 in. 2-Speed Drill-Driver PCL206. Includes operation, torque adjustment, bit installation, and safety instructions.
Table of contents
Manual images
Jump to the sectionQuick guide from the manual
This manual provides essential safety and operational instructions for the Ryobi 18V 1/2 in. 2-Speed Drill-Driver (PCL206). Always read the full manual before use. Key operations include battery installation, bit changing, torque adjustment, and speed selection.
Operation
The drill features a variable speed switch trigger; higher pressure increases speed. The direction of rotation selector (forward/reverse/center lock) must be fully pushed to the left or right to operate. Use the center lock position to prevent accidental starting.
Installing/Removing Battery Pack
- Lock the switch trigger.
- Insert the battery pack until the latches snap into place.
- Depress the latches to remove the battery pack.
Installing/Removing Bits
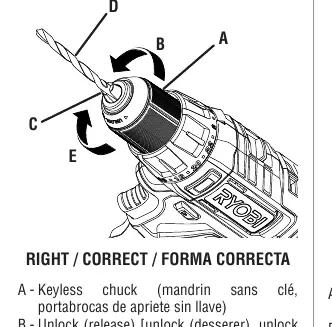
- Lock the switch trigger.
- Open the keyless chuck jaws until the opening is slightly larger than the bit.
- Insert the bit straight into the chuck jaws.
- Rotate the chuck sleeve to tighten the jaws securely. Do not use a wrench.
Two-Speed Gear Train
- Select low speed (1) for high power and torque applications (e.g., driving screws, drilling metal).
- Select high speed (2) for fast drilling or driving applications (e.g., wood, masonry).
- Notice: Never change speeds while the tool is running.
Adjusting Torque
Rotate the adjustment ring to the desired setting:
- 1-4: Small screws
- 5-8: Soft material
- 9-12: Soft and hard material
- 13-16: Hard wood
- 17-23: Large screws
- Icon: Heavy drilling
Maintenance
Avoid using solvents when cleaning plastic parts. Use clean cloths to remove dirt, dust, oil, and grease. For repairs, use only identical replacement parts.
Safety
Always wear eye protection with side shields. Do not use the drill for mixing viscous mixtures like concrete or grout. Be prepared for binding at bit breakthrough when drilling.
Manufacturer information
Ryobi
Practical help
Common problems
Drill will not run
Ensure the direction of rotation selector is pushed fully to the left or right.
Difficulty changing speed range
Turn the chuck by hand until the gears engage.
Drill overheating during low speed usage
Cool the drill by running it without a load at full speed.
Before use
- Ensure the work area is clean and well-lit.
- Wear eye protection with side shields.
- Check that the battery pack is fully secured.
- Verify the direction of rotation selector is set correctly.
- Ensure the bit is inserted straight into the chuck.
Specs in practice
- Variable Speed Trigger
- Speed increases with trigger pressure.
- Two-Speed Gear Train
- Speed 1 for high torque, Speed 2 for high speed.
- Torque Adjustment Ring
- Controls the force applied to screws to prevent over-tightening.
Images and diagrams
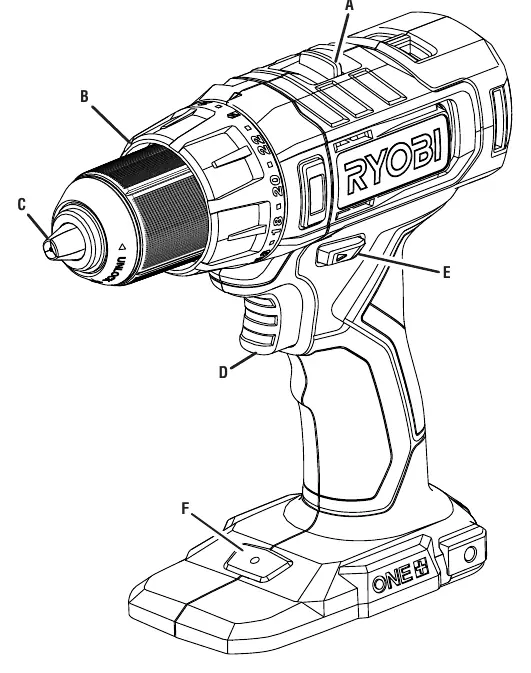
- Fig 1: Shows the rotation selector, switch trigger, and LED light.
- Fig 2: Shows battery pack installation and latch operation.
- Fig 3-4: Shows correct and incorrect bit installation in the keyless chuck.
- Fig 5: Shows the two-speed gear train selector.
- Fig 6: Shows the torque adjustment ring.
Model compatibility
- Use only with batteries and chargers listed in the tool/appliance/battery pack/charger correlation supplement 987000-432.
- Not intended for mixing viscous mixtures like concrete or grout.

Manual page author
David Miller
Documentation analyst
Organizes user manual content into clear summaries, with attention to model details, product context, and everyday usability.